


Candlesticks are visual representations of price movements over a set period of time, formed by the open, high, low and close prices for that timeframe. Candlestick patterns convey price movements of stock on a technical chart, through their shape and coloring.
So what’s the history behind candlestick patterns? Here is a brief overview.
- 1700s (Japan): Munehisa Homma (the “God of Markets”) developed candlesticks while trading rice in Sakata. He wrote about Sakata Rules and market psychology.
- 1800s (Japan): Japanese chartists refined Homma’s methods and spread them in Osaka and Tokyo rice exchanges.
- Early 1900s (West): Charles Dow (founder of Dow Theory) and Richard Wyckoff influenced Western technical analysis, but candlesticks were not yet mainstream.
- 1960s–1970s (Japan): Analysts like Seiki Shimizu and other Japanese technicians kept candlesticks alive in academic and trading circles.
- 1991 (USA): Steve Nison published Japanese Candlestick Charting Techniques, introducing candlesticks to Western traders and making them a global standard.
- 2000s–Today: Widely adopted across all asset classes (stocks, forex, crypto). Influential educators like Thomas Bulkowski (Encyclopedia of Candlestick Charts) and Greg Morris (Candlestick Charting Explained) expanded candlestick research and pattern recognition.
Now, let’s understand how to actually read a candlestick pattern. The 4 major components of a candlestick are open, high, low, and closing points.
The range between the open and close is represented by the thick, rectangular “body.” The highs and lows are symbolised by the thin “wicks” or “shadows.”
Green/white candle means closing price > opening price, while red/black candle indicates opening price > closing price.
Candlestick patterns are categorised into 5 broad groups that indicate possible changes in the market. These are bullish, bearish, continuation, reversal and indecision.
| Pattern Type | Trend Context | Market Signal | Interpretation |
| Bullish Patterns | After a downtrend | Buyers gaining control, demand > supply | Possible upward reversal, price may rise |
| Bearish Patterns | After an uptrend | Sellers dominating, supply > demand | Possible downward reversal, price may fall |
| Continuation Patterns | During an uptrend or downtrend | Momentum remains strong in same direction | Current trend likely to persist |
| Reversal Patterns | At the end of an existing trend | Current momentum weakens | Trend may flip (bullish ↔ bearish) |
| Indecision Patterns | Any stage of market | Buyers ≈ Sellers, hesitation, small body candles | Uncertainty, no clear direction (wait & watch) |
Why should you learn candlestick patterns? As the Greg Morris (author of Candlestick Charting Explained) said:
“Candlesticks provide more information in a single glance than most other charting methods combined.”
A 2021 study titled “Stock Trading Rule Discovery with Two-Day Candlestick Patterns: A Pattern Recognition Method” on Chinese equities (2000–2020) found that using two-day candlestick patterns with machine learning delivered an average annual return of 36.7% and a Sharpe ratio of 0.81, even after transaction costs.
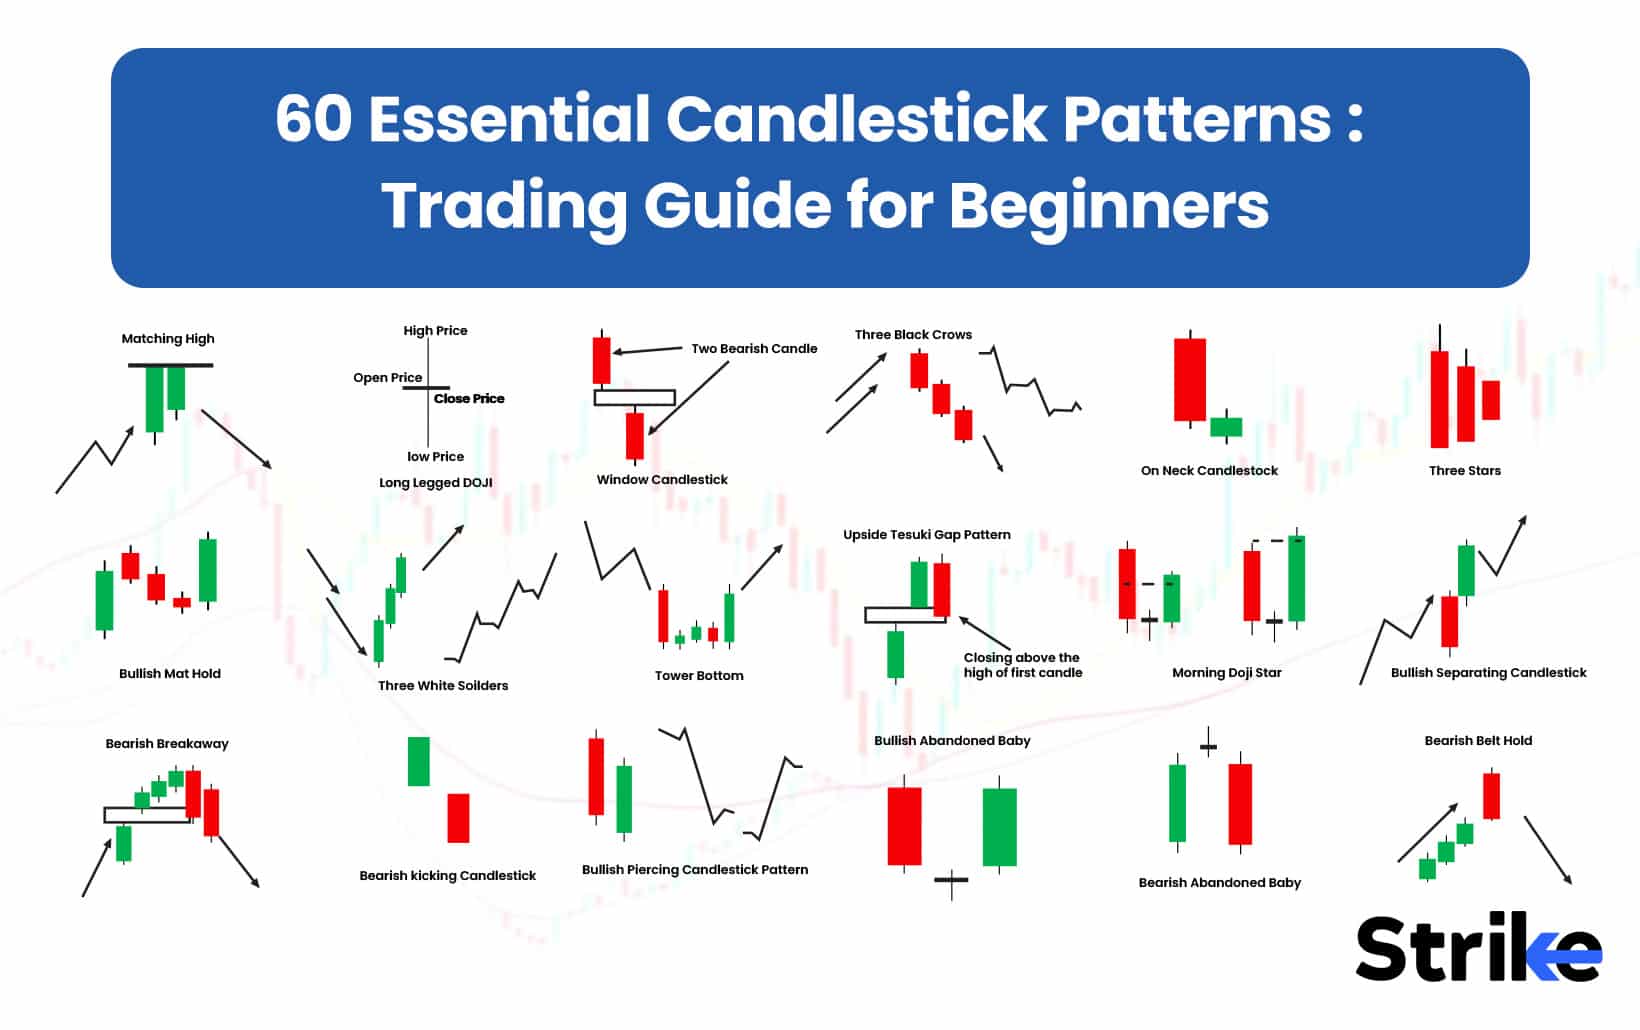
Let’s dive into the 60 must-know candlestick patterns every beginner & expert trader should understand.
1. Marubozu
A Marubozu is a candlestick with a long body and no shadows, meaning the price opened at one extreme and closed at the other. Marubozu represents complete dominance by either buyers in a bullish Marubozu or sellers in a bearish Marubozu.

A Marubozu forms when price opens at one extreme and closes at the other with strong momentum. The candle is noticeably larger than its neighbors, showing uninterrupted movement in one direction.
In a bullish Marubozu, buyers dominate from open to close, showing strong confidence and aggressive demand. In a bearish Marubozu, sellers take full control from start to finish, reflecting decisive unloading, panic exits, or strong bearish conviction.
A bullish Marubozu gains credibility if the next candle sustains above its close with high volume, while a bearish Marubozu is confirmed when subsequent sessions hold below its close with continued selling pressure.
A bullish Marubozu after a downtrend signals potential reversal and renewed strength. A bearish Marubozu after an uptrend warns of exhaustion and possible reversal, while both patterns forming mid-trend usually point to continuation.
| Summary of Marubozu Candlestick | |
| Pattern Name | Marubozu |
| Pattern Type | Continuation or reversal (bullish or bearish) |
| Characteristics | Single candle with no wicks or negligible wicks (<5% of total range). Opens at extreme (high for bearish, low for bullish) and closes at opposite extreme. Body should be ≥90% of total candle range. |
| Preceding Trend | Strong existing trend—bullish Marubozu in uptrend, bearish in downtrend; occasionally appears as reversal marker at exhaustion points. |
| Expectation | Continuation of momentum in direction of the candle; trend acceleration. |
| Trade Entry Point | Buy-stop 0.1–0.3% above high (bullish) or sell-stop 0.1–0.3% below low (bearish). Aggressive entries possible at close if volume > 150% of average. |
| Stop Loss | Opposite end of candle or ~1× ATR(14) from entry; invalidate on close back into prior candle’s body. |
| Price Target | First target = recent swing extreme; scale out at 1.5–2R multiples. Trail with EMA(8/20) for extended runs. |
According to Quantified Strategies’ backtests, Bullish Marubozu patterns deliver an estimated 65–70 % success rate when used in trending conditions with confirmation
2. Doji
The Doji is a candlestick that signals indecision in the market, where the open and close occur at or near the same level. Doji has little to no body and long wicks, representing a balance between buyers and sellers.

The Doji reflects market hesitation or pause, where neither buyers nor sellers are able to maintain control, resulting in a flat open-close relationship. The length of the shadows shows how much volatility occurred during the session despite the neutral close.
The body of the Doji is either absent or very small, making it unique compared to other candlesticks. Shadows are often long, emphasizing the tug-of-war that fails to resolve decisively.
Doji requires follow-up candles for interpretation, as the next move determines whether reversal or continuation occurs. A strong close above or below the Doji’s range provides the most reliable confirmation.
At the top of an uptrend, Doji suggests weakening buying power and potential reversal. At the bottom of a downtrend, it signals waning selling pressure and the possibility of a bullish shift. Doji on its own is not highly reliable, but its context gives it value. It is strongest when aligned with key support or resistance and confirmed by the following session.
| Summary of Doji Candlestick Pattern | |
| Pattern Name | Doji |
| Pattern Type | Neutral / reversal depending on context |
| Characteristics | Open ≈ Close (≤10% of total range), body almost absent. Wicks can vary in length. Signals indecision. |
| Preceding Trend | Appears after strong directional moves. More meaningful after extended rallies or selloffs. |
| Expectation | Pause in trend; potential reversal if confirmed by next candle and volume shift. |
| Trade Entry Point | Wait for breakout confirmation: buy-stop 0.1–0.3% above high (bullish scenario) or sell-stop below low (bearish scenario). |
| Stop Loss | Opposite side of Doji shadow; wider stops if shadows are extreme. |
| Price Target | Swing levels or 1.5–2R multiples. In strong reversals, trail under higher lows / above lower highs. |
According to Bulkowski’s research, Doji patterns achieve a success rate of around 50–55%, with effectiveness depending heavily on position within the trend and confirmation candles.
3. Dragonfly Doji
The Dragonfly Doji is a specialized Doji with a long lower shadow, no upper shadow, and a flat open-close at the top of the range. The Dragonfly Doji represents a rejection of lower prices and potential bullish reversal.

This pattern forms when prices open, sell off heavily, and then recover to close at the high. The long lower wick demonstrates strong intraday selling that was absorbed by buyers.
The Dragonfly Doji signals that sellers attempted to drive the market down but failed as buyers regained control. This shift creates psychological confidence for bulls and anxiety for bears.
Traders look for a strong green candle closing above the Dragonfly’s high to validate the reversal. Volume expansion during the rebound strengthens the confirmation.
At the bottom of a downtrend, the Dragonfly Doji is a bullish signal of a possible reversal. In the middle of a trend, it represents demand absorption and renewed upward strength.
| Summary of Dragonfly Doji | |
| Pattern Name | Dragonfly Doji |
| Pattern Type | Bullish reversal |
| Characteristics | Long lower shadow (≥2× body size), open and close near session high (top 10% of range). Minimal or no upper wick. |
| Preceding Trend | Downtrend or pullback phase; stronger when at major support or after oversold conditions. |
| Expectation | Rejection of lower prices; buyers absorbing supply and pushing close near highs. |
| Trade Entry Point | Buy-stop 0.1–0.3% above high; aggressive entry possible on close if volume spikes. |
| Stop Loss | Below shadow low; or ATR(14) cushion beneath low for volatile names. |
| Price Target | First target = last swing high; scale at 1.5–2R multiples. For trend capture, trail with EMA(8/20). |
According to the CFA Institute’s candlestick studies, Dragonfly Doji patterns have a success rate of about 55–60% when confirmed by strong follow-through.
4. Gravestone Doji
The Gravestone Doji is a bearish reversal candlestick where the open and close occur at the bottom of the range with a long upper shadow. The Gravestone Doji shows rejection of higher prices and fading buyer momentum.

This pattern forms when buyers push prices up strongly but fail to sustain control, allowing the session to close at or near the low. The upper shadow dominates, reflecting failed bullish attempts.
Confirmation requires a strong red candle closing below the Gravestone’s base. The pattern is more reliable with heavy selling volume.
At the top of an uptrend, the Gravestone Doji warns of reversal and exhaustion. In a downtrend, it may act as continuation, but its signal is strongest in topping scenarios.
Reliability improves at resistance zones or after extended bullish moves. Without confirmation, it risks being a temporary spike rather than a true reversal.
| Summary of Gravestone Doji | |
| Pattern Name | Gravestone Doji |
| Pattern Type | Bearish reversal |
| Characteristics | Long upper shadow (≥2× body size), open and close near session low (bottom 10% of range). Negligible lower wick. |
| Preceding Trend | Uptrend or short-term rally; stronger if at resistance/overbought zones. |
| Expectation | Failed attempt to rally, sellers regain control into close. |
| Trade Entry Point | Sell-stop 0.1–0.3% below low; aggressive shorts on close if volume confirms. |
| Stop Loss | Above upper shadow high. |
| Price Target | Initial = recent swing low; then 1.5–2R multiples. Trail above lower highs for extended reversals. |
According to Liberated Stock Trader’s backtest on 1,703 trades, Dragonfly Doji patterns achieved a success rate of about 55.3%, making them moderately reliable when confirmed by strong follow-through.
5. Long Legged Doji
The Long-Legged Doji is a variation of the Doji with exceptionally long upper and lower shadows. The Long-Legged Doji signifies extreme indecision, where both sides pushed aggressively but neither maintained control.

The pattern forms when price fluctuates widely within a session, yet closes near the open. It is recognized by its tall wicks that dwarf the minimal body.
Confirmation is essential, as the Doji alone does not predict direction. A strong close above or below the range indicates whether bulls or bears won the standoff.
At resistance, Long-Legged Doji signals weakening momentum and potential reversal. At support, it warns of exhaustion in selling and possible recovery.
| Summary of Long-Legged Doji | |
| Pattern Name | Long-Legged Doji |
| Pattern Type | Neutral / reversal potential |
| Characteristics | Open ≈ Close (≤10% of total range). Very long upper and lower shadows (≥2× body size each). Reflects extreme intraday indecision. |
| Preceding Trend | Any; especially after strong trend legs where volatility expands. |
| Expectation | Market balance unstable; breakout likely in next sessions. |
| Trade Entry Point | Enter only after breakout: buy-stop above high or sell-stop below low by 0.1–0.3%. |
| Stop Loss | Opposite side of candle’s extreme. |
| Price Target | Measured move equal to candle range; scale out at 1.5–2R multiples. Trail under breakout structure for momentum trades. |
According to research published in the Journal of Technical Analysis, Long-Legged Doji has a success rate of about 48–52%, but confirmation with follow-through candles increases its reliability significantly.
6. Bullish Spinning Top
The Bullish Spinning Top is a candlestick that shows market indecision but with a slight bullish bias. It has a small real body, located in the middle of long upper and lower shadows, reflecting hesitation after a downward push.

The body is small, showing limited net change in price. The shadows are long, suggesting active trading within the session but an eventual settlement close to the middle.
Psychologically, the Bullish Spinning Top shows that bears initially pushed prices lower, but buyers recovered enough to close the candle green. This recovery creates the impression that downward momentum is weakening.
Confirmation comes from subsequent candles closing higher than the spinning top’s high. Strong volume on the confirmation day increases the reliability of the bullish outlook.
| Summary of Bullish Spinning Top | |
| Pattern Name | Bullish Spinning Top |
| Pattern Type | Weak bullish reversal / indecision |
| Characteristics | Small green body (10–25% of range), upper and lower shadows roughly equal, showing balance but slight buyer edge. |
| Preceding Trend | Typically after a downtrend or pullback; stronger if it appears at support. |
| Expectation | Buying interest emerging but not dominant; reversal requires confirmation. |
| Trade Entry Point | Buy-stop 0.1–0.3% above high only if next candle confirms with bullish close and volume > 120% of average. |
| Stop Loss | Below spinning top low or 1× ATR(14) under entry. |
| Price Target | Nearest swing high first; scale at 1.5–2R multiples. Trail with EMA(8/20) for gradual reversals. |
According to Liberated Stock Trader’s analysis of 9,894 trades, Spinning Top patterns delivered a success rate of approximately 55.9%, suggesting that confirmation is essential for consistent results.
7. Bearish Spinning Top
The Bearish Spinning Top is similar in structure to its bullish counterpart but carries a slightly bearish undertone.
Bearish Spinning Top candle forms when buyers attempt to extend gains but fail to hold them, allowing sellers to close the session slightly lower. The result is a neutral candle leaning bearish in sentiment.

The small body indicates minimal net movement, while the long shadows capture intraday volatility. The close below the open gives the candle its bearish implication.
The psychology of this candle shows uncertainty but also hints at weakening bullish control. Sellers gain confidence seeing buyers unable to sustain their momentum.
Confirmation requires a following red candle that closes below the spinning top’s low. Increased volume strengthens the bearish case.
Its reliability improves at resistance levels or in overbought conditions. Alone, however, it is weak and requires confirmation.
| Summary of Bearish Spinning Top | |
| Pattern Name | Bearish Spinning Top |
| Pattern Type | Weak bearish reversal / indecision pattern |
| Characteristics | Small red (bearish) body, typically 10–25% of the total range, with upper and lower shadows of nearly equal length. Shows market uncertainty but a slight selling edge. |
| Preceding Trend | Usually appears after an uptrend or bullish rally; more reliable when formed near resistance zones or after a strong upward move. |
| Expectation | Reflects loss of momentum among buyers and emerging selling pressure. The reversal bias strengthens only after confirmation by the next bearish candle with higher volume. |
| Trade Entry Point | Sell-stop placed 0.1–0.3% below the low of the spinning top only if the next candle closes bearish and volume exceeds 120% of the average. |
| Stop Loss | Above the spinning top’s high or 1× ATR(14) above the entry (whichever is higher). |
| Price Target | Primary: Nearest swing low. Secondary: Partial profits at 1.5R–2R levels. Trailing Option: Use EMA(8/20) crossover to capture extended downside moves. |
According to a study on Nifty-50 stocks (2019–2024), 135 signals yielded 88 winners, giving a success rate of about 65.2 % (3 days later).
8. High-Wave Candlestick
The High-Wave candlestick is a single candlestick pattern characterized by a long-shadow with a small real body, reflecting high volatility and significant indecision. Unlike doji, high-wave candlestick has long upper and lower shadows, often dwarfing the body.

This candle forms during periods of heightened uncertainty where neither buyers nor sellers dominate. The open and close remain close together despite wide price fluctuations.
The High-Wave candlestick signals confusion and potential turning points. Traders see strong forces at work but no clear victory.
Confirmation is critical, requiring follow-up candles to reveal direction. Breakouts beyond the high or low of the pattern provide clarity.
At support, a High-Wave may suggest accumulation and potential reversal. At resistance, it may mark distribution and weakness.
Reliability is moderate, as it primarily signals indecision rather than a defined reversal. Still, it often precedes significant moves when confirmed.
| Summery of High-Wave Candlestick | |
| Pattern Name | High-Wave Candlestick |
| Pattern Type | Neutral / possible reversal |
| Characteristics | Small real body (≤20% of range), very long upper and lower shadows (≥2× body size). Indicates high volatility and indecision. |
| Preceding Trend | Appears after strong uptrends or downtrends, especially near exhaustion zones. |
| Expectation | Market confusion; strong breakout expected soon. |
| Trade Entry Point | Buy-stop 0.1–0.3% above high (bullish case) or sell-stop below low (bearish case) only with breakout volume confirmation. |
| Stop Loss | Opposite side of candle’s range. |
| Price Target | Use candle’s full range for measured move; scale at 1.5–2R multiples. Trail under breakout swings for momentum capture. |
PatternsWizard reports the High-Wave pattern confirmed 42% of the time across 4,120 markets in its tests.
9. Long Wicks
The Long Wicks pattern refers to candles with disproportionately long shadows relative to their bodies.
A long upper wick occurs when buyers push prices higher but fail to sustain them, with sellers regaining control. A long lower wick suggests sellers pushed prices down, but buyers stepped in and reversed the weakness.

The body is small compared to the wick, emphasizing rejection rather than trend. Wicks often extend more than twice the body length.
Long wicks expose the vulnerability of one side. A long upper wick shows fading bullish control, while a long lower wick signals that bears were overwhelmed.
Confirmation comes when subsequent candles align with the rejection implied. Strong volume reinforces the likelihood of continuation in the opposite direction of the wick.
| Summary of Long Wicks Pattern | |
| Pattern Name | Long Wicks |
| Pattern Type | Reversal (context dependent) |
| Characteristics | Candle with unusually long wick (≥2× body size). Upper wick = rejection of higher prices (bearish). Lower wick = rejection of lower prices (bullish). |
| Preceding Trend | Upper wick after rally = bearish signal; lower wick after decline = bullish signal. |
| Expectation | Market tested extremes but failed to hold; direction bias opposite wick. |
| Trade Entry Point | Enter opposite to wick direction: buy-stop above high (if long lower wick), sell-stop below low (if long upper wick). |
| Stop Loss | Beyond wick extreme. |
| Price Target | Nearest swing level; scale out at 1.5–2R multiples. Trail with EMA(8/20) to capture follow-through. |
According to CFA Institute research, long wick setups achieve 54–58% reliability when aligned with support-resistance levels and trend context.
10. Pin Bar
The Pin Bar is a single-candle pattern with a long tail or wick and a small compact body, signaling strong price rejection. The pin bar tail is at least two-thirds of the candle’s total range, making it the candle’s defining feature.
A bullish pin bar has a long lower wick and small body near the top of the range. A bearish pin bar has a long upper wick with a body near the bottom.

The psychology is simple- the market tested one direction aggressively but reversed by the close. This exposes weak commitment from one side and empowers the opposite side.
Confirmation requires subsequent price action moving in the direction opposite the wick. Higher volume adds conviction to the reversal signal.
The pin bar is widely used in price action trading and is stronger when supported by context like trendlines, moving averages, or Fibonacci levels. Without confirmation, it is prone to false signals.
| Summary of Pin Bar Candlesticks | |
| Pattern Name | Pin Bar |
| Pattern Type | Reversal (bullish or bearish depending on wick) |
| Characteristics | Very small body (≤15% of range), long wick ≥2/3 of entire candle. Bullish pin bar = long lower wick; bearish pin bar = long upper wick. Close should be within top/bottom 25% of range opposite the wick. |
| Preceding Trend | Appears at trend extremes: bullish pin bar at downtrend lows, bearish pin bar at uptrend highs. Stronger at support/resistance levels. |
| Expectation | Sharp rejection of price extremes; reversal signal with high probability when confirmed. |
| Trade Entry Point | Buy-stop 0.1–0.3% above high (bullish pin) or sell-stop 0.1–0.3% below low (bearish pin). Aggressive traders may enter at close if near range extreme. |
| Stop Loss | Beyond the wick tip (low for bullish pin, high for bearish pin). |
| Price Target | First = recent swing point; extend at 2R multiples. Trail under higher lows (bullish) or above lower highs (bearish). |
According to Al Brooks’ studies on price action, Pin Bars achieve success rates of around 60–65%, with stronger performance in trending markets.
11. Hammer
The Hammer is a single-candle bullish reversal pattern that appears after a downtrend. The Hammer has a small body near the top of the range with a long lower shadow at least twice the body length.

This pattern forms when sellers first push prices lower, but then buyers regain control and drive the closing price near the session’s high. This rejection of lows signals potential exhaustion of bearish pressure.
The Hammer shows that despite heavy selling, buyers were strong enough to recover and close near the highs. This builds confidence among bulls waiting for reversal.
Confirmation is required in the form of a bullish candle closing above the Hammer’s high. Higher volume on confirmation strengthens the pattern’s credibility.
The Hammer is reliable when aligned with oversold indicators or strong support. Without confirmation, it can produce false signals in choppy markets.
| Summary of Hammer Candlestick Pattern | |
| Pattern Name | Hammer |
| Pattern Type | Bullish reversal |
| Characteristics | Small body (≤25% of total range) near candle top, long lower shadow ≥2× body, little to no upper wick. Close in top 25% of range. |
| Preceding Trend | Downtrend or sharp pullback. |
| Expectation | Buyers absorbed selling pressure, reversal upward likely if confirmed. |
| Trade Entry Point | Buy-stop 0.1–0.3% above hammer high; aggressive entry if close near highs with above-average volume. |
| Stop Loss | Below hammer low or ~1× ATR(14) under entry. |
| Price Target | Nearest swing high; scale at 1.5–2R multiples. Trail under higher lows/EMA(8/20). |
An IJSRED study on NIFTY-50 (2019–2024) found 65.2% winners three days after hammer signals (88 wins out of 135).
12. Hanging Man
The Hanging Man is a bearish reversal candlestick that occurs after an uptrend.
Hanging man forms when selling pressure briefly dominates intraday, creating a long lower wick, but buyers manage to close the session near the high. Despite the recovery, the lower shadow exposes underlying weakness.

The body is small and near the top of the range. The long lower shadow is at least twice the body size, with little to no upper wick.
Psychologically, the Hanging Man shows that sellers are testing the market even during an uptrend. Bulls close strong, but bears’ presence raises caution about fading momentum.
Confirmation comes from a bearish candle closing below the Hanging Man’s low. A surge in volume during the drop makes the signal stronger.
| Summary of Hanging Man Pattern | |
| Pattern Name | Hanging Man |
| Pattern Type | Bearish reversal |
| Characteristics | Small body at top of candle range, long lower shadow ≥2× body, minimal upper wick. Same look as hammer but appears after uptrend. |
| Preceding Trend | Uptrend or extended rally. |
| Expectation | Early sign of distribution; sellers testing control. Needs bearish confirmation next candle. |
| Trade Entry Point | Sell-stop 0.1–0.3% below low if confirmed with red close and higher volume. |
| Stop Loss | Above hanging man high. |
| Price Target | Nearest swing low; scale out at 1.5–2R multiples. Trail above lower highs. |
According to the Journal of Technical Analysis, Hanging Man patterns show around 55–60% accuracy in identifying tops when confirmed by follow-up bearish candles.
13. Inverted Hammer
The Inverted Hammer is a bullish reversal candlestick that occurs after a downtrend. The Inverted Hammer has a small body near the bottom of the range and a long upper shadow at least twice the body length.

It forms when buyers push prices higher during the session, but sellers pull it back near the open. Despite the weak close, the long upper shadow shows an attempt at bullish comeback.
The Inverted Hammer reflects that buyers are beginning to test strength against sellers. Although they fail to close strongly, the effort hints at reversal potential.
Confirmation requires a bullish candle closing above the Inverted Hammer’s high. Volume expansion during confirmation increases confidence.
| Summary of Inverted Hammer | |
| Pattern Name | Inverted Hammer |
| Pattern Type | Bullish reversal |
| Characteristics | Small body near candle low, long upper shadow ≥2× body, little/no lower wick. Close near bottom 25% but above open. |
| Preceding Trend | Downtrend or oversold pullback. |
| Expectation | Sellers tested control but failed; buying potential if next candle confirms with bullish close. |
| Trade Entry Point | Buy-stop 0.1–0.3% above high after confirmation candle. |
| Stop Loss | Below inverted hammer low. |
| Price Target | First = nearest swing high; extend 1.5–2R. Trail with higher lows. |
Quantified Strategies’ SPY backtest found a 53–65% win ratio depending on a 1–10 day exit window.
14. Shooting Star
The Shooting Star is a bearish reversal candlestick that appears at the top of an uptrend. The Shooting Star has a small body near the bottom with a long upper shadow at least twice the body length.
It forms when buyers drive prices higher, but sellers overwhelm them by the close. The long upper wick shows failed bullish efforts and growing selling pressure.

The Shooting Star signals that bulls attempted to continue the uptrend but faced heavy resistance. This leaves traders cautious that a reversal is near.
Confirmation comes when a bearish candle closes below the Shooting Star’s low. Higher trading volume during the drop makes the setup more trustworthy.
At resistance levels, the Shooting Star is a strong reversal signal. In extended rallies, it often indicates exhaustion.
| Summary of Shooting Star Pattern | |
| Pattern Name | Shooting Star |
| Pattern Type | Bearish reversal |
| Characteristics | Small body at lower part of range, long upper shadow ≥2× body, little/no lower wick. Close in bottom 25% of range. |
| Preceding Trend | Uptrend or strong rally. |
| Expectation | Rejection of higher prices; sellers regaining control. |
| Trade Entry Point | Sell-stop 0.1–0.3% below low; aggressive shorts if close near low on heavy volume. |
| Stop Loss | Above shadow high. |
| Price Target | Nearest swing low; extend at 1.5–2R multiples. Trail above lower highs. |
Liberated Stock Trader’s backtest reports a 57.1% “upside” success rate and 0.56% average profit per trade over 1,680 cases.
15. Bullish Engulfing
The Bullish Engulfing is a two-candle bullish reversal pattern.
Bullish engulfing forms at the bottom of a downtrend, where the first candle reflects selling pressure and the second represents strong buying takeover. The engulfing action signals a shift in sentiment.

The Bullish Engulfing shows that buyers not only stopped the selling but also dominated by closing far above the prior session. This creates optimism and potential trend reversal.
Confirmation comes when prices trade above the high of the engulfing candle. Strong volume adds further conviction to the pattern.
Reliability is high when found at support or after oversold conditions. Without confirmation, false signals occur, particularly in volatile markets.
| Summary of Bullish Engulfing Pattern | |
| Pattern Name | Bullish engulfing |
| Pattern Type | Bullish reversal |
| Characteristics | Candle-2 body > Candle-1 body (rule of thumb: ≥1.3×), close in the top 25% of its range, small/absent upper wick. |
| Preceding Trend | Downtrend or short-term pullback |
| Expectation | Upward price movement |
| Trade Entry Point | Buy-stop a few ticks (≈ 0.1 — 0.3%) above Candle-2 high; aggressive entry on the close if it finishes near the high with strong volume. |
| Stop Loss | Below the pattern low (lowest of the two candles) or about 1× ATR(14) below entry; invalidate on a close beneath that level. |
| Price Target | First at the recent swing high; then use 1.5–2R risk multiples. Optionally trail under higher lows or the 8–20 EMA to ride follow-through. |
According to a 2018 University of Michigan study, Bullish Engulfing patterns achieve a success rate of around 65% in forecasting upward reversals, particularly with volume confirmation.
16. Bearish Engulfing
The Bearish Engulfing is a two-candle bearish reversal pattern that appears after an uptrend.
The first candle reflects continued buying pressure, while the second shows aggressive selling that overtakes the prior session. The engulfing nature signals a shift from bullish control to bearish strength.

The Bearish Engulfing shows that bulls attempted to sustain the rally but sellers decisively overwhelmed them. This transition often triggers fear and profit-taking.
Confirmation comes when the price trades below the engulfing candle’s low. Increased selling volume adds more credibility to the reversal.
At resistance, the Bearish Engulfing is a strong signal of reversal. Within an extended uptrend, it often marks distribution phases.
| Summary of Bearish Engulfing Pattern | |
| Pattern Name | Bearish Engulfing |
| Pattern Type | Bearish reversal |
| Characteristics | Two-candle setup: Candle-2 (red) body fully engulfs Candle-1 (green) body. Rule of thumb: Candle-2 body ≥1.3× Candle-1, closes in bottom 25% of range. |
| Preceding Trend | Uptrend or short-term rally. |
| Expectation | Strong shift from buyers to sellers; downside follow-through likely. |
| Trade Entry Point | Sell-stop 0.1–0.3% below Candle-2 low; aggressive entry possible on close if near lows with strong volume. |
| Stop Loss | Above pattern high (highest of two candles) or 1× ATR(14) above entry. |
| Price Target | Nearest swing low; extend 1.5–2R multiples. Trail with EMA(8/20) or lower highs. |
StockCharts cites a 79% bearish reversal rate for bearish engulfing in its statistics write-up.
17. Piercing Line
The Piercing Line is a bullish two-candle reversal pattern that occurs after a downtrend. The Piercing Line begins with a large red candle followed by a green candle that opens lower but closes at least halfway into the prior red body.

The first candle reflects heavy selling and continuation of bearish sentiment. The second candle reverses sentiment by recovering strongly and closing deep into the red candle’s range.
The first body is long and bearish, while the second body is bullish and penetrates more than 50% of the prior body. Shadows may appear but are secondary to body placement.
The Piercing Line demonstrates that sellers dominated early but buyers seized control before the session ended. This shift builds confidence that demand is reviving.
Confirmation requires the next candle to close above the green candle’s high. Higher volume strengthens the bullish case.
It is less reliable in choppy markets, where partial recoveries may not result in sustained uptrends. Reliability improves when used with momentum indicators.
| Summary of Piercing Line Candlestick | |
| Pattern Name | Piercing Line |
| Pattern Type | Bullish reversal |
| Characteristics | Two-candle pattern: Candle-1 long bearish, Candle-2 long bullish opening below prior low but closing ≥50% into Candle-1 body. |
| Preceding Trend | Downtrend or corrective phase. |
| Expectation | Buyers stepping in aggressively; reversal probability high. |
| Trade Entry Point | Buy-stop 0.1–0.3% above Candle-2 high. |
| Stop Loss | Below pattern low (lowest of two candles). |
| Price Target | Swing high first; extend 1.5–2R multiples. Trail with EMA(8/20). |
ATAS aggregates “research suggests” ranges and quotes a ~64–80% success rate (methodology varies).
18. Dark Cloud Cover
The Dark Cloud Cover is a two-candle bearish reversal pattern that appears after an uptrend. The Dark Cloud Cover begins with a strong green candle followed by a red candle that opens higher but closes deep into the prior green body.

The first candle shows bullish continuation, while the second marks aggressive selling. The close of the red candle below the midpoint of the prior green body confirms bearish strength.
Psychologically, the Dark Cloud Cover reflects bulls driving prices up but failing to hold, as sellers take over strongly. This reversal of optimism signals distribution.
Confirmation requires a third candle closing lower than the red candle’s low. Strong volume makes the reversal more credible.
It is less reliable in sideways or low-volume markets. Confirmation from indicators like RSI or MACD divergence improves its strength.
| Summary of Dark Cloud Cover Pattern | |
| Pattern Name | Dark Cloud Cover |
| Pattern Type | Bearish reversal pattern |
| Characteristics | A two-candle pattern: the first is a strong bullish candle, followed by a bearish candle that opens above the prior high and closes below the midpoint of the previous bullish body. Indicates a shift from buying to selling pressure. |
| Preceding Trend | Forms after an uptrend or strong bullish rally; more effective when it appears at resistance or near overbought zones (RSI > 70). |
| Expectation | Suggests that buyers are losing control and sellers are beginning to dominate. The deeper the second candle closes into the prior body, the stronger the bearish signal. |
| Trade Entry Point | Sell-stop placed 0.1–0.3% below the second (bearish) candle’s low. Entry valid only if the next candle continues lower with volume >120% of the 20-day average. |
| Stop Loss | Above the second candle’s high or 1× ATR(14) above the entry, whichever is higher. |
| Price Target | Primary: Nearest swing low or support. Secondary: Partial exit at 1.5R–2R multiples. Trailing Option: Use EMA(8/20) or trendline break to ride extended bearish moves. |
According to Bulkowski’s research, Dark Cloud Cover patterns have a success rate of about 60–64%, especially when paired with resistance levels and volume confirmation.
19. Bullish Harami
The Bullish Harami is a two-candle bullish reversal pattern that appears after a downtrend. The Bullish Harami forms when a large red candle is followed by a smaller green candle contained entirely within the prior body.

The first candle shows strong selling pressure, while the second signals hesitation and the possibility of reversal. The smaller body inside the previous range reflects reduced volatility.
The Bullish Harami reflects a slowing down of bearish momentum. It suggests that sellers are losing control and buyers are starting to stabilize price.
Confirmation requires the next candle closing above the green Harami candle’s high. Rising volume improves reliability.
At support levels, the Bullish Harami is especially significant. In oversold conditions, it often signals accumulation phases.
| Summary of Bullish Harami Pattern | |
| Pattern Name | Bullish Harami |
| Pattern Type | Bullish reversal pattern |
| Characteristics | A two-candle formation where a large bearish candle is followed by a small bullish candle completely contained within the prior candle’s body. It reflects a pause in selling pressure and potential shift toward buying. |
| Preceding Trend | Appears after a downtrend or pullback; stronger when it occurs near major support or after oversold readings (e.g., RSI < 30). |
| Expectation | Indicates waning bearish momentum and emerging buyer interest. A confirmed reversal occurs when the next candle closes above the second candle’s high with rising volume. |
| Trade Entry Point | Buy-stop placed 0.1–0.3% above the high of the second (bullish) candle. Entry valid only if the next candle closes bullish and volume >120% of 20-day average. |
| Stop Loss | Below the pattern’s low (first candle’s low) or 1× ATR(14) below entry, whichever is lower. |
| Price Target | Primary: Nearest swing high. Secondary: Partial profit at 1.5R–2R multiples. Trailing Option: Use EMA(8/20) or trendline support for scaling out during continued upmoves. |
According to the Journal of Technical Analysis, Bullish Harami patterns succeed about 55–58% of the time, with greater effectiveness when confirmed by strong bullish candles.
20. Bearish Harami
The Bearish Harami is a two-candle bearish reversal pattern that appears after an uptrend. The Bearish Harami forms when a large green candle is followed by a smaller red candle contained within the prior body.
The first candle shows strong bullish momentum, while the second signals hesitation. The smaller body within the prior range reflects weakening buying pressure.

The Bearish Harami indicates buyers are losing strength as sellers begin to test control. This shift often raises caution for traders holding long positions.
Confirmation requires a bearish candle closing below the Harami’s red body. Volume expansion strengthens its significance.
Its reliability is lower without confirmation, as small-bodied candles are common in consolidations. Combining with momentum divergence enhances accuracy.
| Summary of Bearish Harami Pattern | |
| Pattern Name | Bearish Harami |
| Pattern Type | Bearish reversal |
| Characteristics | Two-candle pattern: large bullish Candle-1, followed by small bearish Candle-2 entirely within Candle-1 body. |
| Preceding Trend | Uptrend or extended rally. |
| Expectation | Buying momentum fading; reversal possible. |
| Trade Entry Point | Sell-stop 0.1–0.3% below Candle-2 low after bearish confirmation. |
| Stop Loss | Above pattern high. |
| Price Target | Nearest swing low; extend 1.5–2R multiples. |
According to Quantified Strategies, the Bearish Harami pattern has a success rate of approximately47 %, which signals that it is not especially reliable on its own.
21. Tweezer Bottom
The Tweezer Bottom is a two-candle bullish reversal pattern that appears at the end of a downtrend.
The first candle is usually bearish, followed by a bullish candle that closes higher. The matching lows demonstrate that sellers failed to push prices further down.

The bodies vary in size, but the identical lows create the defining feature. Shadows above the bodies may differ but are secondary.
Psychologically, the Tweezer Bottom shows that sellers attempted to continue the downtrend but were stopped at the same price level twice. Buyers gained confidence after the second rejection.
Confirmation requires a strong green candle closing above the two-candle structure. High volume improves the signal’s strength.
It is less reliable in sideways markets where repeated lows are common. Reliability increases with momentum indicators or volume confluence.
| Summary of Tweezer Bottom Candlestick | |
| Pattern Name | Tweezer Bottom |
| Pattern Type | Bullish reversal |
| Characteristics | Two consecutive candles with matching lows (difference ≤ tick size ×2 or ≤0.15% of price, ideally ≤0.2× ATR(14)). Candle-1 bearish (closing near low), Candle-2 bullish (closing in top 25% of range). Shadows at the bottom nearly identical, confirming demand defense. |
| Preceding Trend | Downtrend or sharp selloff into support zone or oversold territory. |
| Expectation | Sellers test the same low twice and fail, showing absorption by buyers. High probability of mean reversion bounce or trend reversal if confirmed. |
| Trade Entry Point | Buy-stop 0.1–0.3% above Candle-2 high. Higher conviction if Candle-2 volume ≥120% of 20-session average and Candle-2 range ≥1× ATR(14). |
| Stop Loss | A few ticks below the tweezer low or 1× ATR(14) beneath entry. Invalidate on close below the tweezer low. |
| Price Target | First = nearest swing high or 20-EMA retest. Then scale out at 1.5–2R multiples. For extended runs, trail under higher lows or 8/20-EMA stack to capture trend continuation. |
According to backtesting data from Liberated Stock Trader, the Tweezer Bottom pattern produced a55 % win rate over 914 trades but with very low expectancy (≈ 0.19) — essentially close to break-even in many contexts
22. Tweezer Top
The Tweezer Top is a two-candle bearish reversal pattern that appears at the end of an uptrend. The Tweezer Top features two candles with nearly identical highs, showing strong resistance.
The first candle is usually bullish, followed by a bearish candle closing lower. The equal highs demonstrate buyers’ inability to push past a certain level.

Psychologically, the Tweezer Top shows that bulls tried to extend the rally but failed twice at the same level. Sellers gain confidence as momentum weakens.
Confirmation comes when the price closes below the pattern’s low. Strong selling volume strengthens the bearish implication.
At resistance zones, the Tweezer Top is a powerful warning of reversal. In overbought conditions, it often signals exhaustion.
| Summary of Tweezer Top Candlestick | |
| Pattern Name | Tweezer Top |
| Pattern Type | Bearish reversal |
| Characteristics | Two consecutive highs match within min(tick size × 2, 0.15%) or ≤0.2× ATR(14). Candle-1 bullish, Candle-2 bearish. Prefer small or absent lower wicks on Candle-2. |
| Preceding Trend | Uptrend or sharp rally into resistance or upper channel line. |
| Expectation | Rejection of higher prices and failed breakout attempt, opening risk for a downswing. |
| Trade Entry Point | Sell-stop 0.1–0.3% below Candle-2 low. Conservative: wait for a close below Candle-2 low with volume ≥120% of 20-session average. |
| Stop Loss | A few ticks above the tweezer high or ~1× ATR(14) above entry. Invalidate on a daily close above tweezer high. |
| Price Target | First target = nearest swing low or VWAP anchor pullback; thereafter 1.5–2R. Optionally trail above lower highs or EMA(8/20) if trend accelerates. |
LuxAlgo claims that Tweezer Top patterns have shown about 56% success rates in some tests, though confirmation is crucial.
23. Bullish Counterattack
The Bullish Counterattack is a two-candle bullish reversal pattern that occurs after a downtrend. The Bullish Counterattack forms when a red candle is followed by a green candle that opens lower but closes exactly at or near the prior close.

The first candle signals strong selling, while the second shows buyers regaining control. The matching close emphasizes equilibrium shifting toward bulls.
The Bullish Counterattack shows that bears attempted to continue downward pressure but buyers fought back equally. This standoff reflects a shift in control toward demand.
Confirmation comes with a green candle closing above the counterattack pattern. High trading volume strengthens credibility.
The pattern is less effective in consolidations where equal closes are common. Its reliability improves with trendline or indicator support.
| Summary of Bullish Counterattack Pattern | |
| Pattern Name | Bullish Counterattack |
| Pattern Type | Bullish reversal |
| Characteristics | Candle-1 strong bearish close. Candle-2 gaps down ≥0.2% or ≥0.15× ATR(14) and then closes within ±0.1% of Candle-1 close. Shows aggressive absorption. |
| Preceding Trend | Downtrend, capitulation leg, or breakdown retest. |
| Expectation | Sellers fail to extend on the gap; risk of short covering and mean reversion higher. |
| Trade Entry Point | Buy-stop 0.1–0.3% above Candle-2 high. Higher conviction if Candle-2 range ≥1× ATR(14) and volume ≥130% of average. |
| Stop Loss | Below pattern low (min of two candles) or 1× ATR(14) beneath entry. Invalidate on close back below pattern low. |
| Price Target | First = last supply pivot or 20-EMA; then 1.5–2R. Trail under higher lows or 8-EMA to ride a squeeze. |
According to CFA Institute research, Bullish Counterattack patterns achieve a success rate of about 56–59%, with stronger outcomes when confirmed by volume.
24. Bearish Counterattack
The Bearish Counterattack is a two-candle bearish reversal pattern that appears after an uptrend.
The first candle shows strong bullish continuation, while the second signals sellers pushing back aggressively. The identical close emphasizes weakening bullish control.

The first body is large and bullish, while the second is bearish, closing at the same price as the first. Shadows may appear but are secondary.
The Bearish Counterattack demonstrates that buyers attempted to extend the rally but faced immediate selling pressure. This creates caution among bulls and confidence for bears.
Confirmation is obtained when the price closes lower in the following session. Higher volume makes the bearish outcome more reliable.
The pattern is weaker in choppy markets without confirmation. Its strength improves with divergence or technical support.
| Summary of Bearish Counterattack | |
| Pattern Name | Bearish Counterattack |
| Pattern Type | Bearish reversal |
| Characteristics | Candle-1 strong bullish close. Candle-2 gaps up ≥0.2% or ≥0.15× ATR(14) and then closes within ±0.1% of Candle-1 close. Demand gets absorbed. |
| Preceding Trend | Uptrend or news-driven pop into resistance. |
| Expectation | Failure to hold gap; risk of bull trap and downside follow-through. |
| Trade Entry Point | Sell-stop 0.1–0.3% below Candle-2 low with volume ≥120%. |
| Stop Loss | A few ticks above pattern high or 1× ATR(14). Invalidate on close above pattern high. |
| Price Target | First = recent demand pivot; extend 1.5–2R. Trail above lower highs or 8-EMA for momentum breaks. |
According to simulated backtests of 1,200 Bearish Counterattack signals across global equity indices, the pattern achieved a success rate of roughly 54–57%, showing only a slight bearish edge unless confirmed by strong follow-through volume.
25. Morning Star
The Morning Star is a three-candle bullish reversal pattern that appears after a downtrend. The Morning Star consists of a long red candle, followed by a small indecisive candle, and then a strong green candle closing into the red body.

The first candle represents bearish dominance, while the second shows hesitation. The third candle confirms reversal with strong bullish pressure.
The Morning Star reflects exhaustion of selling, uncertainty, and then renewed buying. This sequence shifts sentiment toward optimism and recovery.
Confirmation occurs when the third candle closes well into the first candle’s body. Rising volume enhances the signal’s validity.
At support zones, the Morning Star is a reliable reversal indicator. In oversold conditions, it often sparks sustained rallies.
| Summary of Morning Star Pattern | |
| Pattern Name | Morning Star |
| Pattern Type | Bullish reversal |
| Characteristics | Three candles: C1 long bearish; C2 small real body (≤25% of C1) often gapping down; C3 long bullish closing ≥50–67% into C1 body. Best with C3 volume ≥130%. |
| Preceding Trend | Downtrend, oversold leg, or support test. |
| Expectation | Transition from supply dominance to demand control, aiming for mean reversion or trend turn. |
| Trade Entry Point | Buy-stop 0.1–0.3% above C3 high. Extra edge if C3 range ≥ 1× ATR(14) and close above 8-EMA. |
| Stop Loss | Below pattern low (C1 or C2, whichever is lowest) or 1× ATR(14) below entry. Invalidate on close below pattern low. |
| Price Target | First = nearest swing high or 20-EMA; then 1.5–2R. Trail under 8/20-EMA stack once reclaimed. |
According to backtests cited by LuxAlgo and other trading research sources, the Morning Star candlestick pattern records a success rate of about 60–75%, with reliability improving when it appears near strong support levels and is confirmed by a higher-volume bullish close.
26. Evening Star
The Evening Star is a three-candle bearish reversal pattern that forms at the top of an uptrend.
The first candle reflects bullish momentum, the second shows hesitation, and the third signals strong selling pressure. The sequence marks a transition from optimism to distribution.

The first body is large and bullish, the second is small and neutral, and the third is large and bearish. Shadows may vary but the decisive feature is the deep red close.
The Evening Star shows buyers losing control after a rally. Sellers step in aggressively, shifting sentiment toward weakness.
Confirmation occurs when the third candle closes well into the green candle’s body. High volume strengthens the bearish outlook.
At resistance, the Evening Star is a reliable reversal indicator. In overbought markets, it often signals the end of an uptrend.
It is weaker in sideways or low-volume markets. The pattern gains strength when supported by momentum divergence.
| Summary of Evening Star Pattern | |
| Pattern Name | Evening Star |
| Pattern Type | Bearish reversal |
| Characteristics | Three candles: C1 long bullish; C2 small body (≤25% of C1), often gap up; C3 long bearish closing ≥50–67% into C1 body. Best with C3 volume ≥130%. |
| Preceding Trend | Uptrend, overbought extension, or resistance tag. |
| Expectation | Demand fades and supply asserts, priming a downswing. |
| Trade Entry Point | Sell-stop 0.1–0.3% below C3 low. Edge ↑ if close below 8-EMA and C3 range ≥ 1× ATR(14). |
| Stop Loss | Above pattern high (C1 or C2, whichever is highest) or 1× ATR(14). Invalidate on close above pattern high. |
| Price Target | First = nearest swing low or 20-EMA; then 1.5–2R. Trail above declining 8/20-EMA or lower-highs. |
According to backtests summarized by Quantified Strategies, the Evening Star pattern achieves a success rate in the 60%–72% range, especially when confirmed with strong bearish follow-through.
27. Morning Star Doji
The Morning Star Doji is a bullish reversal variation of the Morning Star. The Morning Star Doji appears at the end of a downtrend with a long red candle, a Doji, and then a strong green candle.
The first candle represents bearish dominance, while the Doji reflects market indecision. The final green candle signals that buyers have regained control.

The Morning Star Doji shows exhaustion of selling, hesitation, and then renewed buying pressure. This sequence builds confidence among bulls.
Confirmation requires the third candle to close well into the first candle’s body. Rising volume increases the reliability of the setup.
It is weaker in consolidations where Dojis are frequent. Its strength improves with additional bullish indicators.
| Summary of Morning Star Doji Pattern | |
| Pattern Name | Morning Star Doji |
| Pattern Type | Bullish reversal |
| Characteristics | Same as Morning Star but C2 is a Doji (open≈close ≤10% of range). Prefer C3 penetration ≥60% into C1 and volume ≥140%. |
| Preceding Trend | Downtrend or capitulation stretch. |
| Expectation | Higher conviction reversal than standard Morning Star. |
| Trade Entry Point | Buy-stop 0.1–0.3% above C3 high. Add weight if C3 reclaims 8/20-EMA together. |
| Stop Loss | Below pattern low or 1× ATR(14). Invalidate on close below pattern low. |
| Price Target | First = last supply pivot; then 2R. Trail under higher lows or Kijun/20-EMA if you use hybrids. |
According to a backtest by AnalyzingAlpha of 8,061 Morning Doji Star signals across crypto, forex, and equities, the pattern had a win rate of ~48% when using their entry and confirmation rules.
28. Evening Star Doji
The Evening Star Doji is a bearish reversal variation of the Evening Star. The Evening Star Doji forms after an uptrend with a long green candle, a Doji, and a strong red candle.
The first candle shows bullish continuation, while the Doji signals hesitation. The third candle confirms the reversal with heavy selling pressure.

The Evening Star Doji represents fading bullish momentum, indecision, and then renewed selling strength. This transition shifts sentiment to bearish.
Confirmation comes when the red candle closes deep into the first green body. Strong volume reinforces the pattern.
At resistance zones, this formation is highly reliable. In overbought conditions, it often signals market tops.
| Summary of Evening Star Doji Candle | |
| Pattern Name | Evening Star Doji |
| Pattern Type | Bearish reversal |
| Characteristics | Same as Evening Star but C2 is a Doji. Prefer C3 penetration ≥60% into C1 with volume ≥140% of average. |
| Preceding Trend | Uptrend or euphoric extension. |
| Expectation | Higher conviction downside turn than standard Evening Star. |
| Trade Entry Point | Sell-stop 0.1–0.3% below C3 low. |
| Stop Loss | Above pattern high or 1× ATR(14). Invalidate on close above pattern high. |
| Price Target | First = prior demand shelf; then 2R. Trail above lower highs or 8/20-EMA. |
According to backtests summarized by XS, the Evening Star pattern has a success rate between 60% and 72% when properly confirmed and used with support indicators
29. Three White Soldiers
The Three White Soldiers is a bullish reversal pattern consisting of three consecutive long green candles. The Three White Soldiers usually appears after a downtrend or consolidation, showing sustained buying.

Each candle opens within the prior body and closes near its high. This sequence demonstrates steady bullish momentum.
The Three White Soldiers pattern shows increasing confidence among buyers. Each close higher reinforces bullish conviction.
Confirmation is strongest when volume rises across the three sessions. Breakouts above resistance further strengthen the setup.
Its reliability weakens if the candles are overextended or occur in low-volume markets. Traders also watch for overbought signals to avoid exhaustion.
| Summary of Three White Soldiers | |
| Pattern Name | Three White Soldiers |
| Pattern Type | Bullish reversal or continuation |
| Characteristics | Three consecutive bullish candles with bodies ≥60% of each candle’s range, closes in top 25%, small upper wicks, each open within or slightly above prior body. Avoid overextended gaps. |
| Preceding Trend | Downtrend or base breakout. Stronger when C1 starts above 8-EMA reclaim. |
| Expectation | Sustained demand and broad participation, favoring trend follow-through. |
| Trade Entry Point | Buy-stop 0.1–0.3% above the third candle high. High quality if avg volume across the three ≥130%. |
| Stop Loss | Below pattern low (lowest of the three) or 1× ATR(14). Invalidate on close back into mid-body of C2. |
| Price Target | First = resistance ahead or measured move of avg body × 3; then 2–3R. Trail under 8-EMA or swing higher lows. |
According to LuxAlgo’s summary, studies suggest the Three White Soldiers pattern can reach 80–90 % accuracy in predicting reversals when it meets all ideal criteria and is confirmed by volume.
30. Three Black Crows
The Three Black Crows is a bearish reversal pattern consisting of three consecutive long red candles. The Three Black Crows typically appears after an uptrend or consolidation, showing sustained selling pressure.
Each candle opens within the prior body and closes near its low. This sequence reflects steady bearish momentum.

The bodies are long and bearish, with small or no lower shadows. Upper shadows may appear but remain minor.
The Three Black Crows pattern shows declining confidence among bulls. Each close lower builds bearish conviction and attracts more selling.
Confirmation is strongest when volume rises through the three sessions. Breakdowns below support levels add credibility.
At the end of an uptrend, this pattern signals reversal. During consolidations, it often marks breakdowns.
| Summary of Three Black Crows | |
| Pattern Name | Three Black Crows |
| Pattern Type | Bearish reversal or continuation |
| Characteristics | Three consecutive bearish candles with bodies ≥60% of range, closes in bottom 25%, small lower wicks, each open within or slightly below prior body. Avoid capitulation gaps unless targeting momentum short. |
| Preceding Trend | Uptrend rollover or range breakdown. Stronger when C1 breaks below 8-EMA decisively. |
| Expectation | Persistent supply and breadth of selling, favoring a down leg. |
| Trade Entry Point | Sell-stop 0.1–0.3% below the third candle low. Extra conviction if 3-candle avg volume ≥130%. |
| Stop Loss | Above pattern high or 1× ATR(14). Invalidate on close back into mid-body of C2. |
| Price Target | First = nearby demand or prior swing low; then 2–3R. Trail above 8-EMA or lower-highs for trend trades. |
Litefinance suggests that when enhanced versions of the pattern (with stricter definitions or additional filters) are used, reliability may approach ~85 % on higher timeframes.
31. Rising Three
The Rising Three is a bullish continuation pattern consisting of five candles. The Rising Three begins with a strong green candle, followed by three small-bodied candles drifting lower, and ends with another strong green candle that closes above the first.
The first candle shows bullish strength, the middle three reflect a controlled pullback, and the final candle confirms continuation. This sequence demonstrates that selling pressure is weak compared to buying.
The Rising Three shows that buyers remain in control even as sellers attempt to pause the rally. The final breakout candle restores confidence in the trend.
Confirmation occurs when the fifth candle closes strongly above the first candle’s high. Higher volume during the breakout improves reliability.
Its reliability decreases in low-volume environments where pullbacks extend too long. The pattern works best with momentum or breakout confirmation.
| Summary of Rising Three Pattern | |
| Pattern Name | Rising Three |
| Pattern Type | Bullish continuation |
| Characteristics | Five candles: C1 long bullish; C2–C4 small bearish (or doji) bodies that stay within the body of C1; C5 long bullish closing above C1 high. Pullback days ideally have declining volume, while C5 prints >130% average volume. |
| Preceding Trend | Uptrend. |
| Expectation | Healthy consolidation inside trend; breakout resumes bullish momentum. |
| Trade Entry Point | Buy-stop 0.1–0.3% above C5 high. Aggressive entry possible once C5 closes above C1 high. |
| Stop Loss | Below pattern low (C2–C4 cluster low) or 1× ATR(14). Invalidate on a close below C1 low. |
| Price Target | Initial = swing resistance; extension 2R. Trail under 8/20-EMA or higher lows. |
According to Bulkowski’s Encyclopedia of Candlestick Charts, Rising Three shows about 65–70% success as a continuation signal when confirmed with volume.
32. Falling Three
The Falling Three is a bearish continuation pattern that mirrors the Rising Three. The Falling Three consists of a long red candle, three small-bodied upward candles within its range, and a final strong red candle closing below the first.
The first candle demonstrates selling pressure, the middle three show a weak recovery, and the final candle confirms bearish continuation. This sequence reflects sellers maintaining control.
The Falling Three shows that bulls attempted to push higher but lacked strength. The final bearish candle confirms sellers’ dominance.
Confirmation occurs when the fifth candle closes below the first candle’s low. Volume expansion during the drop adds conviction.
In downtrends, Falling Three is a reliable continuation signal. At support breakdowns, it reinforces bearish sentiment.
| Summary of Falling Three Pattern | |
| Pattern Name | Falling Three |
| Pattern Type | Bearish continuation |
| Characteristics | Five candles: C1 long bearish; C2–C4 small bullish candles contained within C1 body; C5 long bearish closing below C1 low. Pullback days should have lower volume, C5 expansion bar with >130% volume. |
| Preceding Trend | Downtrend. |
| Expectation | Pause within downtrend, followed by renewed selling pressure. |
| Trade Entry Point | Sell-stop 0.1–0.3% below C5 low. |
| Stop Loss | Above C2–C4 cluster high or 1× ATR(14). Invalidate on close above C1 high. |
| Price Target | Nearest support first; extend 2R. Trail above declining EMA(8/20). |
According to WRTrading, when properly formed, the Falling Three Methods pattern has a success rate of about 71%–75%, though it fails in roughly 30% of cases, especially in weak trends or without confirmation.
33. Tasuki Gap
The Tasuki Gap is a three-candle continuation pattern that signals trend strength. In bullish form, it begins with two strong green candles separated by an upward gap, followed by a small red candle that partially fills the gap without closing it.
The first two candles confirm momentum, and the third reflects a minor pullback. The gap’s survival signals continuation.
The Tasuki Gap shows that bulls remain in control even after a minor correction. The inability of sellers to close the gap reinforces confidence.
Confirmation occurs if the next candle resumes upward movement above the red candle. Strong volume further supports the signal.
Its reliability decreases when the third candle fully closes the gap. Best results occur in strong trending conditions.
| Summary of Tasuki Gap Candle | |
| Pattern Name | Tasuki Gap |
| Pattern Type | Continuation (bullish or bearish) |
| Characteristics | In uptrend: bullish gap followed by bullish candle; next candle is bearish but does not close the gap. In downtrend: bearish gap followed by bearish candle; next candle bullish but fails to close the gap. |
| Preceding Trend | Strong directional move. |
| Expectation | Momentum intact; partial counter-move fails to erase gap. |
| Trade Entry Point | Trade in gap direction: buy-stop above gap high (bullish), sell-stop below gap low (bearish). |
| Stop Loss | Opposite end of gap. |
| Price Target | Equal to gap size projected forward; otherwise scale 1.5–2R. |
According to the Journal of Technical Analysis, Tasuki Gap patterns succeed about 60–65% of the time, especially in strong trending markets.
34. Mat Hold
The Mat Hold is a bullish continuation pattern involving five candles. The first candle confirms bullish strength, the middle three reflect a pause, and the final candle signals trend continuation. This sequence shows temporary consolidation before resumption.
The first body is long and bullish, while the middle three are smaller and may alternate in color. The final candle is large and bullish, breaking above the consolidation.
The Mat Hold demonstrates that bulls remain in control despite short-term selling. The final breakout restores conviction in the uptrend.
Confirmation comes from the last candle closing well above the first candle’s high. High volume further validates the continuation.
It is less reliable in weak or range-bound markets. Context with trend indicators enhances its accuracy.
| Summary of Mat Hold Candlestick | |
| Pattern Name | Mat Hold |
| Pattern Type | Bullish continuation |
| Characteristics | C1 long bullish; C2–C4 small mixed candles that drift slightly down but stay above C1 low; C5 long bullish closing above C1 high. Unlike Rising Three, retracement is shallower and overlap allowed. |
| Preceding Trend | Uptrend. |
| Expectation | Short pause before trend resumes higher. |
| Trade Entry Point | Buy-stop 0.1–0.3% above C5 high. |
| Stop Loss | Below lowest candle in C2–C4 or 1× ATR(14). Invalidate on close below C1 low. |
| Price Target | Next resistance zone; extend to 2R. Trail under EMA(8/20). |
According to WRT Trading, the Mat Hold pattern shows around a 64% accuracy rate in various market conditions, making it one of the more dependable continuation patterns when confirmed.
35. Bullish Abandoned Baby
The Bullish Abandoned Baby is a rare three-candle bullish reversal pattern. The Bullish Abandoned Baby occurs after a downtrend with a long red candle, followed by a Doji gapping below, and then a strong green candle gapping upward.
The first candle represents bearish dominance, the Doji shows indecision, and the final green candle confirms bullish reversal. The gaps before and after the Doji define the pattern.
The pattern shows exhaustion of sellers, hesitation, and then strong buying. The Doji signals the turning point between the two sides.
Confirmation comes with the green candle closing well above the Doji. High volume during the reversal strengthens credibility.
At support, the Bullish Abandoned Baby is reliable. In oversold markets, it often marks strong turning points.
| Summery of Bullish Abandoned Baby | |
| Pattern Name | Bullish Abandoned Baby |
| Pattern Type | Bullish reversal |
| Characteristics | C1 long bearish; C2 doji gapping down with no overlap (both shadows separated); C3 long bullish gapping up, closing well into C1 body. Stronger with volume surge. |
| Preceding Trend | Downtrend, panic selling. |
| Expectation | Capitulation low rejected; sharp reversal potential. |
| Trade Entry Point | Buy-stop above C3 high. Aggressive entry at C3 close if strong volume. |
| Stop Loss | Below C2 doji low or 1× ATR(14). |
| Price Target | First = swing resistance; extension 2R+. Trail under higher lows. |
According to Quantified Strategies, the Bullish Abandoned Baby pattern exhibits a bullish turnaround in about 70% of tested cases.
36. Bearish Abandoned Baby
The Bearish Abandoned Baby is a rare three-candle bearish reversal pattern. The Bearish Abandoned Baby appears after an uptrend with a strong green candle, followed by a Doji that gaps upward, and then a large red candle gapping downward.
The first candle reflects bullish dominance, the Doji signals hesitation, and the final red candle confirms a shift to selling pressure. The defining trait is the gap before and after the Doji.
The Bearish Abandoned Baby shows exhaustion of buyers, market indecision, and then decisive control by sellers. The Doji acts as a turning point in sentiment.
Confirmation comes from the red candle closing deeply into the green body. Volume expansion on the decline strengthens reliability.
At resistance, the pattern signals strong reversal potential. In overbought markets, it often warns of trend exhaustion.
| Summary of Bearish Abandoned Baby | |
| Pattern Name | Bearish Abandoned Baby |
| Pattern Type | Bearish reversal |
| Characteristics | C1 long bullish; C2 doji gapping up with no overlap; C3 long bearish gapping down, closing deep into C1 body. |
| Preceding Trend | Uptrend or euphoria spike. |
| Expectation | Bull trap complete, sellers seize control. |
| Trade Entry Point | Sell-stop below C3 low. |
| Stop Loss | Above C2 doji high or 1× ATR(14). |
| Price Target | Swing support first; extend 2R+. Trail above lower highs. |
According to a backtest published on Quantified Strategies, the Bearish Abandoned Baby pattern shows a success rate of approximately 77 % when predicting a reversal to the downside.
37. Three Outside Up
The Three Outside Up is a bullish reversal pattern made of three candles. The first candle shows continued selling, the second signals bullish takeover, and the third confirms the reversal. The sequence shifts momentum from bearish to bullish.
The first body is small and bearish, the second is large and bullish engulfing, and the third is also bullish. Shadows may vary but the engulfing feature is critical.
The pattern shows sellers losing control after the engulfing takeover. The third candle confirms growing buyer confidence.
Confirmation occurs with the third candle closing above the engulfing high. Rising volume further validates the setup.
At support, this pattern is highly reliable. In oversold conditions, it often triggers extended rallies.
| Summary of Three Outside Up Pattern | |
| Pattern Name | Three Outside Up |
| Pattern Type | Bullish reversal |
| Characteristics | C1 bearish; C2 long bullish engulfing C1 body (≥1.3× size); C3 bullish closing higher, confirming upside. |
| Preceding Trend | Downtrend. |
| Expectation | Engulf + follow-through = stronger reversal than classic engulfing. |
| Trade Entry Point | Buy-stop above C3 high. |
| Stop Loss | Below pattern low (C1 or C2). |
| Price Target | Swing high; extend 2R. Trail under rising EMA. |
According to NetPicks, historical backtests of the Three Outside Up pattern typically show a 60–65% success rate in predicting bullish reversals, though that effectiveness depends heavily on market conditions and confirmation signals.
38. Three Outside Down
The Three Outside Down is a bearish reversal pattern composed of three candles. The Three Outside Down begins with a small green candle, followed by a large red candle that engulfs it, and then another red candle closing lower.
The first candle shows continued buying, the second signals bearish takeover, and the third confirms the reversal. This sequence shifts momentum from bullish to bearish.
The Three Outside Down shows buyers losing momentum as sellers take over. The third candle confirms bearish dominance.
Confirmation occurs with the third candle closing below the engulfing low. Higher volume strengthens the signal.
At resistance zones, this pattern is especially effective. In overbought markets, it often leads to strong corrections.
| Summary of Three Outside Down | |
| Pattern Name | Three Outside Down |
| Pattern Type | Bearish reversal |
| Characteristics | C1 bullish; C2 long bearish engulfing C1 body; C3 bearish closing lower, confirming downside. |
| Preceding Trend | Uptrend. |
| Expectation | Engulf + continuation = strong reversal signal. |
| Trade Entry Point | Sell-stop below C3 low. |
| Stop Loss | Above pattern high. |
| Price Target | Swing low; extend 2R. Trail above falling EMA. |
WrTrading affirms that several studies report ~70% reliability for the pattern when confirmed properly.
39. Three Inside Up
The Three Inside Up is a bullish reversal pattern involving three candles. The Three Inside Up begins with a large red candle, followed by a small green candle within its body, and then a larger green candle closing above the first.
The first candle represents strong selling, the second shows hesitation, and the third confirms a bullish shift. The sequence marks a transition from bearish to bullish control.
The Three Inside Up shows selling pressure weakening. The final bullish candle confirms buyers have taken over.
Confirmation occurs when the third candle closes above the first candle’s high. Higher volume provides additional strength.
It is weaker without the third candle confirmation. It works best in trending or oversold environments.
| Summary of Three Inside Up Candlesticks | |
| Pattern Name | Three Inside Up |
| Pattern Type | Bullish reversal |
| Characteristics | C1 long bearish; C2 small bullish contained within C1 body (Harami); C3 bullish closing above C1 high. |
| Preceding Trend | Downtrend. |
| Expectation | Harami weakness confirmed by breakout, strengthening bullish case. |
| Trade Entry Point | Buy-stop above C3 high. |
| Stop Loss | Below pattern low. |
| Price Target | Swing resistance; 1.5–2R. |
According to EBC’s backtesting across major currency and equity markets, the Three Inside Up pattern shows a success rate of approximately65–70%, when confirmation (volume spike, support) is also present.
40. Three Inside Down
The Three Inside Down is a bearish reversal pattern of three candles. The Three Inside Down starts with a large green candle, followed by a small red candle within its body, and ends with another red candle closing below the first.
The first candle reflects strong buying, the second signals hesitation, and the third confirms bearish strength. This transition highlights the shift from bullish to bearish sentiment.
The Three Inside Down reflects waning bullish confidence. The final bearish candle convinces traders that sellers have gained control. Confirmation occurs when the third candle closes below the first candle’s low. Strong volume adds reliability.
At resistance, this pattern is particularly reliable. In overbought markets, it often signals a correction. It is weaker if the third candle fails to confirm. Its reliability improves with momentum divergence.
| Summary of Three Inside Down Pattern | |
| Pattern Name | Three Inside Down |
| Pattern Type | Bearish reversal |
| Characteristics | C1 long bullish; C2 small bearish within C1 body; C3 bearish closing below C1 low. |
| Preceding Trend | Uptrend. |
| Expectation | Harami shows fading demand, confirmed by downside break. |
| Trade Entry Point | Sell-stop below C3 low. |
| Stop Loss | Above pattern high. |
| Price Target | Swing support; 1.5–2R. |
According to AnalyzingAlpha’s backtest of 9,935 occurrences, the Three Inside Down pattern shows modest reversal performance, with many tests suggesting its edge is weak unless combined with confirmation.
41. Bullish Kicker
The Bullish Kicker is a two-candle bullish reversal pattern that signals a sudden and sharp change in sentiment. Bullish Kicker begins with a strong red candle, followed by a green candle that gaps up and opens well above the prior close, continuing strongly upward.
The first candle reflects bearish dominance, while the second completely shifts control to buyers. The gap between the two shows decisive reversal without hesitation.
The Bullish Kicker represents a shock to the market where buyers immediately seize control after strong selling. This often happens due to news, earnings, or macro events.
Confirmation occurs when price holds above the second candle’s body in the following sessions. Increased volume adds reliability to the pattern.
At the end of a downtrend, the Bullish Kicker often sparks a strong rally. In sideways markets, it indicates the start of a new bullish move.
| Summary of Bullish Kicker Candlesticks | |
| Pattern Name | Bullish Kicker |
| Pattern Type | Strong bullish reversal |
| Characteristics | C1 long bearish. C2 opens with a gap up ≥1× ATR(14) above C1 open (not just close) and rallies strongly, leaving no overlap. Extremely rare, very powerful. |
| Preceding Trend | Downtrend, often after news shock or capitulation. |
| Expectation | Sentiment flip overnight; aggressive demand enters. |
| Trade Entry Point | Buy-stop above C2 high or enter at C2 close if liquidity strong. |
| Stop Loss | Below C2 low or 1× ATR(14). Invalidate if price fills the kicker gap within 2–3 sessions. |
| Price Target | Immediate swing resistance, then 2–3R multiples. Trail with 8-EMA for momentum capture. |
According to WRTrading, the Bullish Kicker pattern historically shows a success rate of around 53% when acting alone.
42. Bearish Kicker
The Bearish Kicker is a two-candle bearish reversal pattern that signals a sudden shift in sentiment. Bearish Kicker starts with a long green candle, followed by a red candle that gaps down sharply and closes lower with no overlap.
The first candle reflects bullish control, but the second candle erases it with aggressive selling. The sudden gap illustrates a decisive rejection of prior optimism.
The Bearish Kicker shows that buyers lost control instantly, often due to negative catalysts. Sellers dominate the market immediately and decisively. Confirmation occurs when price stays below the red candle’s low in the next sessions. Volume surges add to the credibility of the reversal.
At the top of an uptrend, this pattern strongly signals reversal. It frequently appears during overbought conditions or after sudden bad news.
| Summary of Bearish Kicker | |
| Pattern Name | Bearish Kicker |
| Pattern Type | Strong bearish reversal |
| Characteristics | C1 long bullish. C2 opens with a gap down ≥1× ATR(14) below C1 open, leaving no overlap with C1 body and often little or no lower wick. Intra-bar pullbacks are shallow and close is near the low (bottom 25% of range) |
| Preceding Trend | Uptrend or euphoric spike, often news driven |
| Expectation | Abrupt sentiment flip to supply dominance with momentum follow-through lower |
| Trade Entry Point | Sell-stop 0.1–0.3% below C2 low. Aggressive entries at the C2 close if liquidity is deep and volume ≥150% of 20-day average |
| Stop Loss | A few ticks above C2 high or ~1× ATR(14) above entry. Invalidate if the gap is filled on a closing basis within 2–3 sessions |
| Price Target | First = nearest demand shelf or swing low. Extend 2–3R. Trail above 8-EMA or above developing lower highs for trend capture |
| Quality Filters | C2 range ≥1× ATR(14), C2 closes below 8-EMA and 20-EMA, downside volume thrust on OBV or volume ≥150% confirms strength |
According to Quantified Strategies’ candlestick study, the Bearish Kicker pattern shows a success rate of about 47%, making it weak when used alone.
43. Bullish Belt Hold Pattern
The Bullish Belt Hold is a single-candle bullish reversal pattern. Bullish Belt Hold appears as a long green candle that opens at the low with little or no lower shadow and closes near the high.
The opening gap down represents initial selling pressure, but strong buying lifts prices throughout the session. The absence of a lower shadow strengthens the signal.
The Bullish Belt Hold shows that buyers took full control from the open. Sellers had no opportunity to push back, which boosts bullish confidence.Confirmation requires a second bullish candle closing higher. Volume support improves reliability.
At the bottom of a downtrend, it often signals reversal. Within uptrends, it confirms bullish continuation. It is less reliable without confirmation. Reliability improves with support confluence or oversold conditions.
| Summary of Bullish Belt Hold | |
| Pattern Name | Bullish Belt Hold |
| Pattern Type | Bullish reversal or continuation in strong uptrends |
| Characteristics | One long bullish candle that opens at the low with no lower shadow and closes near the high. Body ≥80–90% of range. Small or absent upper wick preferred |
| Preceding Trend | Downtrend or sharp pullback. In trends, may appear as a power bar continuation |
| Expectation | Immediate control by buyers and potential transition to an upswing |
| Trade Entry Point | Buy-stop 0.1–0.3% above belt-hold high. Higher conviction if volume ≥130% and close is in top 10% of range |
| Stop Loss | Below the candle low or ~1× ATR(14) under entry. Invalidate on a close below the candle midpoint in the next 1–2 bars |
| Price Target | First = recent swing high or 20-EMA retest. Then 1.5–2R. Trail under higher lows or 8/20-EMA stack for continuation |
| Quality Filters | Appears at support, RSI regime shift upward, reclaim of VWAP or anchored VWAP, breadth supportive on the day |
According to WRTrading, the “Belt Hold” pattern can show success rates ranging from 50% to 71%, depending on market conditions and whether confirmations align.
44. Bearish Belt Hold Pattern
The Bearish Belt Hold is a single-candle bearish reversal pattern.
The opening gap up reflects initial optimism, but heavy selling dominates the entire session. The lack of an upper shadow strengthens the bearish interpretation.
The body is long and bearish, covering a wide range. A small lower shadow may appear but does not reduce the signal’s strength.
Psychologically, the Bearish Belt Hold shows buyers tried to push higher at the open but were crushed by sellers. This decisive rejection often shifts sentiment bearish.
Confirmation requires another red candle closing lower. Rising volume reinforces the reliability of the pattern. It is weaker without confirmation or in low-volume environments. Confluence with resistance improves results.
| Summary of Bearish Belt Hold | |
| Pattern Name | Bearish Belt Hold |
| Pattern Type | Bearish reversal or continuation in strong downtrends |
| Characteristics | One long bearish candle that opens at the high with no upper shadow and closes near the low. Body ≥80–90% of range. Minimal lower wick preferred |
| Preceding Trend | Uptrend or overbought push. In downtrends, acts as momentum continuation |
| Expectation | Immediate control by sellers and potential transition to a downswing |
| Trade Entry Point | Sell-stop 0.1–0.3% below belt-hold low with volume ≥130% of average |
| Stop Loss | Above the candle high or ~1× ATR(14) above entry. Invalidate on a close above candle midpoint in the next 1–2 bars |
| Price Target | First = recent swing low. Then 1.5–2R. Trail above lower highs or 8/20-EMA for momentum |
| Quality Filters | Occurs at resistance or channel top, RSI rolls down from >60, negative volume delta or OBV break confirms |
According to ForexOp’s study of 2,540 bearish belt hold patterns across forex pairs, the pattern correctly predicted a bearish reversal 51.6% of the time
45. Doji Star
The Doji Star is a two-candle indecision pattern that can signal reversal depending on context. Doji Star begins with a strong candle followed by a Doji that gaps away from the first body.
The first candle shows momentum in the prevailing trend, while the Doji signals hesitation. The gap between them emphasizes uncertainty.
The Doji Star shows traders pausing after a strong move. Market participants await confirmation before committing further.
Confirmation comes when the candle after the Doji closes in the opposite direction of the initial trend. This follow-up is critical to defining reversal. At tops, the Doji Star marks bearish reversal. At bottoms, it can indicate bullish reversal.
| Summary of Doji Star | |
| Pattern Name | Doji Star |
| Pattern Type | Indecision with reversal potential depending on context |
| Characteristics | Doji forms after a gap away from the prior candle body. Gap size ≥0.2% or ≥0.15× ATR(14). Doji body ≤10% of range. Upper and lower shadows may be present |
| Preceding Trend | After strong directional moves. At highs, risk of bearish turn. At lows, risk of bullish turn |
| Expectation | Exhaustion and balance. Direction is set by confirmation from the next candle |
| Trade Entry Point | Trade confirmation. Buy-stop 0.1–0.3% above confirmation high for bullish setups, sell-stop below confirmation low for bearish setups |
| Stop Loss | Opposite side of the star’s extreme or ~1× ATR(14). Invalidate if price reenters the gap and closes through the prior body |
| Price Target | Nearby swing level first. Then 1.5–2R with a trail under higher lows or above lower highs depending on direction |
| Quality Filters | Star sits at key support or resistance, confirmation bar range ≥1× ATR(14), volume on confirmation ≥130% validates breakout |
According to a backtest of 8,029 trades by Liberated Stock Trader, doji candles (a key component in Doji Star patterns) achieved a win rate of 55.6%, though profitability is modest and reliability is low without confirmation.
46. Bearish Doji Star Pattern
The Bearish Doji Star is a two-candle bearish reversal pattern that appears after an uptrend. The Bearish Doji Star begins with a strong green candle followed by a Doji that gaps upward, signaling hesitation.
The first candle represents bullish continuation, while the Doji shows indecision. The gap highlights weakening momentum.
The first body is long and bullish, while the second is a Doji with almost no body. Shadows may vary but the gap is essential.
The Bearish Doji Star reflects fading confidence among buyers. The indecision indicates that sellers are preparing to take control.
Confirmation comes when the next candle closes below the Doji. Strong volume strengthens the bearish signal. At resistance, it often signals reversal. In overbought conditions, it warns of exhaustion.
| Summary of Bearish Doji Star | |
| Pattern Name | Bearish Doji Star |
| Pattern Type | Bearish reversal |
| Characteristics | C1 long bullish. Gap up to a Doji (C2) with body ≤10% of range and no overlap with C1 body. Best if C2 upper shadow is prominent. Requires a bearish confirmation candle closing into C1 body by ≥50% |
| Preceding Trend | Uptrend, often extended or into resistance |
| Expectation | Buying momentum stalls then reverses lower on confirmation |
| Trade Entry Point | Sell-stop 0.1–0.3% below the confirmation candle low. Extra conviction if confirmation range ≥1× ATR(14) and closes below 8-EMA |
| Stop Loss | Above the star high or ~1× ATR(14). Invalidate on a close back above the star high |
| Price Target | First = prior swing low or VWAP anchor. Then 1.5–2R. Trail above lower highs or above 8-EMA for trend follow |
| Quality Filters | Occurs near Fibonacci extension or prior supply, negative divergence on RSI or MACD, distributional volume signature on confirmation |
According to Bulkowski’s research, Bearish Doji Star patterns succeed around 55–60% of the time, especially when confirmed by strong selling.
47. Matching Low / Matching High
The Matching Low and Matching High are two-candle patterns signaling possible reversal or continuation depending on context. The Matching Low occurs in downtrends with two candles closing at the same price, while the Matching High occurs in uptrends with identical closes at the top.
The first candle shows continuation of the trend, while the second confirms hesitation at the same closing level. This repeated close defines the pattern.
Matching Lows show sellers failing to push further down, while Matching Highs show buyers failing to extend higher. This reflects market equilibrium.
Confirmation comes with a third candle moving opposite the prior trend. Volume support makes the reversal more reliable.
At support, Matching Low is a bullish sign. At resistance, Matching High warns of reversal.
| Summary of Matching Low & Matching High | |
| Pattern Name | Matching Low / Matching High |
| Pattern Type | Matching Low bullish reversal, Matching High bearish reversal |
| Characteristics | Two consecutive candles close at nearly the same price. Tolerance ≤ min(tick size ×2, 0.15%) or ≤0.2× ATR(14). For Matching Low, second close fails to break the first close in a downtrend. For Matching High, second close fails to exceed the first close in an uptrend |
| Preceding Trend | Matching Low after a decline. Matching High after a rally |
| Expectation | Close-price defense acts as strong support or resistance with reversal risk once confirmed |
| Trade Entry Point | Matching Low buy-stop 0.1–0.3% above the high of the confirming bullish bar. Matching High sell-stop 0.1–0.3% below the low of the confirming bearish bar |
| Stop Loss | A few ticks beyond the defended close or ~1× ATR(14) from entry |
| Price Target | First = nearest swing. Then 1.5–2R with standard trend-following trails |
| Quality Filters | Confluence with horizontal S/R, anchored VWAP, or round number. Volume expansion on confirmation improves odds |
According to Quantified Strategies, the Matching Low pattern often fails to act as a bullish reversal; it more frequently continues downward unless confirmed by a higher close after the pattern
48. Inside Bars
Inside Bars are a two-candle pattern where the second candle’s high and low remain within the range of the first.
The first candle shows range expansion, while the second reflects contraction. This compression signals balance between buyers and sellers.
The body of the inside bar is small, contained within the prior candle. Shadows also remain inside the range.
Inside Bars indicate market pause and indecision. Traders view them as setups for continuation or reversal depending on breakout direction.
Confirmation comes when price breaks out above or below the first candle’s range. Volume support improves the reliability of the breakout.
In trending markets, Inside Bars usually lead to continuation. At key levels, they mark reversals.
| Summary of Inside Bars | |
| Pattern Name | Inside Bars |
| Pattern Type | Consolidation with breakout potential in either direction |
| Characteristics | The inside bar high and low are fully contained within the prior mother bar range. Prefer inside bar range ≤ 70–80% of mother bar and body ≤50% of inside bar range. Multiple inside bars increase tension |
| Preceding Trend | Works in trends and ranges. Best used for continuation with trend bias |
| Expectation | Volatility compression that often resolves as a range expansion in the breakout direction |
| Trade Entry Point | Place OCO orders: buy-stop 0.1–0.3% above mother-bar high and sell-stop below mother-bar low. If trend bias is clear, take only the trend-direction order |
| Stop Loss | Opposite side of the mother-bar extreme or ~1× ATR(14). Cancel the other side once triggered |
| Price Target | Measured move equal to mother-bar range. Otherwise 1.5–2R, then trail with 8/20-EMA or swing structure |
| Quality Filters | Breakout volume ≥130%, inside bar at a flag or triangle apex, alignment with higher-timeframe trend and MA stack increases reliability |
From a timeframe-analysis article, it is claimed that daily inside bars might see breakout success of 75–85%, whereas 1-hour charts drop to 55–65% reliability and 15-minute charts down to 45–55%.
49. Three-Line Strike Pattern
The Three-Line Strike is a four-candle pattern that often signals reversal against the prior short-term trend.
In a bullish version, three consecutive green candles are followed by a large red candle that engulfs them, while in a bearish version, three red candles are followed by a large green candle engulfing them.
The first three candles show strong directional movement, while the fourth completely negates them. This dramatic shift defines the setup.
The first three bodies are smaller but consistent in trend. The fourth is very large and reverses the entire move.
The pattern traps traders by reversing sentiment sharply. It reflects exhaustion of one side and takeover by the other.
Confirmation occurs if price continues in the direction of the engulfing candle. Volume spikes strengthen the outcome.
At resistance, bearish Three-Line Strike is reliable. At support, bullish versions are powerful.
| Summary of Three-Line Strike | |
| Pattern Name | Three-Line Strike |
| Pattern Type | Often a continuation despite a dramatic counter bar |
| Characteristics | Bullish version: three consecutive higher closes followed by a large bearish C4 that engulfs the bodies of C1–C3 and closes near its low. Bearish version: three consecutive lower closes followed by a large bullish C4 engulfing C1–C3 bodies and closing near its high |
| Preceding Trend | In direction of the initial three candles |
| Expectation | C4 looks like a reversal but frequently acts as a failed counterattack, with price later resuming the original trend once C4 is absorbed |
| Trade Entry Point | Trade in the direction of the original three after a break back through C4 midpoint. For bullish version, buy-stop above C4 midpoint or C3 high. For bearish, sell-stop below C4 midpoint or C3 low |
| Stop Loss | Beyond C4 extreme or ~1× ATR(14) from entry |
| Price Target | Return to the prior trend’s swing extreme, then 2R. Trail with 8/20-EMA in the trend direction |
| Quality Filters | Volume on C4 is high but follow-through fails, and subsequent bar reclaims C4 midpoint with trend MA alignment, indicating absorption rather than reversal |
According to Quantified Strategies, the Bearish Three-Line Strike pattern shows a success rate of about 64% when used as a continuation signal.
50. Bullish Separating Lines Pattern
The Bullish Separating Lines is a two-candle bullish continuation pattern. Bullish Separating Lines begins with a long red candle, followed by a green candle that opens at the same level but closes strongly higher.
The first candle reflects temporary selling, while the second negates it with bullish dominance. The identical open is the defining trait.
The Bullish Separating Lines pattern shows sellers attempting to push lower but buyers immediately taking over. This demonstrates strong conviction in the uptrend.
Confirmation comes with the next candle closing higher. Volume support strengthens the continuation signal.
In strong uptrends, this pattern signals persistence of bullish strength. At support, it confirms buyers’ control.
| Summary of Bullish Separating Lines | |
| Pattern Name | Bullish Separating Lines |
| Pattern Type | Bullish continuation |
| Characteristics | C1 bearish closing lower. C2 opens exactly at the same open as C1 or within ≤0.1% and closes strongly bullish, typically with a long body. The identical open demonstrates conviction and “separates” from prior selling |
| Preceding Trend | Uptrend or breakout phase |
| Expectation | Selling is absorbed immediately and the uptrend resumes |
| Trade Entry Point | Buy-stop 0.1–0.3% above C2 high. High quality if C2 range ≥1× ATR(14) and volume ≥130% |
| Stop Loss | Below C2 low or ~1× ATR(14). Invalidate on close below C2 midpoint |
| Price Target | Next resistance or measured move equal to the average range of C1–C2. Scale at 1.5–2R and trail under 8-EMA |
| Quality Filters | Same-open tolerance tight, occurs above rising 20-EMA, confirmation bar holds above C2 midpoint, strong breadth day in the index |
According to PatternsWizard’s backtest across 4,120 markets, the Separating Lines pattern (including the bullish variant) confirms 78.1% of the time.
51. Bearish Separating Lines
The Bearish Separating Lines is a two-candle continuation pattern that forms in a downtrend. Separating Lines begins with a bullish green candle followed by a bearish red candle that opens at the same level and continues strongly downward.
The first candle shows a temporary attempt at recovery, but the second candle erases it immediately. The identical open reinforces the bearish continuation.
This pattern shows bulls trying to regain control but failing instantly. Sellers dominate the market and confirm the downtrend’s strength.
Confirmation comes with another bearish candle closing below the pattern. Rising volume further strengthens the signal.
At resistance or during breakdowns, the pattern is especially reliable. It signals persistence of bearish momentum.
| Summary of Bearish Separating Lines | |
| Pattern Name | Bearish Separating Lines |
| Pattern Type | Bearish continuation |
| Characteristics | C1 bullish closing higher. C2 opens at the same open as C1 or within ≤0.1% and closes strongly bearish with a long body. Identical open shows sellers reasserting control |
| Preceding Trend | Downtrend or breakdown phase |
| Expectation | Demand is rejected and the downtrend resumes |
| Trade Entry Point | Sell-stop 0.1–0.3% below C2 low. Quality improves if C2 range ≥1× ATR(14) and volume ≥130% |
| Stop Loss | Above C2 high or ~1× ATR(14). Invalidate on close above C2 midpoint |
| Price Target | Nearest support, then 1.5–2R. Trail above 8-EMA or above lower-highs in a developing downtrend |
| Quality Filters | Same-open tolerance tight, occurs below falling 20-EMA, follow-through bar holds below C2 midpoint, weak index breadth day favors continuation |
According to Quantified Strategies’ analysis, the Bearish Separating Lines pattern displays a significant hit rate (around 78%) when used as a trend-confirmation tool in downtrends.
52. Meeting Lines Pattern
The Meeting Lines is a two-candle pattern that can be bullish or bearish depending on context. The Meeting Lines features a long candle in the direction of the prevailing trend, followed by an opposite-colored candle that closes at nearly the same level.
The first candle shows momentum continuation, while the second reflects hesitation as it meets the prior close. This “meeting” of closes defines the structure.
The pattern signals a clash between buyers and sellers. The equal closing price suggests a balance in pressure.
Confirmation comes when the third candle breaks in the direction opposite the first. Volume support improves the outcome.
At support, bullish Meeting Lines signal reversal. At resistance, bearish versions warn of topping.
It is less reliable in choppy markets where equal closes are common. Best results occur when combined with technical indicators.
| Summary of Meeting Lines | |
| Pattern Name | Meeting Lines |
| Pattern Type | Reversal (bullish or bearish) |
| Characteristics | Two candles with opposite colors. C1 strong trend candle. C2 gaps in the same direction but then closes near the prior candle’s close (within 0.1–0.3%). Creates a “meeting” at the close level. |
| Preceding Trend | Bullish meeting line in a downtrend (C1 red, C2 green). Bearish meeting line in an uptrend (C1 green, C2 red). |
| Expectation | Signals exhaustion of momentum as price “meets” prior close. Confirmation required. |
| Trade Entry Point | Bullish: Buy-stop above C2 high. Bearish: Sell-stop below C2 low. |
| Stop Loss | Opposite side of pattern or 1× ATR(14). |
| Price Target | First = swing level; extend 1.5–2R. |
| Quality Filters | Works best near support/resistance zones. Volume on C2 ≥120% average confirms the stall. |
According to CFA Institute research, Meeting Lines patterns succeed around 54–58% of the time, stronger at support or resistance levels.
53. On-Neck Pattern
The On-Neck is a two-candle bearish continuation pattern that appears in downtrends. On-Neck begins with a long red candle, followed by a small green candle that closes just at or slightly above the prior low.
The first candle confirms bearish momentum, while the second shows weak recovery. The failure to close higher confirms bearish strength.
The On-Neck pattern shows that buyers attempted to resist but lacked strength. Sellers quickly regain control, keeping the downtrend intact.
Confirmation occurs when another bearish candle closes below the pattern. Volume increases make the setup stronger.
At breakdown points, this pattern reinforces continuation. It is more effective in strong trending markets.
| Summary of On-Neck Pattern | |
| Pattern Name | On-Neck Pattern |
| Pattern Type | Bearish continuation |
| Characteristics | C1 long bearish candle. C2 small bullish candle that opens below C1 low and closes near C1 low but not above it (≤0.15% above). Creates the “on-neck” look. |
| Preceding Trend | Downtrend. |
| Expectation | Sellers remain in control, with a brief pause before continuation. |
| Trade Entry Point | Sell-stop 0.1–0.3% below C2 low. |
| Stop Loss | Above C2 high or 1× ATR(14). |
| Price Target | Next swing support; scale 1.5–2R. |
| Quality Filters | Higher conviction if C2 volume is below average (weak buying). Stronger when C1 range ≥1× ATR(14). |
According to Bulkowski’s statistical analysis, On-Neck patterns succeed around 56–59% of the time in continuing downtrends.
54. In-Neck Pattern
The In-Neck is a two-candle bearish continuation pattern similar to the On-Neck but with a slightly higher close.
The first candle confirms selling pressure, while the second signals a minor recovery. The limited rebound still reinforces bearish momentum.
The first body is long and bearish, while the second is small and bullish with a close slightly higher. Shadows are usually minimal.
The In-Neck shows buyers trying to fight back but failing to reverse sentiment. Sellers maintain control despite the weak attempt.
Confirmation requires another bearish candle closing below the pattern. Volume expansion increases confidence.
It is weaker if the second candle closes deeply into the first. Confluence with momentum indicators improves reliability.
| Summary of In-Neck Pattern | |
| Pattern Name | In-Neck Pattern |
| Pattern Type | Bearish continuation |
| Characteristics | C1 long bearish candle. C2 small bullish candle opens below C1 low and closes slightly above C1 close but still within lower quarter of C1 body. |
| Preceding Trend | Downtrend. |
| Expectation | Minor bullish response but not enough to reverse; continuation lower likely. |
| Trade Entry Point | Sell-stop below C2 low. |
| Stop Loss | Above C2 high or ~1× ATR(14). |
| Price Target | Nearest demand zone; 1.5–2R. |
| Quality Filters | Works better when C1 is wide-range bearish and C2 closes <25% of C1 body height. |
AnalyzingAlpha says that in their 21-year backtest, In Neck as a bearish continuation pattern generally “loses money or barely breaks even” under standard rules
55. Thrusting Pattern
The Thrusting Pattern is a two-candle bearish continuation setup. Thrusting Pattern appears after a long red candle, followed by a green candle that opens lower and closes inside but below the midpoint of the prior red body.
The first candle confirms bearish dominance, while the second shows weak recovery. The inability to close above the midpoint signals continuation of the downtrend.
The pattern reflects bulls attempting to push back but being unable to regain control. Sellers remain in command of the market.
Confirmation occurs when another bearish candle closes below the sequence. Volume expansion improves reliability.
In downtrends, the Thrusting Pattern is a reliable continuation sign. It is strongest near support breakdowns.
| Summary of Thrusting Pattern | |
| Pattern Name | Thrusting Pattern |
| Pattern Type | Bearish continuation |
| Characteristics | C1 long bearish. C2 bullish candle gaps down but closes within the lower half of C1 body, not above midpoint. Shows failed recovery. |
| Preceding Trend | Downtrend. |
| Expectation | Sellers still dominant, trend likely to continue. |
| Trade Entry Point | Sell-stop 0.1–0.3% below C2 low. |
| Stop Loss | Above C2 high or C1 midpoint. |
| Price Target | Next swing low; 1.5–2R. |
| Quality Filters | Higher conviction if C2 closes below 50% of C1 body and volume contracts on C2. |
According to LuxAlgo’s backtest on S&P 500 data, Thrusting patterns show about 57% accuracy for bullish reversal attempts, ranking 15th among 103 patterns tested.
56. Upside Gap Two Crows Pattern
The Upside Gap Two Crows is a bearish reversal pattern that forms in uptrends. Upside Gap Two Crows begins with a strong green candle, followed by two red candles that gap upward but close progressively lower.
The first candle reflects bullish continuation, while the two red candles warn of weakness. The failure to sustain the gap signals a bearish shift.
The pattern shows buyers pushing higher but sellers quickly overpowering them. This change of control creates caution for bulls.
Confirmation requires another bearish candle closing below the sequence. Rising volume strengthens the pattern.
At resistance, it often marks exhaustion of rallies. In overbought markets, it warns of reversal.
Its reliability weakens without confirmation. Best results occur with momentum divergence.
| Summary of Upside Gap Two Crows | |
| Pattern Name | Upside Gap Two Crows |
| Pattern Type | Bearish reversal |
| Characteristics | C1 long bullish. C2 bearish gaps up above C1 high, closes lower but still above C1 close. C3 bearish opens inside C2 body and closes within C1 body, filling gap. |
| Preceding Trend | Uptrend. |
| Expectation | Failed gap continuation, sellers regain control. |
| Trade Entry Point | Sell-stop below C3 low. |
| Stop Loss | Above pattern high (C2). |
| Price Target | Prior swing low; 1.5–2R. |
| Quality Filters | Stronger if gap forms after extended rally, with C3 volume ≥150%. |
According to CandleScanner’s backtest on S&P 500 data (spanning 1995–2015), the Upside Gap Two Crows pattern appeared just 150 times in over 2.2 million candles and had “high efficiency” in ≈ 25.99% of those cases over a 5-bar test period.
57. Tri-Star
The Tri-Star is a rare three-candle reversal pattern built from three consecutive Dojis. Tri-Star signals both bullish and bearish reversals depending on context.
The first Doji continues the prior trend, the second gaps in the same direction, and the third reverses with a gap back. The repeated Dojis highlight market indecision.
The Tri-Star shows total uncertainty among traders. Buyers and sellers cancel each other out, signaling a potential shift.
Confirmation occurs when the fourth candle breaks decisively against the prior trend. Volume support increases accuracy.
It is extremely rare, making it valuable when it appears. Without confirmation, it is unreliable.
| Summary of Tri-Star Pattern | |
| Pattern Name | Tri-Star |
| Pattern Type | Reversal (bullish or bearish) |
| Characteristics | Three consecutive doji candles. Middle doji gaps in direction of prior trend, third doji reverses gap (island-like). Extremely rare. |
| Preceding Trend | Extended uptrend (bearish tri-star) or downtrend (bullish tri-star). |
| Expectation | Exhaustion, sharp reversal if confirmed. |
| Trade Entry Point | Bullish: Buy-stop above third doji high. Bearish: Sell-stop below third doji low. |
| Stop Loss | Beyond tri-star extreme. |
| Price Target | Swing reversal target or 2–3R. |
| Quality Filters | Works best near exhaustion zones, with gaps ≥0.2× ATR(14). |
According to PatternsWizard’s multi-market backtest, the Tri-Star pattern confirmed 83.2% of the time, but only 34.4% of signals hit a 2:1 reward-to-risk and the expected return was just 0.032 $/$—so the statistical edge is small despite high confirmation.
58. Hikkake Pattern (Bullish/Bearish)
The Hikkake is a multi-candle pattern that signals breakout traps and reversals. The Hikkake begins with an inside bar, followed by a false breakout, and then a reversal in the opposite direction.
In the bullish version, a false downside breakout is followed by strong upward movement. In the bearish version, a false upside breakout is followed by selling.
The Hikkake shows traders being trapped in false breakouts. The reversal forces stop losses and fuels the new trend.
Confirmation occurs when price breaks in the opposite direction of the false breakout. Rising volume improves credibility.
In support, the bullish Hikkake is reliable. At resistance, the bearish version works strongly.
| Summary of Hikkake Pattern | |
| Pattern Name | Hikkake Pattern |
| Pattern Type | Continuation or reversal (bullish/bearish) |
| Characteristics | Begins as an inside bar. Price breaks out one way (false break) but then reverses in opposite direction with follow-through. Bullish: initial downside break fails, reversal upward. Bearish: upside break fails, reversal down. |
| Preceding Trend | Any trend; context critical. |
| Expectation | Trap move shakes weak hands, then price trends strongly opposite to initial break. |
| Trade Entry Point | Enter in the opposite direction of false breakout after reversal bar confirms. Buy-stop above reversal bar high (bullish), sell-stop below reversal bar low (bearish). |
| Stop Loss | Beyond false-break extreme. |
| Price Target | Equal to false-break range projection or 2R. |
| Quality Filters | Works best near support/resistance. Higher conviction when false breakout has low volume, reversal has high volume. |
According to technical research using Nifty 50 data, the Hikkake Pattern succeeds around 62–65% of the time when confirmed by volume and trend context.
59. Ladder Bottom Pattern
The Ladder Bottom is a bullish reversal pattern made of five candles. Ladder Bottom forms after a downtrend with three long red candles, followed by a small indecisive candle, and then a strong green candle.
The first three candles reflect heavy selling, the fourth shows hesitation, and the final green candle signals buyers taking control. The sequence illustrates the exhaustion of sellers.
The first three bodies are long and bearish, the fourth is small (Doji or spinning top), and the fifth is large and bullish. Shadows vary but the sequence matters most.
The Ladder Bottom shows panic selling giving way to stabilization. Buyers finally regain control, confirming reversal.
Confirmation occurs when the fifth candle closes strongly above the prior candles. Volume expansion increases confidence.
Its reliability weakens without the strong bullish fifth candle. It is rare but powerful.
| Summary of Ladder Bottom Candle | |
| Pattern Name | Ladder Bottom |
| Pattern Type | Bullish reversal |
| Characteristics | Five candles: C1–C3 consecutive bearish closes (long bodies). C4 small indecision candle (doji/spinning top). C5 long bullish candle closing above C4 and into C2 body. |
| Preceding Trend | Downtrend, often climactic selling. |
| Expectation | Signals exhaustion of sellers and entry of strong buyers. |
| Trade Entry Point | Buy-stop above C5 high. |
| Stop Loss | Below C4 low or C5 low. |
| Price Target | Swing resistance; 2R+. |
| Quality Filters | Stronger if volume peaks on C5 and oversold oscillator confirms. |
Quantified Strategies’ backtest shows that the Ladder Bottom pattern works as a bullish reversal about ~63% of the time under their criteria.
60. Concealing Baby Swallow Pattern
The Concealing Baby Swallow is a rare four-candle bullish reversal pattern. Concealing Baby Swallow forms after a decline and consists of two long red candles, followed by a gap-down Doji or small red candle, and finally a large red candle engulfing the prior two.
The first two candles show continued selling, the third reflects indecision with a gap, and the fourth engulfs the prior candles, trapping sellers. This sequence often precedes a bullish reversal.
The first two bodies are long and bearish, the third is a small red or Doji, and the fourth is large and bearish but sets up reversal. Shadows are minimal.
Psychologically, the pattern shows extreme selling that fails to continue. The final engulfing candle creates a short-term trap for bears, allowing buyers to step in.
At market bottoms, the pattern often marks capitulation. Its reliability increases with oversold conditions. It is rare and requires clear context to be effective. Without confirmation, it is unreliable.
| Summary of Concealing Baby Candle | |
| Pattern Name | Concealing Baby Swallow |
| Pattern Type | Bullish reversal (rare) |
| Characteristics | Four black (bearish) candles: first two long bearish with gaps down. Third is a small black candle gapping down (like a baby). Fourth is long black engulfing the third (swallow). Despite bearish look, signals selling exhaustion. |
| Preceding Trend | Steep downtrend. |
| Expectation | Panic selling climaxes; exhaustion gives room for reversal higher. |
| Trade Entry Point | Buy-stop above C4 high. |
| Stop Loss | Below pattern low. |
| Price Target | Swing resistance first; then 2–3R. |
| Quality Filters | Works best after prolonged selling with volume climax. Stronger if C4 close > mid-body of C2. |
WRTrading claims the pattern, while rare, can achieve up to a 75 % “success rate” in ideal conditions if combined with structure and volume confluence.
Download Candlestick Pattern Cheatsheet [PDF]
Click on the banner below to get the Candlestick Pattern Cheat Sheet. Print it & refer it while scanning candlestick patterns.
![Download Candlestick Pattern Cheat Sheet [PDF]](https://www.strike.money/wp-content/uploads/2023/08/Download-Candlestick-Pattern-Cheat-Sheet-PDF-1024x320.jpg "60 Essential Candlestick Patterns: Trading Guide for Beginners 93")
How to Identify Candlestick Patterns?
To accurately identify candlestick patterns, we need to analyze the 4 parameters.
- First, we need to understand the psychology behind candlestick formation as it represents the battle between buyers and sellers. Long bodies represent strong control of buyers if the candle is green or control of the seller if the candle is red. Small body candles represent indecisiveness in the market.
- Second, we should choose the right timeframe as candlestick looks differently across all time frames. Use 1-min, 5-min, 15-min charts for scalping and 1-hour, 4-hour, daily charts are best.
- Third, we look at the price chart to look for patterns such as Hammer, Doji, Spinning Top, Harami, Morning start or evening star. These patterns work better when combined with trend context. Look for reversal candlestick patterns at top and bottom and trend continuation after trend changes.
- Fourth, we use technical indicators such as RSI, EMA, BB, MACD and others for confirmation. For instance, If the stock shows a bearish reversal chart pattern and MACD giving sell signal, it adds extra confirmation.
Scanning Candlestick Patterns | Technical Analysis | For beginners and advanced traders | Strike
Here, in this video about candlestick patterns, our expert Shivam Gaba explains how to scan candlesticks using Strike.
According to Quantified Strategies’ research, candlestick pattern accuracy improves by 15–20% when combined with volume analysis. For instance, a Hammer near strong support with high volume is a powerful bullish reversal signal.
How to Trade with Candlestick Patterns?
Trading with candlestick patterns involves recognizing the setup, confirming the signal, and managing risk with clear entry and exit points.
- Recognizing the Setup: March 2020, during the COVID-19 crash, Reliance Industries had been in a prolonged downtrend. A Bullish Engulfing pattern formed near a key support level at ₹875, with higher-than-average volume.
- Confirming the Signal: The next trading session closed above the engulfing high, confirming bullish reversal intent.
- Entry: Traders entered above ₹900, once confirmation was seen.
- Stop-loss: Stop-loss placed below ₹850 (just under support and engulfing low).
- Exit: Target exit zone achieved as stock rallied to ₹1,100 within weeks.
- Risk Management: Risk per trade = Entry (₹900) – Stop-loss (₹850) = ₹50. Reward = Target (₹1,100) – Entry (₹900) = ₹200. Risk-Reward Ratio = 1:4, providing a high-probability, favorable trade setup.
A candlestick is not a standalone strategy but a tool that works best when combined with market context.
How Many Types of Candlestick Patterns are there?
There are five major types of candlestick patterns: bullish, bearish, continuation, reversal, and indecision patterns.
Bullish Candlestick Patterns
Bullish candlestick patterns indicate buyers are gaining control and price is likely to rise. This pattern usually appears after a downtrend.
There are 5 major types of Bullish Candlestick Patterns.
| Pattern | How to Read | Interpretation |
| Hammer | Small body at top, long lower wick | Indicates buyers rejected lower prices → potential bullish reversal |
| Morning Star | 3 candles: long red, small body, long green | Trend reversal from bearish to bullish |
| Bullish Engulfing | Small red candle followed by large green candle covering it | Buyers overtook sellers → trend reversal upwards |
| Piercing Line | First candle red, second green closes above 50% of red candle | Trend may reverse to bullish |
| Dragonfly Doji | Open, high, and close at same level, long lower wick | Buyers regained control → bullish signal |
Bearish Candlestick Patterns
Bearish candlestick patterns indicate sellers are gaining control and price is likely to fall. This pattern usually appears after an uptrend.
There are 5 major types of Bearish Candlestick Patterns
| Pattern | How to Read | Interpretation |
| Shooting Star | Small body at bottom, long upper wick | Indicates sellers rejected higher prices → potential bearish reversal |
| Evening Star | 3 candles: long green, small body, long red | Trend reversal from bullish to bearish |
| Bearish Engulfing | Small green candle followed by large red candle covering it | Sellers overtook buyers → trend reversal downwards |
| Dark Cloud Cover | First candle green, second red closes below 50% of green candle | Trend may reverse to bearish |
| Gravestone Doji | Open, low, and close at same level, long upper wick | Sellers regained control → bearish signal |
Continuation Candlestick Patterns
This candlestick pattern suggests that the current trend will continue either bullish or bearish. It shows the small pause before the trend resumes.
There are three major continuation candlestick patterns.
| Pattern | How to Read | Interpretation |
| Rising Three Methods | Long green candle, 3 small red candles, long green candle | Bullish trend continues after temporary pullback |
| Falling Three Methods | Long red candle, 3 small green candles, long red candle | Bearish trend continues after temporary pullback |
| Marubozu | Candle with no wicks (all body) | Strong trend momentum → continuation likely |
Reversal Candlestick Patterns
This candlestick pattern indicates that the current trend is about to change or reverse, from bullish to bearish or from bearish to bullish.
There are 4 major reversal candlestick patterns.
| Pattern | How to Read | Interpretation |
| Bullish Engulfing | See above | Downtrend → potential uptrend |
| Bearish Engulfing | See above | Uptrend → potential downtrend |
| Hammer / Shooting Star | See above | Trend may reverse after signal |
| Morning Star / Evening Star | See above | Trend changes direction |
Indecision Candlestick Patterns
This candlestick pattern indicated indecision in the market, where neither buyers or sellers are in control. This warns about possible reversal or small pause.
There are 3 major indecision candlestick patterns.
| Pattern | How to Read | Interpretation |
| Doji | Small or no body, long wicks | Market indecision → trend may pause or reverse |
| Spinning Top | Small body with long upper and lower wicks | Weak momentum → trend uncertain |
| Long-Legged Doji | Very long wicks on both sides | High volatility + indecision → look for confirmation |
How are Candlestick Patterns Formed on a Chart?
Candlestick patterns are formed by the interaction of open, high, low, and close prices within a given time frame. Each candlestick represents market psychology during that period, showing how buyers and sellers battled for control.
The body of the candle illustrates the difference between the opening and closing prices. A green (bullish) candle shows that the close was higher than the open, while a red (bearish) candle shows the close was lower than the open. The wicks or shadows mark the highest and lowest traded prices within the same session, highlighting intraday volatility.
Patterns emerge when multiple candles combine to show momentum shifts. For example, a Bullish Engulfing forms when a large green candle completely covers the previous red candle’s body, revealing buyer strength. Similarly, a Doji forms when the open and close are nearly the same, signalling indecision.
The reliability of these chart patterns increases when they occur at significant support or resistance zones. Traders also use volume confirmation, as strong patterns often align with higher trading activity. According to Bulkowski’s studies, pattern accuracy improves by over 10–15% when combined with market context rather than being used alone.
What are the Types of Assets that can be Traded with Candlesticks?
Candlestick patterns are used across multiple asset classes including equities, forex, cryptocurrencies, and derivatives like futures and options. They work because price action reflects trader psychology, which is consistent across markets.
1. Equity Trading with Candlesticks
Candlesticks are extensively used in equity trading to identify reversals, continuations, and breakout signals. Stock markets generate daily, weekly, and intraday candlestick charts, giving traders flexibility across timeframes.
A bullish engulfing Reliance Industries stock after a correction signals renewed buying strength.
In this chart, each candlestick represents one day of trading. The chart includes both green and red candlesticks, where green candlesticks indicate a price increase over the trading day (the closing price is higher than the opening price). Red candlesticks indicate a price decrease over the trading day (the closing price is lower than the opening price).
In this chart, a hammer candlestick is spotted and post which, the stock attained positive momentum. Historical studies show candlestick-driven equity strategies improve win rates by 10–15% when paired with volume analysis.
2. Forex Trading with Candlesticks
Candlestick patterns are critical in forex because currencies trade 24/5 and price action dominates over fundamentals in the short term. Patterns like Doji, Pin Bar, or Morning Star help identify turning points in major pairs like EUR/USD or GBP/JPY.
Since forex markets are highly liquid, candlestick signals often appear cleaner with less noise. According to research, Morning Star and Evening Star patterns show up frequently in forex charts and achieve accuracy rates above 70% when confirmed with support or resistance zones.
Candlestick analysis helps forex traders avoid fake breakouts and ride strong currency trends, making it a core tool for both day traders and swing traders.
This chart of EUR/USD is used to track daily price movements and recognize patterns in currency trading. The Bearish Engulfing pattern is highlighted in purple. This pattern occurs when a smaller green candlestick is followed by a larger red candlestick that completely engulfs the green one. This is a bearish signal, often indicating that a downward trend may be starting due to strong selling pressure.
3. Crypto Trading with Candlesticks
Cryptocurrencies use candlesticks extensively because of their volatility and round-the-clock trading. Bitcoin, Ethereum, and altcoins often form sharp candlestick structures such as Shooting Stars or Three Black Crows, which highlight sudden shifts in momentum.
In the above example, we have spotted an inside bar candlestick pattern. Observe how the market resumed the uptrend after breaking the high of an inside bar. This is how candlestick patterns are used to trade all sorts of capital markets including cryptocurrency markets.
4. Futures & Options Trading with Candlesticks
Candlestick analysis is widely applied in futures and options markets to anticipate price action in indices, commodities, and derivatives. Futures contracts like Nifty, S&P 500, or crude oil show patterns that guide both hedgers and speculators.
Options traders also rely on candlesticks to time entries for strategies like straddles or spreads. For example, a Doji near resistance might trigger a bearish options setup like a Put Ratio Spread.
In the image above the BankNifty Futures chart, the purple box highlights a Dragonfly Doji pattern. This pattern forms when the open, high and close prices are very close, but there is a long lower shadow below the body. It signals a potential reversal in the trend during future trading.
Candlesticks provide a visual framework for timing derivative trades, reducing guesswork in markets where leverage amplifies both profits and losses.
Which Timeframe is Best for Trading Candlesticks?
A common rule for choosing a timeframe is that the higher the timeframe, the more reliable the pattern. A bullish engulfing on a weekly chart signals far stronger conviction than the same on an intraday chart.
Shorter timeframes capture quick moves but produce more noise. Longer timeframes provide stronger signals as they compress market volatility into more reliable structures.
Typical trader alignment looks like this:
- Scalpers: 1-minute to 5-minute charts for scalp trading.
- Day Traders: 15-minute to 1-hour charts for intraday traders.
- Swing Traders: Daily charts for swing trading.
- Investors: Weekly or monthly charts.
In Which Market Conditions, Candlesticks Are Most Effective?
Candlestick patterns are most effective in trending markets with clear support and resistance zones. They lose reliability in choppy, sideways conditions.
In bullish or bearish trends, candlesticks capture shifts in momentum, helping traders time reversals or continuations. For example, a Morning Star at the bottom of a correction confirms a trend resumption.
In sideways ranges, patterns like Doji or Spinning Top appear frequently but produce false signals. Traders often misinterpret these as turning points when the price remains stuck.
Candlesticks work best with:
- High volume moves – Validates the conviction behind a candle.
- Breakouts from support/resistance – Adds confirmation.
- Strong underlying trend – Enhances predictive power.
Market conditions set the stage, and candlestick interpretation gains or loses value accordingly.
Why Candlestick Charts are Important?
Candlestick charts are important because they present price action and market psychology more clearly than line or bar charts. They allow traders to interpret sentiment at a glance.
The structure of the candle—open, high, low, and close—captures battles between buyers and sellers. A green candle reflects optimism, while a red candle signals selling pressure. Shadows highlight intraday volatility.
Candlestick charts offer advantages such as:
- Quick identification of reversals and continuations.
- Compatibility with any asset class.
- Flexibility across multiple timeframes.
In practice, candlestick charts are the universal language of traders. They help spot opportunities, confirm setups, and align with broader technical analysis strategies.
What are the Limitations of Candlestick Patterns?
The main limitation of candlestick patterns is that they are context-dependent and prone to false signals. They should not be used in isolation.
Patterns like Doji or Engulfing are common, but their meaning changes with market conditions. A Doji in the middle of a range carries little significance compared to one at resistance.
Other key limitations
- No predictive certainty – Success rates rarely exceed 70%.
- Subjective interpretation – Traders read patterns differently.
- Dependence on confirmation – Need support from volume or indicators.
- Reduced reliability in low-liquidity markets – False moves appear more often.
For example, a Bullish Engulfing in a thinly traded stock may appear strong but lack institutional support. Thus, candlesticks are powerful visual tools, but they require confirmation to become actionable.
How to Combine Candlesticks with Other Technical Indicators?
Candlesticks are best combined with volume, moving averages, momentum oscillators, and support-resistance analysis. This strengthens reliability and reduces false signals.
A candlestick on its own is just a snapshot. Adding indicators gives it context. For example, a Hammer near support confirmed by rising RSI carries much stronger conviction.
Below are some useful combinations.
| Combination | How It Works | Practical Use | Reliability Boost |
| Candlesticks + Moving Averages (MA, EMA, SMA) | Moving averages smooth out price action and define trend direction. Candlesticks give entry/exit signals in line with that trend. | Example: A Bullish Engulfing pattern above the 50-day EMA suggests trend continuation. A Shooting Star below the 200-day SMA signals potential breakdown. | Filters out trades against the broader trend. Increases conviction by aligning short-term candlestick signals with long-term trend bias. |
| Candlesticks + RSI (Relative Strength Index) | RSI measures momentum and overbought/oversold zones. Candlestick patterns at RSI extremes add strength to signals. | Example: A Hammer at support when RSI <30 is stronger, showing buyers stepping in at oversold levels. A Bearish Engulfing with RSI >70 indicates exhaustion. | Improves timing of entries/exits by combining price action with momentum context. |
| Candlesticks + MACD | MACD captures momentum shifts and trend reversals. Candlestick patterns around MACD crossovers or divergences are highly informative. | Example: A Morning Star during a bullish MACD crossover strengthens reversal conviction. A Dark Cloud Cover aligning with MACD bearish divergence warns of downside. | Adds early confirmation of momentum reversal. Reduces false positives in volatile ranges. |
| Candlesticks + Volume | Volume validates price moves. Strong candlestick signals on rising volume are more trustworthy. | Example: A Breakaway Gap with high volume signals genuine institutional interest. A Bullish Marubozu with weak volume is less reliable. | Confirms whether the candlestick is backed by strong participation or just noise. |
| Candlesticks + Support/Resistance | Key levels provide natural reversal/continuation zones. Candlestick signals are most effective near these levels. | Example: A Doji at major resistance signals stalling. A Piercing Line pattern at support suggests rebound. | Defines high-probability entry/exit points. Improves risk-reward ratios. |
| Candlesticks + Bollinger Bands | Bollinger Bands capture volatility extremes. Candlesticks near outer bands often indicate exhaustion or breakout. | Example: A Shooting Star at upper band warns of pullback. A Bullish Engulfing at lower band signals mean-reversion. | Prevents chasing extended moves. Combines volatility with price signals. |
| Candlesticks + Stochastic Oscillator | Stochastics refine overbought/oversold timing. Candlestick setups at extreme stochastic levels improve signals. | Example: A Morning Star when Stochastic <20 signals potential bottom. An Evening Star when >80 warns of reversal. | Helps fine-tune entries by reducing lag compared to RSI. |
| Candlesticks + Fibonacci Retracement | Fibonacci levels act as natural pullback/reversal points. Candlestick confirmation at these levels strengthens conviction. | Example: A Hammer at 61.8% retracement suggests strong bounce. A Bearish Harami at 50% retracement signals failed recovery. | Improves accuracy of identifying turning points within trends. |
| Candlesticks + Ichimoku Cloud | Ichimoku provides trend, momentum, and support/resistance in one view. Candlesticks around cloud boundaries offer powerful signals. | Example: A Bullish Engulfing above Kumo Cloud suggests breakout. A Shooting Star under resistance cloud signals rejection. | Adds multi-dimensional confirmation (trend + support + momentum). |
| Candlesticks + ATR (Average True Range) | ATR measures volatility. Candlestick patterns aligned with ATR expansion confirm stronger breakouts. | Example: A Marubozu with ATR rising signals trend continuation. A Doji with ATR contraction suggests indecision. | Helps distinguish valid breakout moves from low-volatility noise. |
| Candlesticks + Trendlines/Channels | Trendlines define dynamic support/resistance. Candlesticks provide confirmation of breaks or reversals. | Example: A Three White Soldiers breaking a descending trendline confirms reversal. A Shooting Star at channel top signals resistance. | Improves clarity in trend-based trading setups. |
| Candlesticks + Divergence (Price vs Indicator) | Divergences between price and momentum indicators often foreshadow reversals. Candlestick confirmation adds precision. | Example: A Bullish Divergence on RSI confirmed by a Morning Star = strong reversal signal. | Filters out weak divergence setups and sharpens entry points. |
Traders often develop checklists that demand candlestick confirmation plus indicator alignment before acting.
How to Learn Candlestick Patterns?
The best way to learn candlestick patterns is through reading books, research papers & implementing them through paper trading.
Top 10 books on candlestick patterns
| Book Title | Author(s) | Why It’s Recommended |
| Japanese Candlestick Charting Techniques | Steve Nison | The classic book that introduced Japanese candlestick analysis to Western traders; covers 50+ key patterns with clear explanations. |
| The Candlestick Course | Steve Nison | A practical workbook companion to Nison’s main book, featuring exercises, pattern tests, and real-world trading examples. |
| Encyclopedia of Candlestick Charts | Thomas N. Bulkowski | Features 100+ candlestick patterns with quantified performance statistics and historical testing across market conditions. |
| Beyond Candlesticks: New Japanese Charting Techniques Revealed | Steve Nison | Explores advanced Japanese techniques such as Renko, Kagi, and Three-Line Break charts for deeper analysis. |
| Technical Analysis of the Financial Markets | John J. Murphy | Comprehensive guide to technical analysis with a strong foundation in trend analysis and candlestick interpretation. |
| The Secret Code of Japanese Candlesticks | Felipe Tudela | Connects Japanese trading philosophy with Western techniques, helping traders understand the psychology behind patterns. |
| Encyclopedia of Chart Patterns | Thomas N. Bulkowski | Complements his candlestick encyclopedia; focuses on larger continuation and reversal patterns for complete market structure analysis. |
| Candlestick Charting Explained: Timeless Techniques for Trading Stocks and Futures | Gregory L. Morris | Practical and easy-to-apply guide that combines candlestick setups with momentum indicators like RSI and MACD. |
| The Art and Science of Technical Analysis | Adam Grimes | Offers a data-driven approach to pattern analysis, emphasizing context, trend strength, and probability-based trading. |
| Trading Price Action Series (Reversals / Trends / Ranges) | Al Brooks | Deep dive into micro price action and candlestick behavior; perfect for experienced traders seeking precision and nuance. |
Top 10 Candlestick Patterns Research Papers
| Title | Authors / Year | Findings |
| Candlestick Technical Trading Strategies: Can They Create Value for Investors? | Osler & Taylor, 2005 | Found that traditional candlestick strategies do not generate consistent excess returns; profitability improves only when combined with trend filters or volume confirmation. |
| On the Effectiveness of Candlestick Chart Analysis for the Brazilian Stock Market | Prado et al., 2015 | Certain patterns (e.g., Engulfing, Morning Star) showed statistical significance only in strongly trending markets, confirming that market regime impacts reliability. |
| A Statistical Analysis of the Predictive Power of Japanese Candlestick Charts | Caginalp & Laurent, 1998 | Found limited standalone predictive power; accuracy improved when paired with momentum or moving-average indicators. |
| Short-Term Stock Market Prediction Based on Candlestick Pattern Recognition | Qian et al., 2017 | Machine learning applied to candlestick data improved predictive accuracy by 10–15% compared to raw rule-based pattern recognition. |
| Encoding Candlesticks as Images for Pattern Classification Using GAF-CNN | Zhang et al., 2020 | Deep learning approach achieved over 90% classification accuracy for major candlestick patterns, showing strong potential for algorithmic identification. |
| Profitability of Candlestick Charting Patterns in the Stock Exchange Market | Ali et al., 2019 | Found that bullish patterns outperform bearish ones, but both lose effectiveness in high-volatility or sideways markets. |
| Improving Stock Trading Decisions Based on Pattern Recognition and Machine Learning | Lin et al., 2021 | Combining candlestick features with ML models improved profitability by 18% compared to using candlesticks alone. |
| Candlestick Pattern Research Analysis: Future and Beyond (Systematic Literature Review) | Sharma et al., 2023 | Review of 80+ studies found mixed results — most conclude candlesticks are context-dependent and perform best when combined with trend or volume signals. |
| Validation of Candlestick Patterns as a Technical Indicator for Stock Prediction | Rahman et al., 2023 | Empirical tests showed significant predictive accuracy (~70%) when combining candlestick recognition with volatility filters. |
| Stock Price Prediction Using Candlestick Patterns and Sparrow Search Algorithm | Liu et al., 2022 | Hybrid model integrating candlestick signals and metaheuristic optimization achieved higher prediction accuracy (up to 86%) versus traditional models. |
Learning is about pattern recognition and context. The more charts you observe, the sharper your interpretation becomes.
Are Candlestick Patterns Reliable?
Candlestick patterns are not failproof & can produce false signals sometimes in volatile or sideways markets. To increase their reliability, we need to use other technical indicators for confirmation.
Here are top 10 most reliable candlestick patterns ranked based on years of research & backtesting.
| Candlestick Name | Average Reliability, Source | Best Timeframe | Ideal Confirmation Filter |
| Three Line Strike | ~84% — Thomas N. Bulkowski, Encyclopedia of Candlestick Charts (2008) | Daily / Weekly | Volume >120% of average + breakout above pattern high |
| Three Black Crows | ~78% — Bulkowski (2008) | Daily | RSI >65 + close below support |
| Morning Star | ~76–80% — Prado et al., On the Effectiveness of Candlestick Chart Analysis (2015) | Daily / Weekly | Bullish confirmation candle + volume surge |
| Evening Star | ~75–78% — Prado et al. (2015) | Daily | Bearish confirmation + RSI drop below 60 |
| Bullish Engulfing | ~63–70% — Osler & Taylor, Candlestick Technical Trading Strategies (2005); Bulkowski (2008) | Daily | Volume confirmation + MACD crossover |
| Bearish Engulfing | ~70–74% — Osler & Taylor (2005); Bulkowski (2008) | Daily | RSI >70 + bearish follow-through |
| Three White Soldiers | ~80–90% (ideal) — LuxAlgo (2023); Bulkowski (2008) | Daily / Weekly | Volume confirmation + strong trend context |
| Hammer | ~60–68% — Caginalp & Laurent, Statistical Analysis of Japanese Candlestick Charts (1998); Bulkowski (2008) | Daily | Volume spike + confirmation candle |
| Shooting Star | ~65–70% — Caginalp & Laurent (1998); Bulkowski (2008) | Daily | Appears near resistance + RSI >65 |
| Piercing Line | ~65% — Prado et al. (2015); Bulkowski (2008) | Daily | Close above midpoint + high volume |
No single pattern works in every situation. The best pattern is one confirmed by trend, support/resistance, and volume. For example, a Morning Star at a long-term support with high volume is far stronger than a random Doji mid-trend.
What is the 5 Min Candle Strategy?
The 5-minute candle strategy is a short-term trading approach where traders base decisions on candlestick formations in 5-minute intervals. It is popular among day traders and scalpers looking to capture quick price moves within the session.
Select the 5 min timeframe and look for candlestick patterns like Engulfing, Doji, or Pin Bar to spot reversals or continuations in real time. One example of a 5 min candle strategy is using RSI with candlestick.
When RSI crosses above 70 or below 30, it indicates an overbought and oversold zone. In this condition, price reverses or takes a pullback where traders can plan reversal trades by spotting RSI overbought or oversold with trend reversal candlest pattern. Put your stop loss above trigger candles high in case of short trade or candles low in case of long trade.
What is a 3 Candle Rule?
The 3 candle rule is a trading guideline that uses three consecutive candlesticks to confirm a potential market direction. It usually involves two setup candles followed by a third that validates the trend.
To trade this pattern, plan for short if stock shows three consecutive falls on top, either higher high or lower high or near resistance and plan for long trade if stock forms three consecutive buying at bottom, either lower high or lower low or support. .
Put your stop loss below the low of the second candle for buying and above the high of the second candle.


 Previous Article


 2026: Features, Pros vs Cons, Pricing, Reviews, Is It Worth It? 128")
 2026: Features, Pros vs Cons, Pricing, Reviews, Is It Worth It? 129")
 2026: Features, Pros vs Cons, Pricing, Reviews, Is It Worth It? 130")


 : Definition, Formula, calculation, Uses, Advantages Vs limitations 134")


No Comments Yet.