Bearish Harami: What is It, Variations, Trading Strategy with Backtest Result


 Author

 Editor
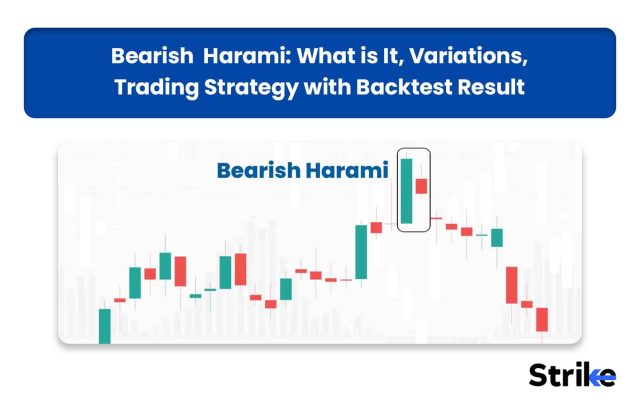
Bearish harami is one of the most popular Bearish reversal candle patterns that helps traders to identify shifts in momentum from buying to selling. The Bearish harami pattern is widely used by traders to identify potential exit points for their long positions or to plan short trades across all assets like crypto, forex, commodity, and equity.
The Bearish harami pattern originated from Japanese candlestick in the 18th century and was later introduced to global traders through Steve Nison’s work on candlestick analysis. The word harami means pregnant in Japanese. Visually the harami pattern looks like a baby (small Bearish candle) inside the mother (the large Bearish candle, hence the pattern also known as Pregnant Lady Pattern.
What Is a Bearish Harami?
Bearish Harami is a bearish reversal candlestick pattern that suggests the reversal of trend from bullish to bearish. It is a two candle pattern and appears at the end of the uptrend with a large bullish candle (mother candle) followed by a smaller bearish candle (baby candle) that forms completely within the body of the first candle. Ideally a baby candle should be 25% or less of the mother candle body.
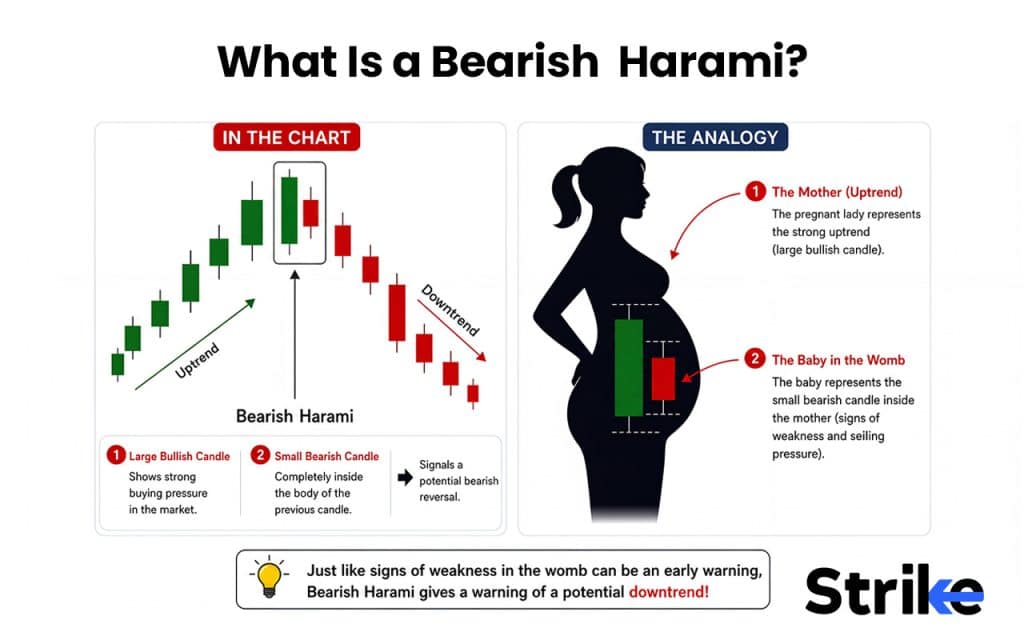
Unlike other bearish reversal candlestick patterns, bearish harami gives an early signal of change in sentiment which later gets confirmed by the confirmation candle.
Is the Bearish Harami Bearish or Bullish?
As the name suggests, a Bearish harami is a Bearish reversal candle pattern that suggests potential change in a trend from bullish to bearish. However, whether the trend will actually reverse depends on the next candle. Bearish harami is just a warning signal, if the next candle closes below the pattern’s low, it confirms pattern and trend reversal.
According to Thomas Bulkowski’s study on bearish harami, trading standalone bullish harami without confirmation candle has success of 43%, but when traded with market context and confirmation, the success rate jumped significantly.
What does the Bearish Harami Pattern Indicate?
The Bearish harami pattern indicates the slowing of ongoing bullish momentum and entry of sellers. The first large bullish candle of the pattern shows optimistic buying, while a small red candle suggests indecision and a reduction in buying pressure. This means that sellers are absorbing the buying pressure and can possibly overpower the buyers. If the next candle breaks the low of the pattern, it confirms that the sellers have taken control and momentum has shifted to bearish.
How to Identify a Bearish Harami
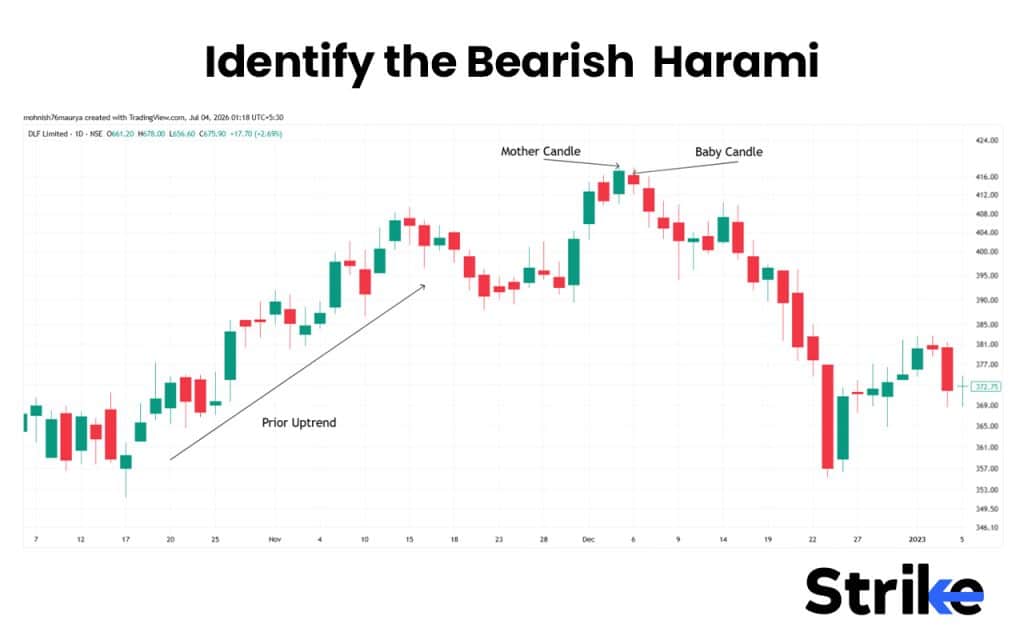
There are five simple steps to identify a bearish harami pattern. The steps involve identifying the prior trend, looking for first candle, second candle, and confirmation.
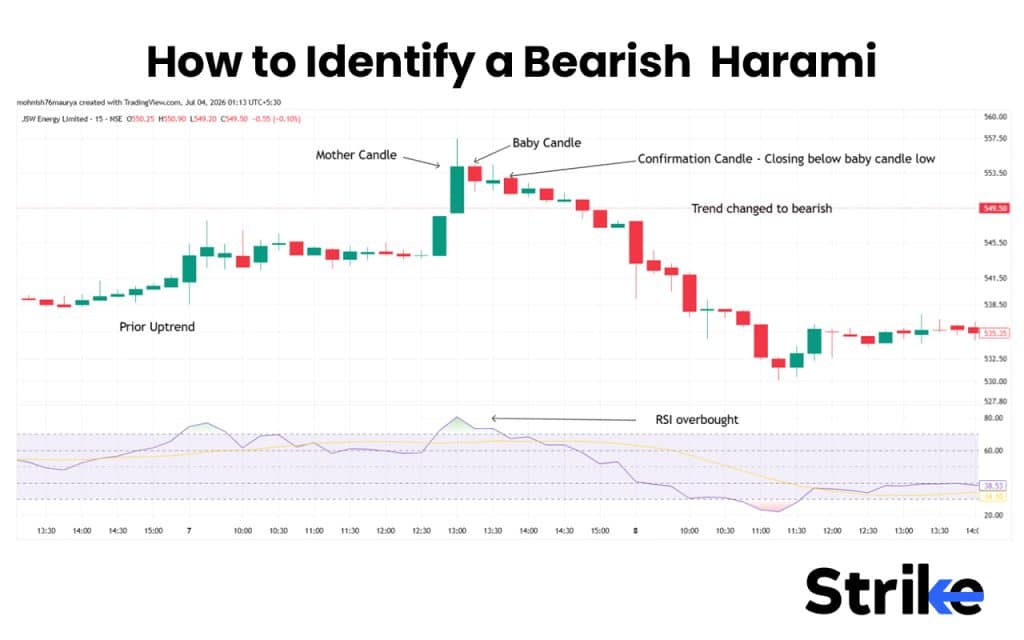
- A Prior Uptrend Must Exist: A bearish harami pattern always forms after a sustained uptrend. If it forms in a range bound or sideways market, it loses its significance. Hence, first identify whether the prior trend is bullish.
- First Candle Should Be Large and Bullish: Check whether the first candle (mother candle) of the pattern is a large bullish candle with minimum wick. The body of the mother candle should cover at least 70-75% of the total range of the body. This suggests a strong buying pressure and control of buyers in the market.
- Second Candle Should Be Smaller: The second candle (baby candle) should be a small bearish candle that stays within the body of the first bearish candle (mother candle). The baby candle should not be more than 25% of the mother candle. This reflects a slowdown in bullish momentum. If possible, look for a gap between the mother candle and baby candle, because in traditional Japanese candlestick theory, the second candle opens a gap down from the first candle.
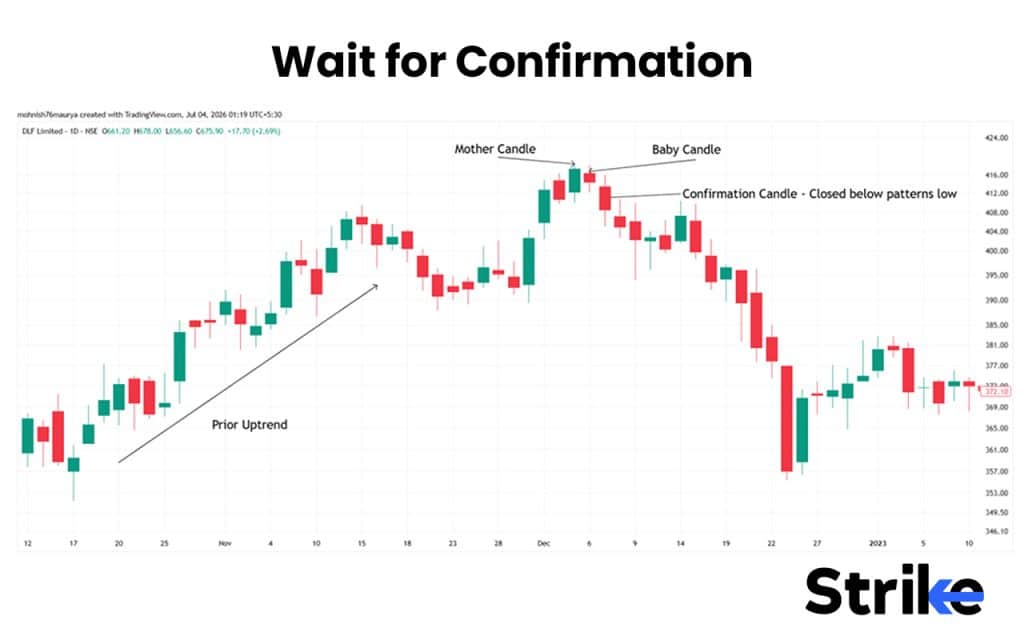
- Look for Confirmation: The next candle close decides whether the bearish harami is valid or not. The next candle should close below the low of the pattern to confirm the reversal.
The reliability of the pattern increases even more when it appears near the key resistance level or an overbought condition.
Is a Bearish Harami a Sell Signal?
Not directly. Bearish harami is not an immediate sell signal, it is just a signal of weakening buying pressure and possible bearish reversal. Whether to actually sell depends on the next candle (confirmation candle).
Consider bullish harami as a sell signal only when the confirmation candle closes below the low of the pattern. Traders who entered aggressively without confirmation carries roughly 2–3x more risk than those who wait for confirmation.
The Psychology Behind the Bearish Harami Pattern
The bearish harami pattern shows the psychological shift from optimism to pessimism where buyers start to fall weak and gradually sellers enter to take control. Lets understand it candle by candle.
- First Candle (Mother Candle): The first large bullish candle suggests an aggressive buying driven by optimism. At this point buyers expect the market to continue rising.
- Second Candle (Baby Candle): At this point, sellers enter the market and start absorbing buying pressure, forming a small bearish candle within the range of the first bullish candle (mother candle). Here, the market has entered a state of indecision, signalling a trend could reverse.
- Confirmation Candle: Sellers aggressively enter the market after buyers get exhausted and push the price lower. This forms a large bearish candle that closes below the pattern’s low, confirming the trend reversal.
Hence, bearish harami does not indicate reversal immediately, it initially suggests that buyers dominance is weakening and sellers are entering. Whether the trend will reverse or not depends on the next candle after the pattern. If the bearish harami forms near a technical or psychological key level, institutions are likely placing limit orders there to absorb buying pressure.
3 Bearish Harami Variations We See on Charts
There are three variations of bearish harami patterns based on the formation of a second candle and surrounding price action. All of this variation still signals weakening of buying pressure but differs in signalling strength of reversal signal.
1.Bearish Harami Cross
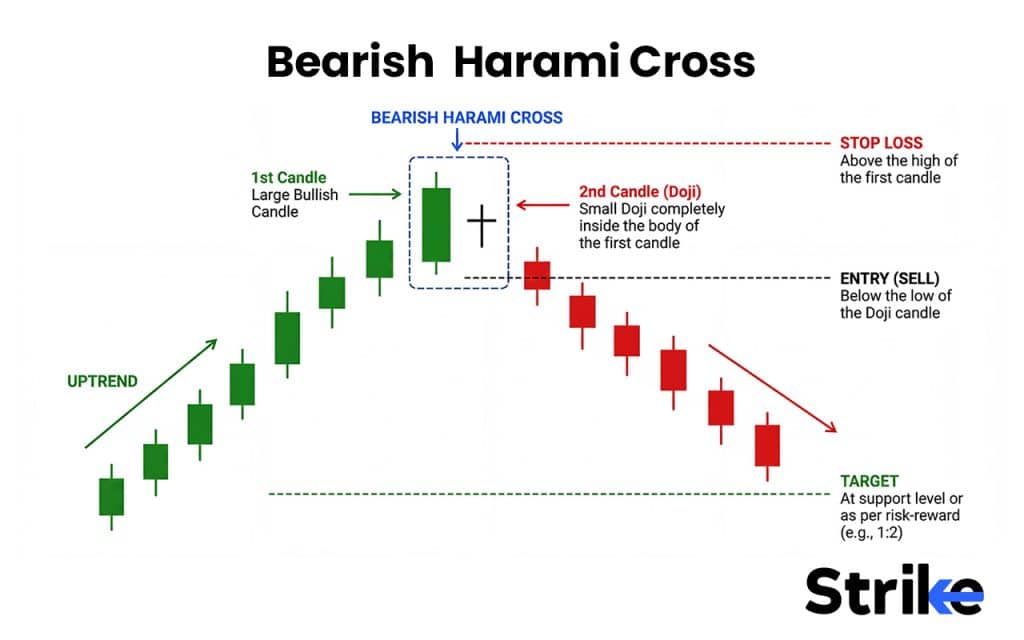
Bearish Harami cross is the strongest pattern in bearish harami variation. In this variation, the second candle (baby candle) forms as a doji instead of a small body candle. This Doji signals that buyers have completely lost their momentum and they couldn’t even close the candle in their favour. This makes the reversal signal significantly more powerful.
2. Hidden Bearish Harami
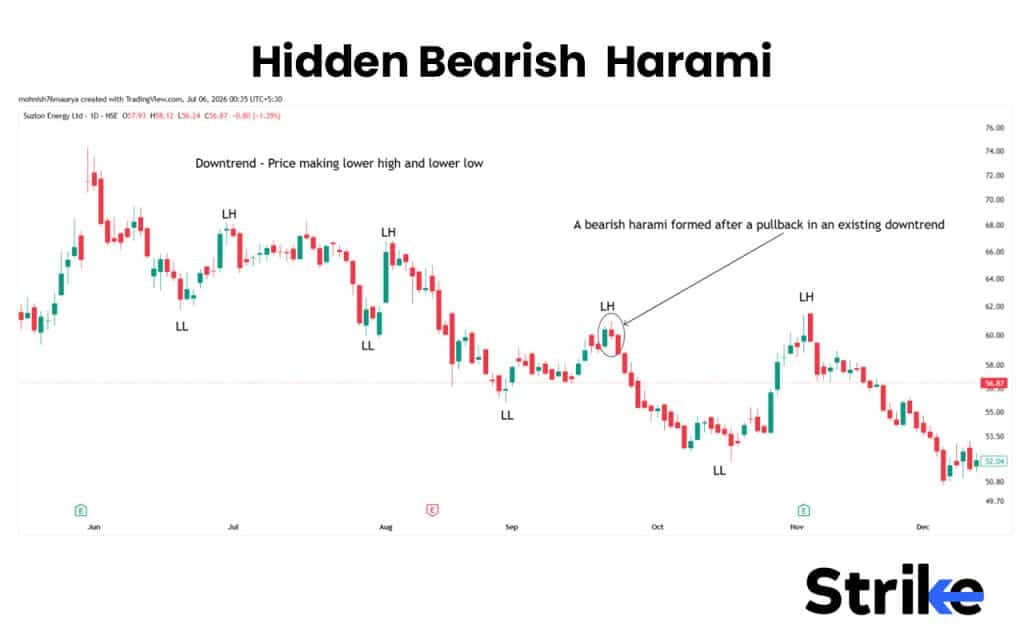
Hidden bearish harami is psychologically similar to traditional bearish harami, but differs in the market context. Unlike traditional bearish harami which appears at the end of the uptrend, hidden bearish harami appears after a pullback in an existing downtrend.
Therefore along with the current timeframe trend, broader timeframe trend also matters while identifying hidden bearish harami. As this pattern appears after a pullback, the pullback should be healthy. If pullback retraces 38–50% of the prior downleg (Fibonacci confluence), it is considered a healthy pullback and bearish harami forming here are highly reliable.
3. Bearish Belt Hold
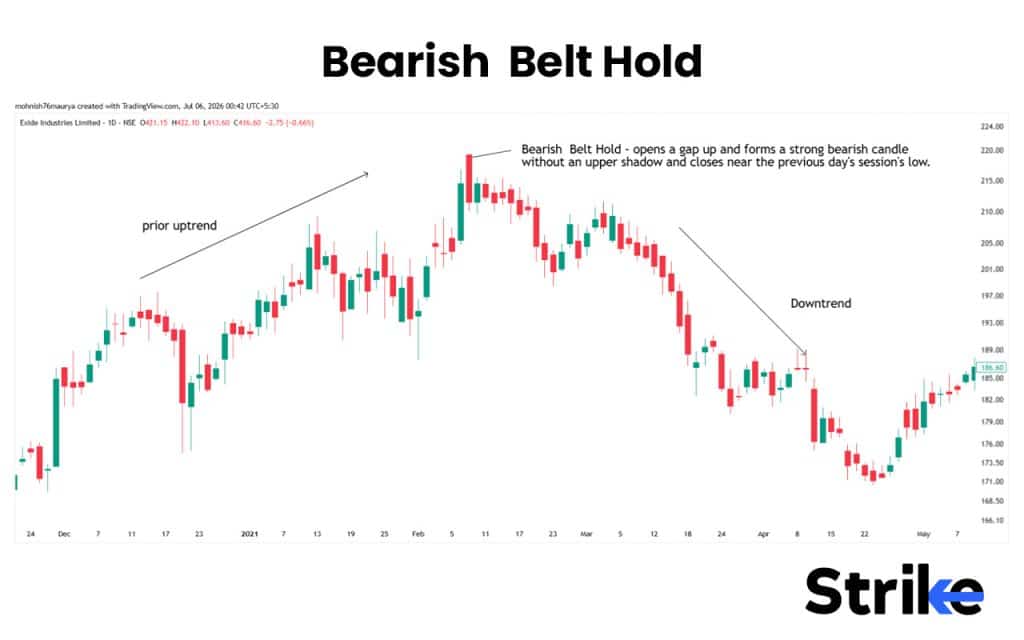
Bearish Belt Hold is a single candlestick bearish reversal pattern that carries the same psychology as Bearish harami. Unlike other two variations, the Bearish belt hold delivers a reversal message in just one powerful candle rather than two.
In a bearish belt hold, one of the more aggressive Candlestick patterns, the candle typically opens with a gap up and forms a strong bearish body. A gap-up of at least 1–2% strengthens such Candlestick patterns significantly, as it shows a rapid rejection of higher prices and a close near the previous day’s low.
| Quick Comparison of All Three Variations | ||||
| Variation | Candles | Signal Type | Strength | Best Used When |
| Bearish Harami Cross | 2 | Reversal | Strong | At key resistance after uptrend |
| Hidden Bearish Harami | 2 | Continuation | Moderate-Strong | During pullback in downtrend |
| Bearish Belt Hold | 1 | Reversal | Moderate-Strong | After uptrend with high volume |
| Classic Bearish Harami | 2 | Reversal | Moderate | After uptrend with confirmation |
How to Trade the Bearish Harami? [With Real Chart Example]
There are six steps to trade Bearish harami candle patterns. The steps are briefly discussed below.
- Identify the Trend: First identify the clear uptrend, because the valid bearish harami form after a sustained uptrend. There should be at least 3–5 consecutive bullish candles. Bearish harami forming in a sideways market is usually less reliable.
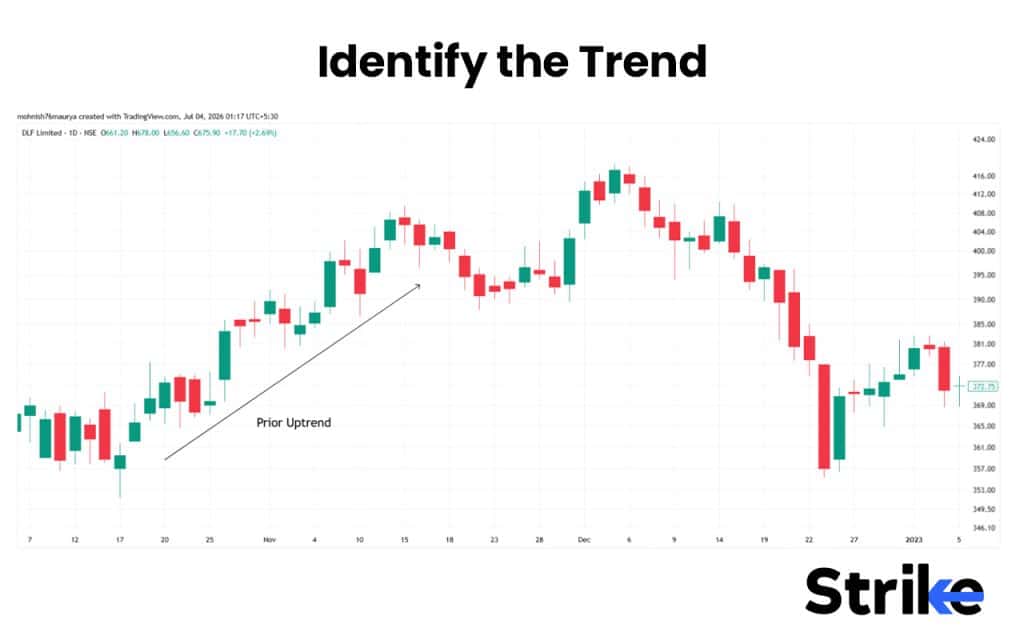
- Identify the Bearish Harami: A valid bearish harami has the first candle strongly bullish (mother candle) and second candle (baby candle) small bearish that remains inside the range of the first candle (mother candle). If you find a gap-down opening in the second candle, its signal is even stronger. In our example, BHEL formed a Bearish harami pattern near the end of Feb month.
- Wait for Confirmation: Avoid entering immediately after identifying a valid bearish harami. Confirm the pattern with the next candle (confirmation candle) close. If the next candle closes strongly below the low of the pattern, it confirms the pattern. In our example, it did close above the pattern’s high, but the candle formed was doji. However the next candle after doji was a strong bullish candle, suggesting buyers entry. Remember, the confirmation candle only conforms to pattern no reversal.
- Enter the Trade: Enter a short trade after the pattern gets confirmed. We entered on doji formation.
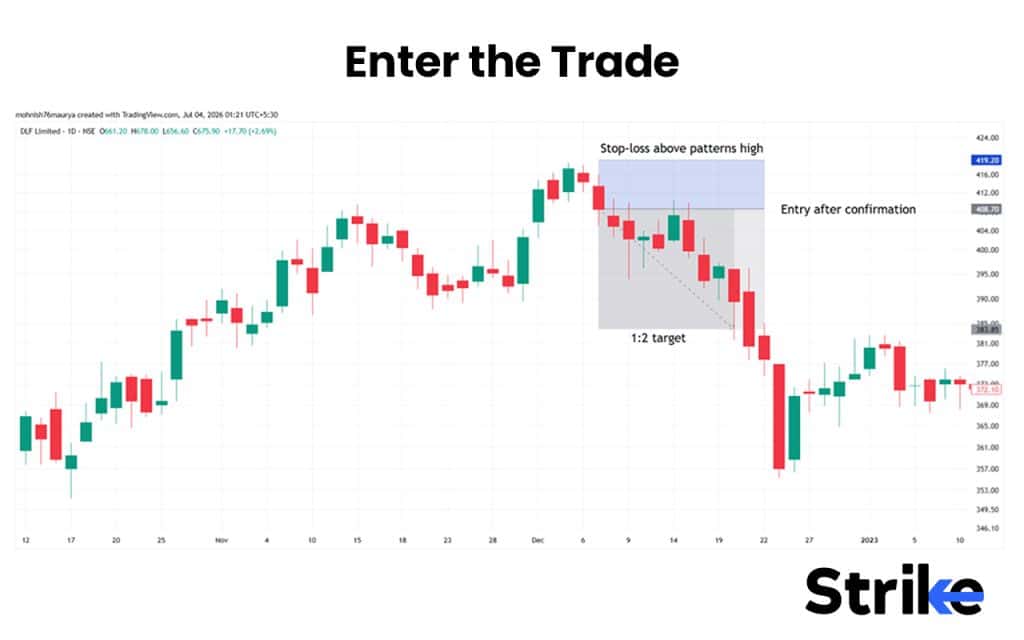
- Place the Stop-Loss: Put your stop-loss above the high of the pattern to minimize the loss.
- Book Profits: Set profits based on risk-reward ratio or aim for the next key support level. 1:2 is the ideal RR ratio for a Bearish harami pattern.
Treat the Bearish Harami as a setup, not a trade. The trade begins only after price confirms the reversal with a Bearish breakout.
How to Confirm a Bearish Harami Trading Setup?
There are four important points to check to confirm bearish harami setup. These points include checking confirmation candles, high trading volume, technical level, and use of momentum indicators. Confirmation helps reduce false signals and improves the probability of a successful trade.
- Confirmation Candle: A bearish harami can be confirmed by the next candle close known as confirmation candle. If the confirmation candle closes strongly below the patterns low, it shows that sellers have now taken control and the trend is more likely to reverse.
| Third Candle Behavior | Signal Strength | Action |
| Closes bearish below baby candle’s low | Strong | Consider entering |
| Closes bearish below mother candle’s midpoint | Very Strong | High confidence entry |
| Closes below mother candle’s low(breakout) | Extremely Strong | Strong entry signal |
- Higher Trading Volume: A confirmation candle breaking the low of the pattern with a strong volume or volume greater than average, ideally be 1.5x or more than the 20-day average volume increases patterns reliability. Low volume breakdowns are usually less reliable.
- Formation Near a Strong Support Level: Bearish harami reliability further increases when it appears near a key resistance level. These resistance levels could be horizontal, trendline, moving averages or Fibonacci levels.
- Momentum Indicator Confirmation: Momentum indicators like RSI and MACD are commonly used to add extra confirmation to the pattern. Bearish harami forming during the RSI overbought conditions support trend reversal after an overextended rise. MACD bearish crossover after a bearish harami formation also adds extra confirmation.
Hence, my keeping above the points in mind you can confirm whether the pattern is genuine or fake while identifying bearish harami,
How to Scan for Bearish Harami Patterns?
You can scan bearish harami patterns using a screener like Chartink, Strikemoney, Tradingview, or Screener. These screeners already have predefined rules to find out bearish harami patterns.
The core logic given to the screener to filter out bearish harami is given below in the table.
| Condition | Rule |
| Prior trend | Stock should be in an uptrend leading into the pattern |
| Candle 1 (Day 1) | Large bullish (green) candle |
| Candle 2 (Day 2) | Small bearish (red) candle |
| Containment | Candle 2’s entire body (open & close) must fall within Candle 1’s body range |
| Color context | The last candle must be red, appearing after an up-trending stock |
| Prior uptrend | Above 50-EMA uptrend, below 50 EMA downtrend |
Using this logic, you can also code it yourself for custom backtest using python programming.
Can Bearish Harami Setup Fail?
Yes, bearish harami setup can fail, because just like other candlestick patterns, bearish harami also signals potential reversal not a guaranteed reversal. It does not matter how confirmed the signal you get, if the buyers are strong, they will regain control over the market.
There are five major scenarios where a bearish harami pattern fails. These scenarios are briefly discussed below.
- No Bearish Confirmation: A bearish harami without a strong strong bearish confirmation candle is more prone to fail.
- Strong Uptrend: If bearish harami forms in a strong uptrend, the chances are high that the bearish harami will result in only a temporary pause before the uptrend resumes.
- Forms Away from Resistance: bearish harami pattern is only valid after a sustained uptrend. If it forms anywhere randomly in the middle of the trend or in a sideways market, the pattern is then most likely to fail.
- Weak Selling Volume: If the confirmation candle has a low volume, it signals that sellers lack the strength to sustain the reversal.
- Positive Market Sentiment: Even a perfect bearish harami pattern can fail if the market sentiment turns positive.
A bearish harami formed in strong uptrend like trading above 200 or 50 EMA fails on a higher rate compared to bearish harami forming below 200 or 50 EMA. Similarly, if bearish harami forms in RSI overbought condition, but the higher timeframe RSI is bullish (above 60), the pattern is then more likely to fail.
How Reliable is Bearish Harami Pattern?
The Bearish Harami pattern is a moderately reliable candlestick pattern when traded with a write market context. Trading bearish harami pattern only has even less reliability and win rate because this pattern has meaning if traded with a write market context. Thomas Bulkowski ranks this pattern at 72 amongst 103 candlestick patterns. QuantifiedStrategies backtested the bearish harami pattern on S&P 500 for the last 20 years and found a 47% win rate.
Our Backtesting Results with Bearish Harami Pattern
At Strike Money, we manually backtested 100 Bearish Harami patterns on NSE-listed large- and mid-cap stocks to evaluate how consistently the pattern identifies bearish reversals. We found that the standard Bearish Harami pattern achieved a 51% win rate when traded only after a confirmed bearish breakdown. Through Backtesting, we applied an additional filter by selecting only those setups where the RSI was above 70 before the pattern formed. This rigorous Backtesting approach reduced the number of qualifying trades but improved the quality of the setups, increasing the win rate to 59%.
Backtest Setup
| Backtest Parameter | Details |
| Pattern Tested | Standard Bearish Harami Pattern |
| Market | NSE-listed large- and mid-cap stocks |
| Timeframe | Daily chart |
| Trade Direction | Short (Bearish) |
| Entry Rule | Sell after the price closes below the Bearish Harami low |
| Alternative Entry | Sell on a pullback after the breakdown |
| Stop-Loss Rule | Above the Bearish Harami high |
| Target Rule | Minimum 1:2 risk-reward ratio or the next support level |
| Risk Rule | Minimum 1:1.5 risk-reward ratio |
| Confirmation Used | Prior uptrend, bearish confirmation candle, above-average volume, and RSI above 70 |
| Avoided Setups | Sideways markets, weak confirmation, and low-volume patterns |
Backtest Logic
The backtest followed the eight rules below:
- Identify a strong prior uptrend.
- Confirm a valid Bearish Harami formation.
- Prefer setups where the RSI is above 70 before the pattern forms.
- Wait for a bearish close below the pattern’s low.
- Enter on the confirmation candle or on a pullback after the breakdown.
- Place the stop-loss above the pattern’s high.
- Target the next support level or maintain a minimum 1:2 risk-reward ratio.
- Exit early if a strong bullish reversal signal appears.
| Backtest Result Summary | ||
| Metric | Standard Bearish Harami | Bearish Harami + RSI > 70 |
| Total Patterns Tested | 100 | 49 |
| Winning Trades | 51 | 29 |
| Losing Trades | 49 | 20 |
| Win Rate | 51% | 59% |
| Average Risk-Reward | 1:1.9 | 1:2.1 |
| Average Winning Trade | 5.9% | 6.6% |
| Average Losing Trade | 3.2% | 3.1% |
Key Findings
- The standard Bearish Harami pattern delivered a 51% win rate when traded after a confirmed bearish breakdown.
- Filtering setups using RSI above 70 improved the win rate to 59% while reducing the total number of trades from 100 to 49.
- Pullback entries after the breakdown generally offered a better reward-to-risk ratio than entering immediately after confirmation.
- Bearish Harami patterns confirmed by above-average trading volume outperformed those accompanied by weak volume.
- The pattern produced the most reliable results after extended rallies near major resistance levels and was significantly less effective during sideways or low-momentum markets.
What Are the Best Timeframes & Markets to Trade Bearish Harami?
Higher timeframes like daily and weekly are considered to be the best timeframe to trade bearish harami patterns, because it contains less market noise, whereas lower timeframes like 5min or 15 min give frequent trading signals, but most of them turn out to be false.
| Timeframe | Best For | Reliability |
| 5–15 Minutes | Intraday Trading | Moderate |
| 30 Minutes–1 Hour | Intraday & Swing Trading | Good |
| 4 Hours | Swing Trading | High |
| Daily | Swing & Positional Trading | Very High |
| Weekly | Long-term Investing | High (Less Frequent) |
The best markets to trade Bearish harami are usually those with a high liquidity. Professionals usually use more than a single timeframe (Multitimeframe) to understand a broader view of the market.
Does Candle Colour Matter in a Bearish Harami?
Yes, candle colour matters in a bearish harami pattern. The first candle (mother candle) in bearish harami should always be bullish colored reflecting buying pressure. The second candle (baby candle) should be in red representing the seller’s entry. If the second candle also forms green, this pattern usually indicates a pause in buying rather than a bearish reversal.
Where does a Bearish Harami Form on a Trend?
Bearish harami patterns usually form at the end of the strong uptrend, where buyers start losing control and sellers actively participate to take control. This leads to a shift in momentum from bullish to bearish.
Common Mistakes to Avoid While Trading Bearish Harami
There are five common mistakes to avoid while trading Bearish harami. The mistakes are briefly discussed below.
- Selling Without Confirmation: Avoid entering immediately after a bearish harami candle forms. Wait for a confirmation through a confirmation candle, volume, or momentum indicator.
- Ignoring the Overall Trend: A valid bearish harami forms after a sustained uptrend. Hence, trade bearish harami with the right trend context.
- Ignoring Trading Volume: If price breaks patterns low with low volume, it indicates lack of sellers conviction, hence try to avoid such low probable setups. Look for breakdown with more than average volume.
- Placing Tight Stop-Loss: Keeping very tight stop-loss can result in premature exit due to normal market fluctuation. Place stop-loss a little higher from the patterns valid high.
- Risking Too Much on One Trade: Risk only 2-3 % of the total capital, maintaining risk reward and position sizing.
Avoiding these common mistakes can significantly improve the reliability of Bearish Harami trades. Always wait for confirmation and follow proper risk management instead of trading the pattern alone.
Bearish Harami vs Other Reversal Patterns
The Bearish Harami is one of many Bearish reversal candlestick patterns. While all reversal patterns aim to identify a potential change in trend, they differ in structure, strength, and the type of market psychology they represent.
The table below compares the Bearish Harami with some of the most popular Bearish reversal patterns.
| Pattern | Candles | Primary Signal | Strength |
| Bearish Harami | 2 | Buying momentum is weakening; potential bearish reversal after confirmation | Moderate |
| Bearish Engulfing | 2 | Sellers completely overpower buyers, signalling a strong bearish reversal | Strong |
| Evening Star | 3 | Transition from bullish to bearish sentiment with strong confirmation | Very Strong |
| Dark Cloud Cover | 2 | Sellers regain control after a strong bullish candle | Strong |
| Shooting Star | 1 | Buyers fail to sustain higher prices; selling pressure emerges | Moderate to Strong |
| Bearish Belt Hold | 1 | Aggressive selling begins immediately after a gap-up opening | Moderate to Strong |
| Hanging Man | 1 | Buying pressure weakens near the top of an uptrend; confirmation required | Moderate |
The Bearish Harami is one of many Bearish reversal candlestick patterns. While all reversal patterns aim to identify a potential change in trend, they differ in structure, strength, and the type of market psychology they represent.
Difference between Bearish Harami vs Bullish Harami
The difference between bearish harami and bullish harami is briefly discussed below in the table.
| Feature | Bearish Harami | Bullish Harami |
| Market Trend | Forms after an uptrend | Forms after a downtrend |
| Expected Signal | Bearish reversal | Bullish reversal |
| First Candle | Large bullish (green) candle | Large bearish (red) candle |
| Second Candle | Small bullish or bearish candle inside the first candle’s body | Small bullish or bearish candle inside the first candle’s body |
| Market Psychology | Buyers are losing momentum and sellers are starting to gain control | Sellers are losing momentum and buyers are starting to gain control |
| Confirmation | Price closes below the Harami low | Price closes above the Harami high |
| Typical Trading Action | Consider short-selling after confirmation | Consider buying after confirmation |
| Stop-Loss | Above the Harami high | Below the Harami low |
| Best Location | Near a major resistance level or after a strong rally | Near a major support level or after a strong decline |
| Reliability | Moderate; stronger with bearish confirmation and high volume | Moderate; stronger with bullish confirmation and high volume |
| Trader Bias | Bearish | Bullish |
Hence, while their structure may be identical, their interpretation differs from a bullish harami based entirely on prior trends. Unlike the bullish harami, which is found in a downtrend, these patterns must be analyzed within their specific market context to avoid misidentification.

 5 mins