


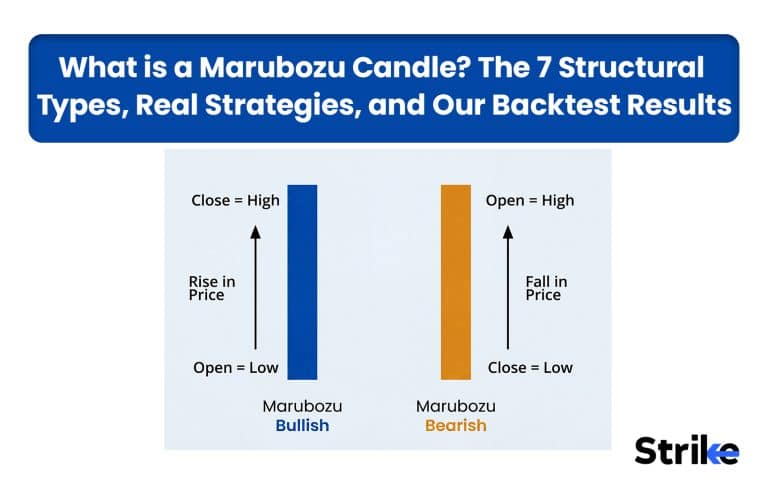


Marubozu is one of the strongest candlestick patterns used in technical analysis that shows the dominance of either strong buyers or strong sellers. Marubozu helps traders to understand who is currently controlling the market and what could be the next probable move of the market. A marubozu can signal a trend reversal, trend continuation, breakdown or breakout.
The marubozu candle originated from a Japanese candlestick in the 18th century and since then many traders actively use it for its reliability. It has a win rate of above 55% according to backtested results by Thomas Bulkowski. He also found that the reliability of the pattern increases further if combined with proper market context. In this we will learn about marubozu in detail with the real time example.
What is a Marubozu Candle?
Marubozu candle is a single candlestick pattern that represents the dominance of either buyers or sellers in the market. It usually has a strong real body with negligible or no shadow which means the candle opened and closed exactly at highs and lows. The word “Marubozu” is taken from japanese which means “bald” or “shaven head,” referring to candlestick with no shadow.
What Does a Marubozu Candle Mean?
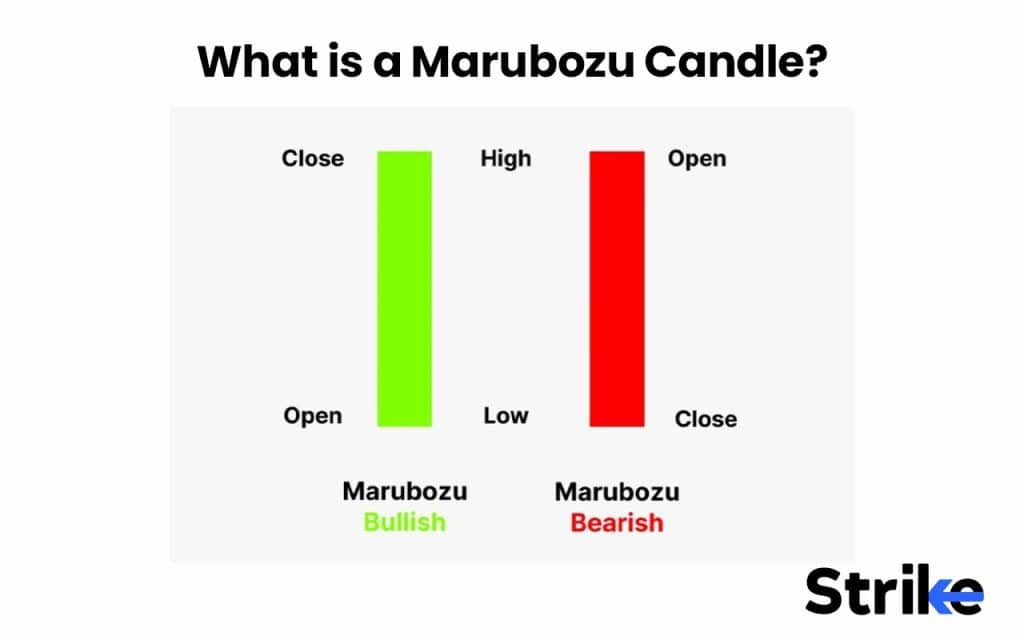
A Marubozu candle means that either buyers or sellers are completely dominating the market in a particular trading session. The absence of shadows from the candle shows that there was no fight from the opposite side during the session and price moved straight in one direction. This shows strong conviction and momentum in market sentiment.
Is Marubozu a Continuation Pattern?
A marubozu candle can be a both, continuation pattern or reversal pattern. Whether it acts as a continuation pattern or reversal pattern entirely depends on where it appears on the chart.
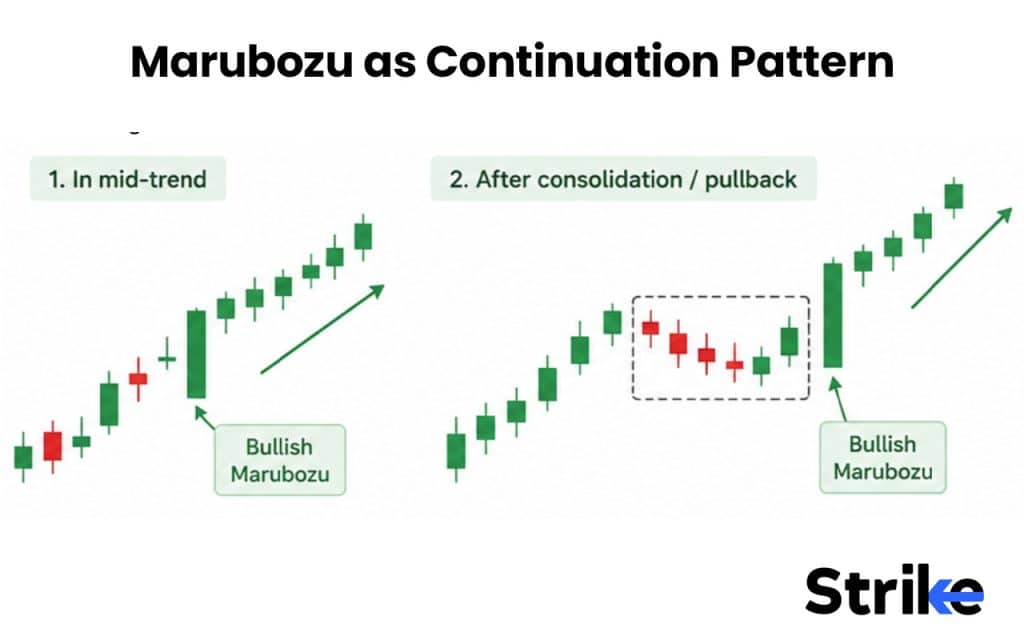
- Marubozu as Continuation Pattern: When marubozu appears in mid-trend or when it appears after a brief consolidation or pullback within a trend, it acts as a continuation pattern. If multiple marubozu candles form in the same direction, it suggests a very strong momentum.
- Marubozu as Reversal Pattern: When opposite-coloured marubozu candle appears after a prolonged uptrend or appears near key support and resistance level, it signals a trend reversal sentiment.
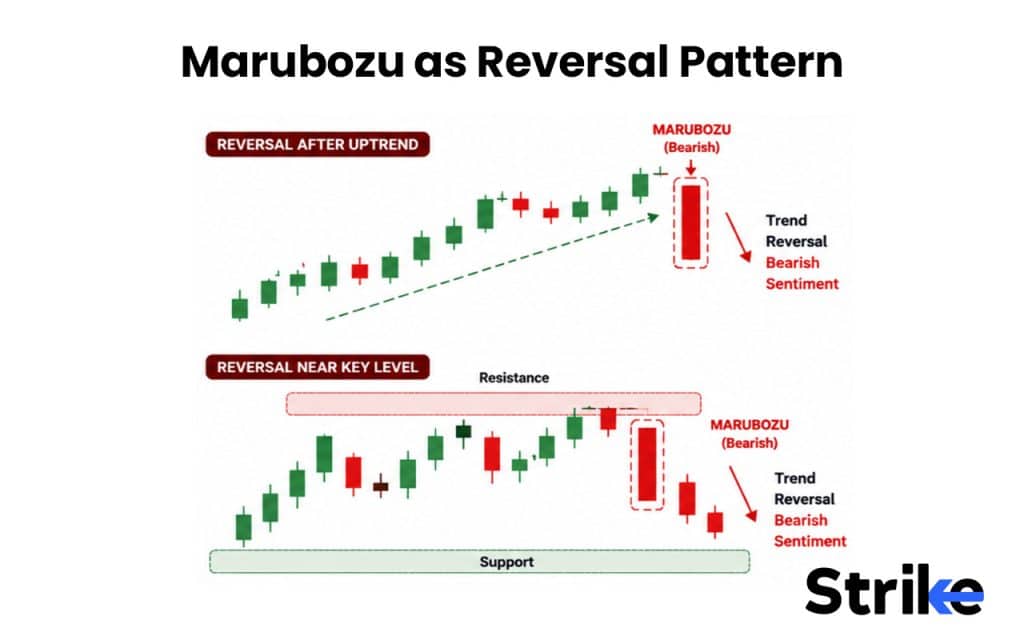
Whether a Marubozu is signalling trend continuation or trend reversal depends on volume, location, prior trend length and next candle.
Is Marubozu a Bullish or Bearish Candle?
A marubozu can be both, either bullish or bearish depending on the direction of the candle. A marubozu is considered to be bullish when its opening is equal to low and closing is equal to high. Whereas, a bearish marubozu has open equals to high and close equals to low. Hence, the marubozu is not inherently categorized with Bullish Candlesticks or Bearish Candlesticks; its meaning depends entirely on how the candle is closing. If it closes near the high, it aligns with other Bullish Candlesticks, whereas a close near the low places it among Bearish Candlesticks.
Anatomy & Psychology Behind a Marubozu Candle
The anatomy of a marubozu candle is characterized by a strong real body with little to no upper and lower shadow. The open and close of the marubozu occurs near the extremes of the candle.
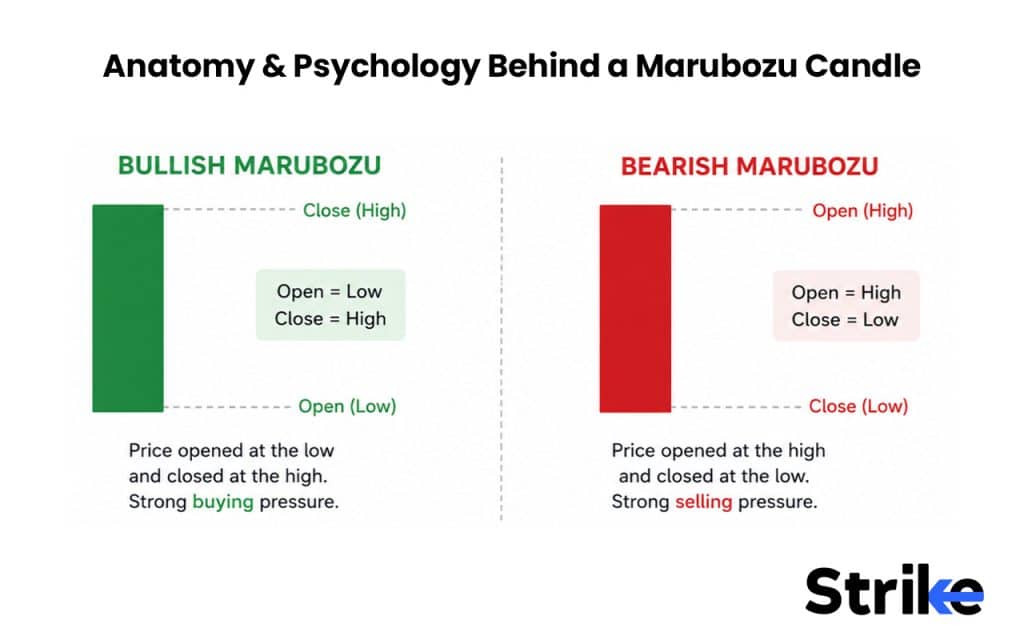
| Price Point | Bullish Marubozu | Bearish Marubozu |
| Open | = Period Low | = Period High |
| High | = Close | = Open |
| Low | = Open | = Close |
| Close | = Period High | = Period Low |
Bullish Marubozu indicates strong control of buyers throughout the session where sellers failed to push price lower, while bearish marubozu indicates control of sellers throughout the session where the buyers failed to push price higher.
How Many Types of Marubozu Candles We Can See in Charts?
Marubozu can appear in seven different form based on the candles open, close, and wick. Understanding each form will help you to assess the strength of market sentiment
1.Bullish Marubozu Candle
A bullish marubozu candle is a green large body candle which indicates the strong buyer’s participation. In a bullish marubozu candle, price opens near the low and closes near the high leaving little to no shadow.
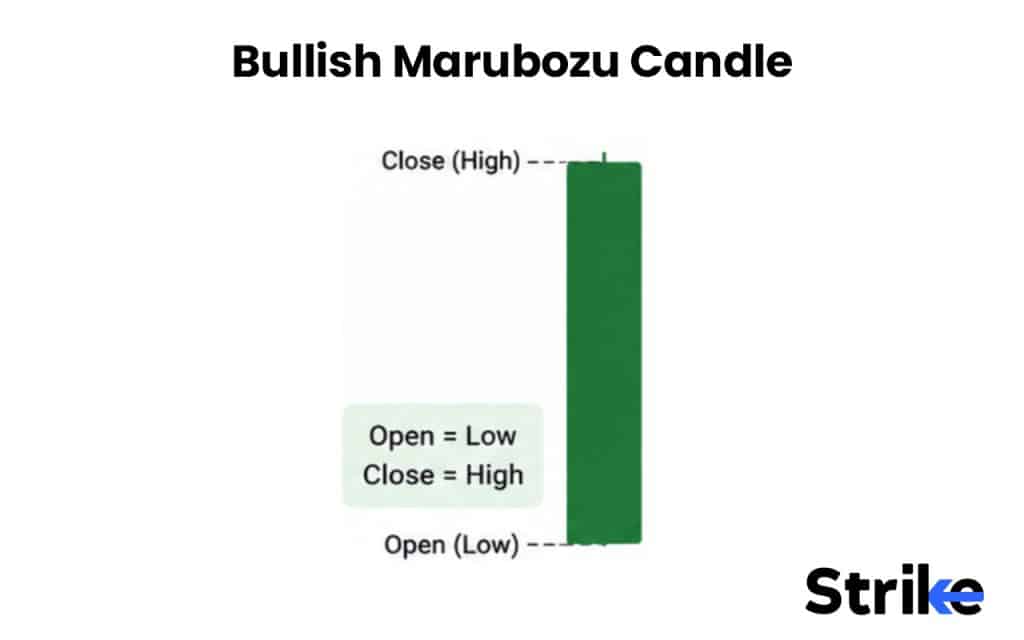
The bullish marubozu usually appears during strong uptrend, after breakout, near support, and after a positive news.
2.Bearish Marubozu Candle
Bearish marubozu forms as a red large body candle which indicates the strong seller’s participation. In bearish marubozu candle, price opens near the high and closes near the low leaving little to no shadow.
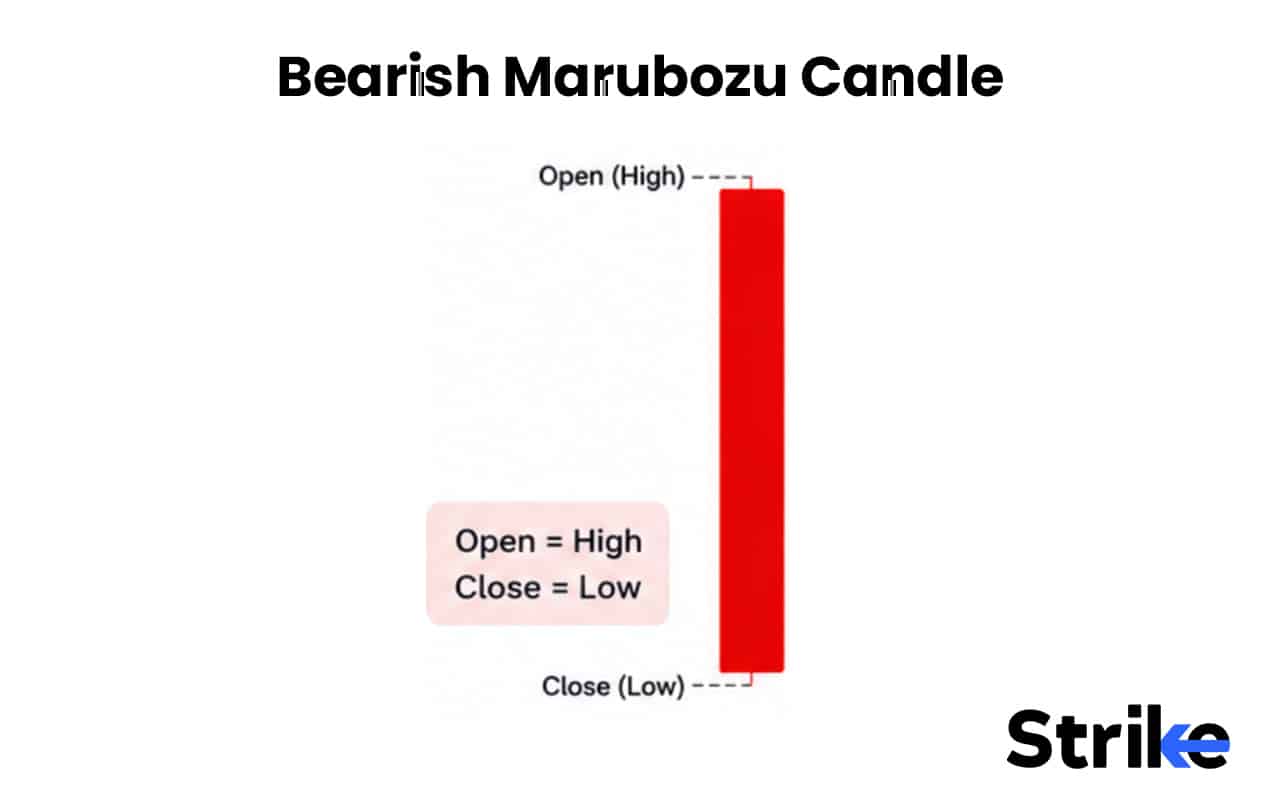
The bearish marubozu usually appears during strong downtrend, after breakdown, near resistance, and during negative news.
3.Opening Marubozu Candle
Opening Marubozu has no shadow near its opening, but has little shadow towards its closing price. There are two versions of the opening marubozu candle, the bearish version and the bullish version.
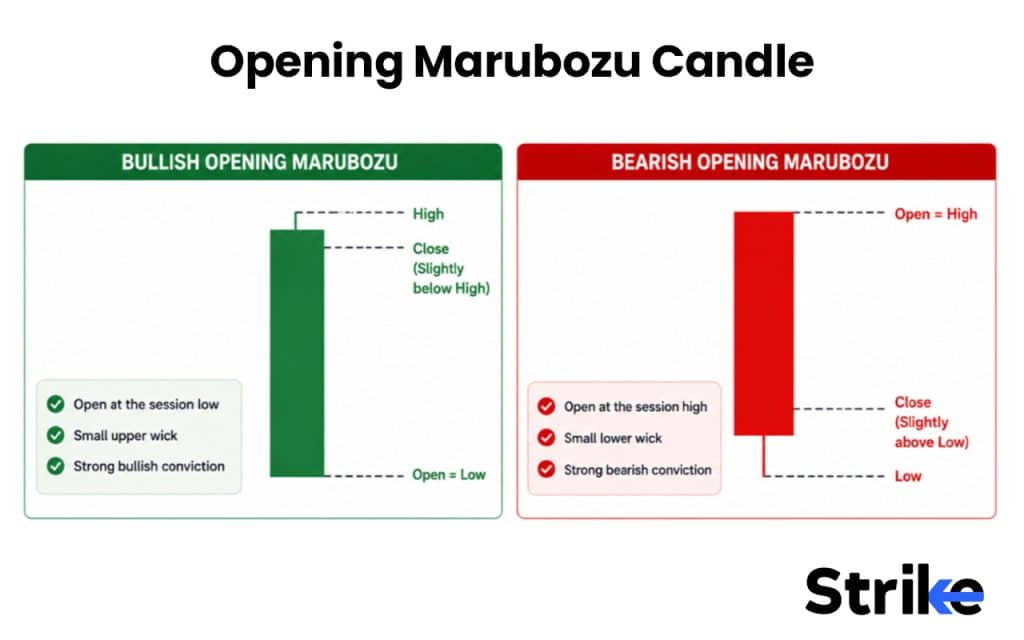
- A bullish version of the opening marubozu candle has its open exactly at the low of the session, but closes slightly below the session high, creating a small wick towards closing.
- A bearish version of the opening marubozu candle has its open exactly at the high of the session, but closes slightly above the session’s low, creating a small wick towards closing.
This pattern suggests that one side immediately gained control during the starting of the session but near the end of session, the opposite side managed to give some counter reaction, creating a wick. The opening marubozu signals a strong directional conviction.
4.Closing Marubozu Candle
Closing Marubozu has no shadow near its close, but has little shadow towards its opening price. There are two versions of the closing marubozu candle, the bearish version and the bullish version.
A bullish closing marubozu experienced a small pullback after open but eventually buyers gained control, pushing the price higher and closing exactly at the session’s high.
In a bearish closing marubozu, buyers initially try to support the price from falling, but eventually sellers take control and drag price lower to close at the day’s low.
Many traders consider closing marubozu candles more reliable than the open marubozu because the closing price reflects the final consensus of market participants. A strong closing at the end of the session indicates the session may continue its move in the same direction.
5.Full Marubozu Candle
A full marubozu candle is the strongest form of marubozu candle with no upper and lower shadow. The candle opens exactly at one extreme of the session and closses at the opposite extreme of the session.
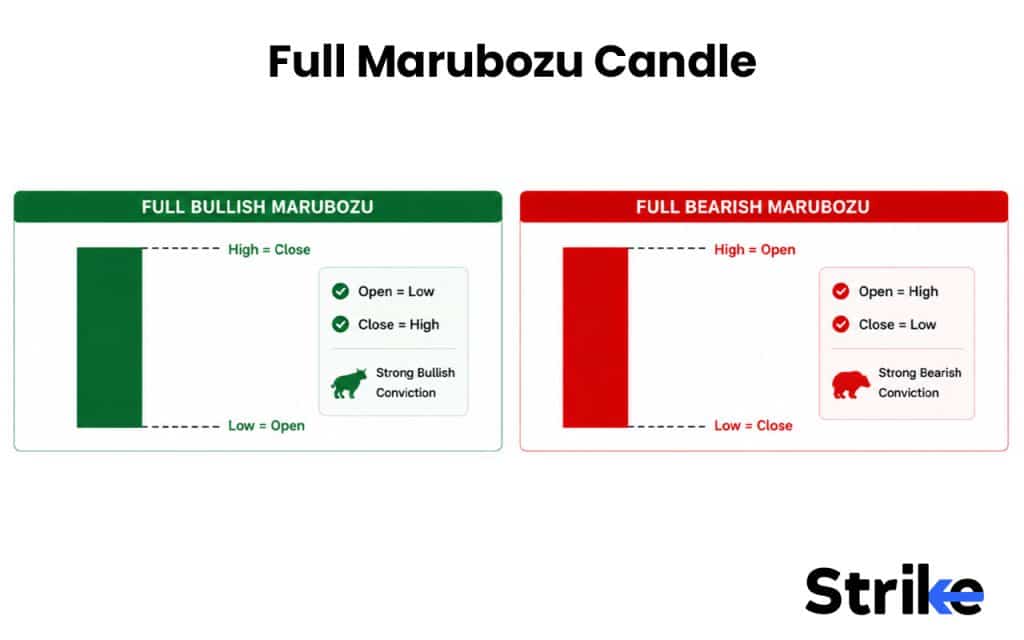
A full bullish marubozu has open equals to low and close equals high, whereas a full bearish marubozu has open equals to high and close equals to low.
A full marubozu candle appears very rarely because market always keeps fluctuating during the session. However, when a full marubozu candle appears, they show a strong conviction among traders and institutions.
6. Gap-up Marubozu
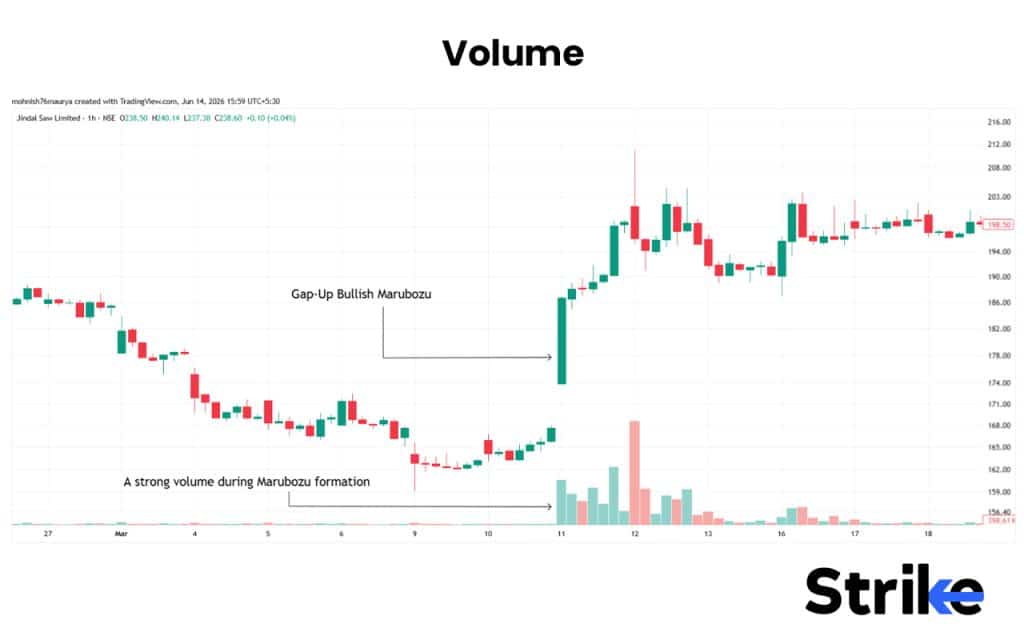
A gap marubozu forms when price opens above the high of the previous day session and starts moving continuously in the upward direction forming a strong bullish marubozu candle. A gap in the marubozu candle itself reflects the immediate buying pressure before regular trading begins, while the marubozu body shows that the buyers remain aggressive throughout the trading session after the gap.
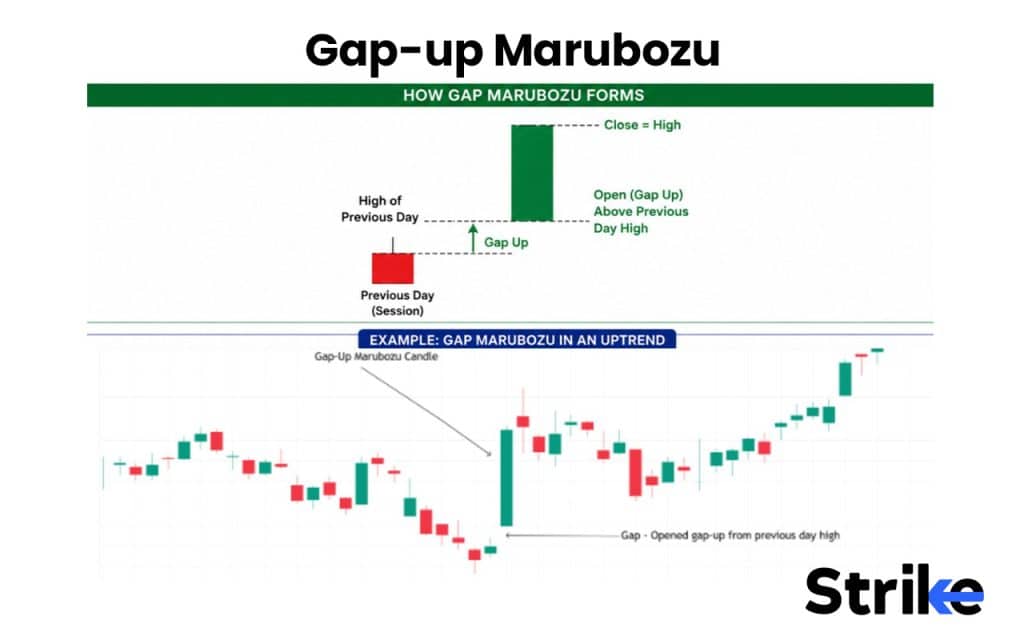
Marubozu candles with a gap often create a strong bullish signal in a candlestick pattern. This candlestick pattern is commonly seen during strong earnings reports, positive corporate announcements, favorable economic data, and major breakout events.
However, it is also important to note that extensively large gaps can sometimes attract profit booking after the initial excitement fades, causing Marubozu candles to fall back.
7. Gap-down Marubozu
Gap down marubozu forms when market opens gap down (below previous day low) and continues falling through the session without any upper shadow. A gap-down marubozu is considered stronger because it is supported by a gap which means immediate selling pressure before the session even begins.
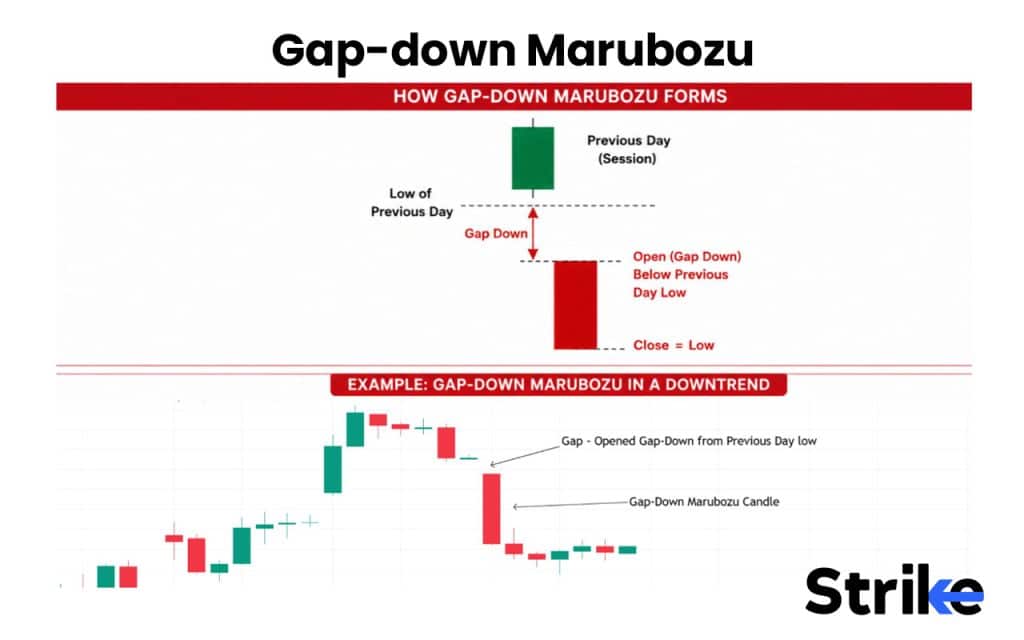
This pattern usually appears after disappointing earnings results, negative company announcements, economic uncertainty, or a broader market selloff, fitting the profile of certain Types of Candlestick Patterns. As fear often spreads faster than optimism, the formation of a gap down marubozu can sometimes lead to a sharp decline or accelerated bear trend, distinguishing it from less Types of Candlestick Patterns.
Which Marubozu Candle is Strongest among These 7?
A full marubozu candle is the strongest among all 7 mentioned marubozu candles because it has no upper and lower shadow, which means there is a complete control by either buyers or sellers throughout the session.
How do you Identify a Marubozu Candle Accurately?
Identifying a marubozu candle requires more than just spotting a candle with a long body. There are six major steps to confirm marubozu candles which are briefly discussed below.
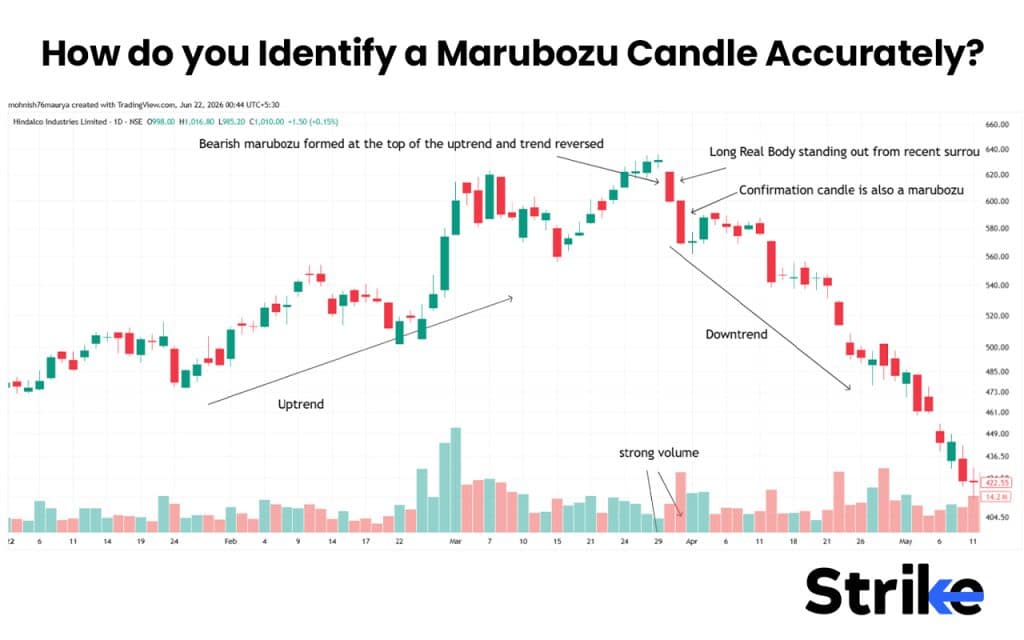
- Look for a Long Real Body: Look for a large-bodied candle that stands out from the rest of the candle with no upper or lower wick with a dominating body which should dominate the entire candle range.
- Verify price points: Mathematically the real marubozu has open and close near the extreme points of the candle. The bullish marubozu has open equals to low and close equals to high, while bearish marubozu has open equals to high and close equals to low. A small shadow is generally acceptable. If the body-to-range ratio is less than 70%, the candle does not identify as a marubozu candle.
- Compare with a Recent Candle: A marubozu candle should stand out from recent surrounding candles, signalling strong momentum and participation from buyers and sellers.
- Understand the Market Context: The significance of marubozu depends on where it appears on the chart. If marubozu appears in uptrend, a bullish marubozu confirms the uptrend continuation. If marubozu appears in a downtrend, a bearish marubozu confirms the downtrend continuation. A marubozu also signals reversal when it appears near key support or resistance level. Marubozu forming randomly on charts are usually less reliable.
- Check Volume: A marubozu with a strong volume suggests strong buying and selling interest. This increases the reliability of the pattern.
- Wait for Confirmation Candle: Many traders wait for the next candle to confirm the marubozu. If the next candle breaks the high of the bullish marubozu, it confirms the bullish marubozu formation, while the next candle breaking the low of the bearish marubozu candle confirms the bearish marubozu formation.
Accurate identification of a Marubozu candle requires evaluating its size, structure, volume, and market context rather than focusing on the candle alone. The more confirmation factors that align with the pattern, the higher its reliability as a trading signal.
How Reliable is the Marubozu Candle?
The reliability of marubozu candles totally depends on the market context in which it appears and how you trade them. For instance, marubozu formed in the direction of an ongoing trend with a strong volume tends to have a higher reliability.
A backtest done by Barry D. Moore CFTe early on 5,000 Marubozu trades spanning over 1,136 years of historical data covering both boom and bust markets produced some surprising findings, the Bearish Marubozu significantly outperformed the Bullish version.
| Metric | Bullish Marubozu | Bearish Marubozu |
| Win Rate | Below average | 56.1% |
| Avg Profit Per Trade | 0.28% | 0.8% |
| Reward/Risk Ratio | 0.97 | Better |
| Overall Verdict | One of the worst patterns | Second best candle overall |
Factors that affect the performance of marubozu are volume, trend, timeframe, support/resistance, and confirmation candle.
Our Backtesting Result with Marubozu Candle
We, at Strike Money, backtested the Marubozu Candle pattern to determine whether a Marubozu candle can provide a reliable continuation trading setup. The test focused only on clean Marubozu candles with little or no shadows and traded in the direction of the candle.
| Backtest Parameter | Details |
| Pattern Tested | Bullish and Bearish Marubozu |
| Market | NSE-listed large and mid-cap stocks |
| Timeframe | Daily chart |
| Bullish Entry | Buy above Bullish Marubozu high |
| Bearish Entry | Sell below Bearish Marubozu low |
| Stop-Loss | Opposite end of the Marubozu candle |
| Target 1 | 1:1.5 Risk-Reward |
| Target 2 | 1:2 Risk-Reward |
| Confirmation Used | Breakout of Marubozu high/low |
| Total Patterns Tested | 100 |
Backtest Logic
The strategy followed four fixed rules:
- Identify a valid Bullish or Bearish Marubozu candle.
- Wait for the price to break the Marubozu high (bullish) or low (bearish).
- Place stop-loss at the opposite end of the candle.
- Exit at either 1:1.5 or 1:2 risk-reward target.
Backtest Result Summary
| Metric | 1:1.5 RR | 1:2 RR |
| Total Trades | 100 | 100 |
| Winning Trades | 63 | 51 |
| Losing Trades | 37 | 49 |
| Win Rate | 63% | 51% |
| Average Return per Trade | Higher | Moderate |
| Best Result | Better Consistency | Larger Winners |
What the Backtest Shows
The Marubozu Candle pattern performed better when traders targeted a 1:1.5 risk-reward ratio rather than stretching for a 1:2 target. While the 1:2 target captured larger moves, many trades failed to reach the extended target, reducing the overall win rate.
Key Findings
- Bullish Marubozu candles performed best when they appeared during an existing uptrend.
- Bearish Marubozu candles performed best when they appeared during an existing downtrend.
- Volume expansion on the Marubozu candle improved reliability.
- The 1:1.5 risk-reward target produced a higher win rate and smoother performance.
- Marubozu candles appearing near major support or resistance levels generated stronger follow-through moves.
- Sideways markets reduced the effectiveness of the pattern significantly.
Conclusion
The Marubozu Candle is a reliable momentum pattern when traded in the direction of the prevailing trend. Our backtest showed that confirmation through a breakout of the Marubozu high or low, combined with a 1:1.5 risk-reward target, delivered the most consistent results.
How to Trade Using the Marubozu Candle [With Real Trading Strategy]
Always trade marubozu along with other confluence, because trading marubozu alone delivers poor results. There are six major steps to trade marubozu candles which are briefly discussed below.
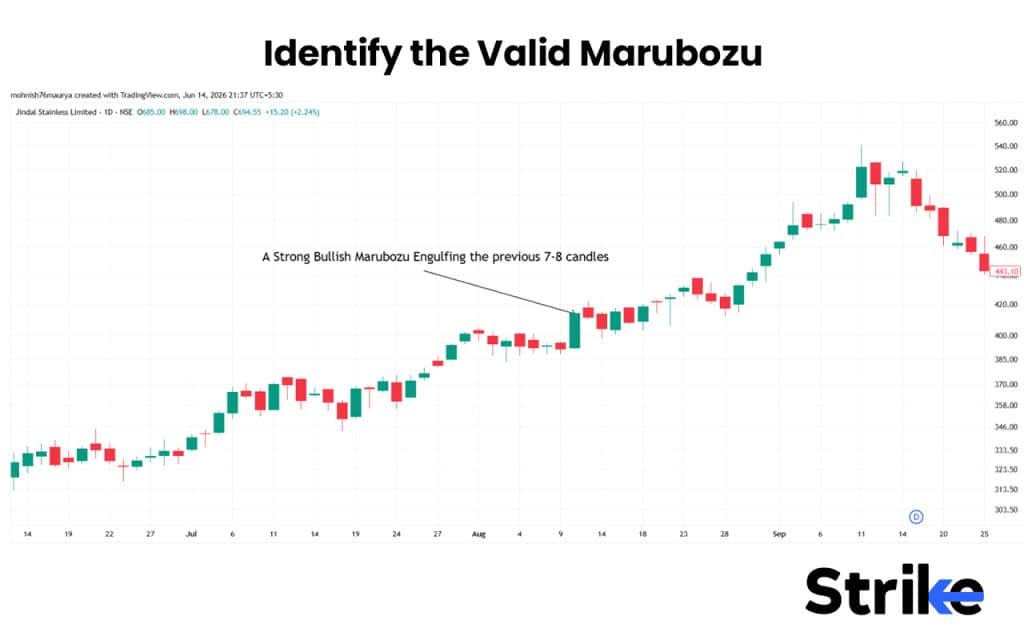
- Identify the Valid Marubozu: A strong body candle with high volume and minimal or no upper and lower wick. The candle should stand out from the surrounding candles.
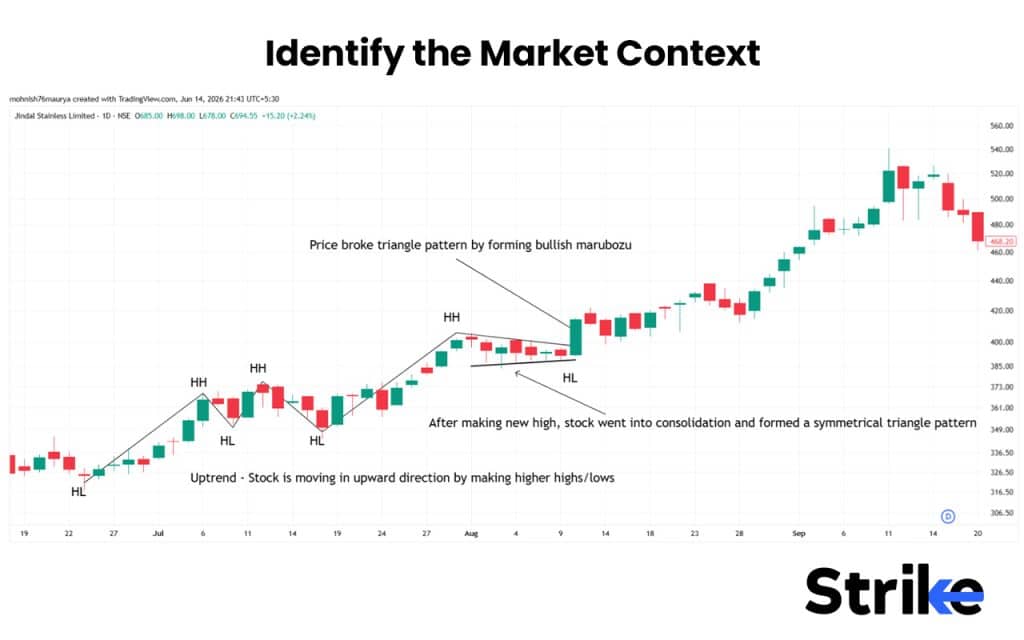
- Identify the Market Context: Identify the position of the marubozu candle in a current market condition, whether it is forming a trend continuation pattern or trend reversal pattern. A continuation marubozu forms in the direction of the existing trend while reversal marubozu forms in the direction opposite to the existing trend.
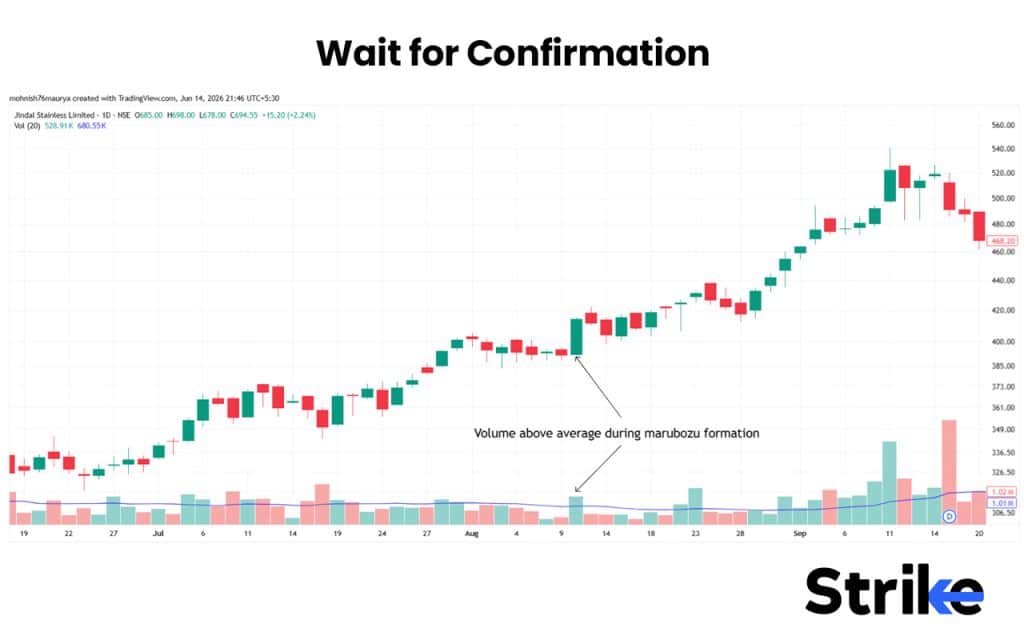
- Wait for Confirmation: After marubozu identification, do not enter immediately, wait for the next candle to confirm the direction. For bullish marubozu, the next candle should close above the high of the marubozu to confirm the pattern, while for bearish marubozu, the next candle should close below the low of the marubozu candle to confirm the pattern. Volume above average also confirms the marubozu formation.
- Entry: Enter the long trade when bullish marubozu is confirmed in an ongoing uptrend, while enter a short trade when bearish marubosu is confirmed in an ongoing downtrend.
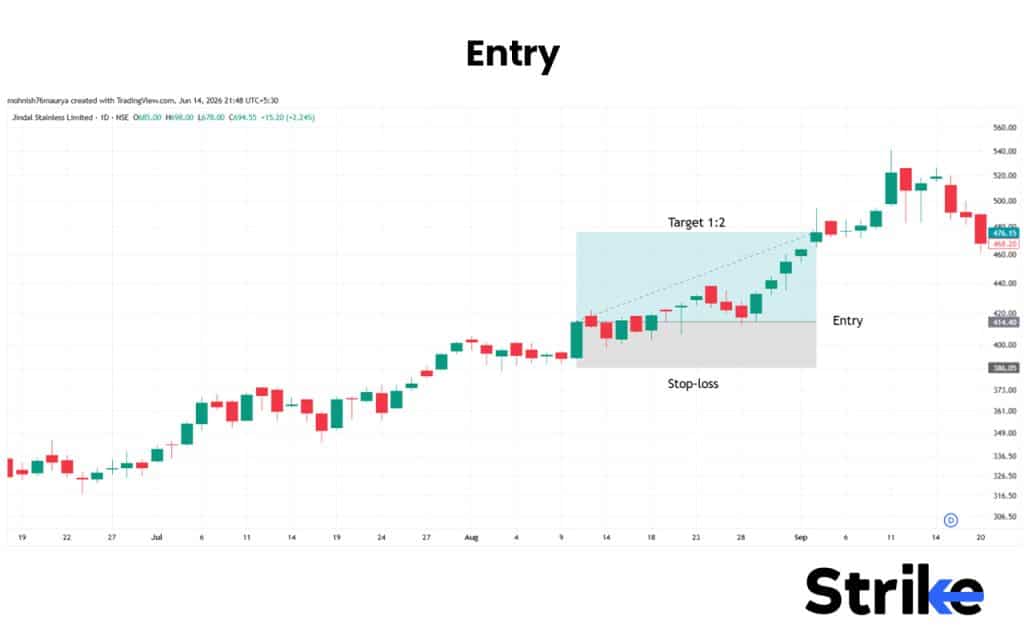
- Stoploss: For long trade, place the stoploss below the low of the marubozu and for a short trade place the stoploss above the high of the marubozu.
- Profit Target: Profit target can be set based on risk to reward ratio. Look for minimum 1:1.5 RR or 1:2 RR. You can also set a target near to the next key support or resistance level.
Hence, marubozu is only a signal of conviction and dominance, the real edge to trade marubozu comes from identifying where the candle forms, why it forms, and whether the market is likely to support its momentum in the sessions ahead.
Does High Volume Make Marubozu Stronger?
Yes, a high volume generally 1.5 –2 times more than average volume makes marubozu candles stronger and more reliable, because volume represents the actual level of participants behind the move. A marubozu formed with an above-average volume suggests that the move is supported by a strong buying or selling pressure. When a marubozu forms with low volume, as reflected by various Volume Indicators, it indicates a lack of strong participation. This highlights the importance of using Volume Indicators to confirm whether such a bold price move is truly backed by significant market activity.
What is the Significance of Marubozu Candle at Support and Resistance?
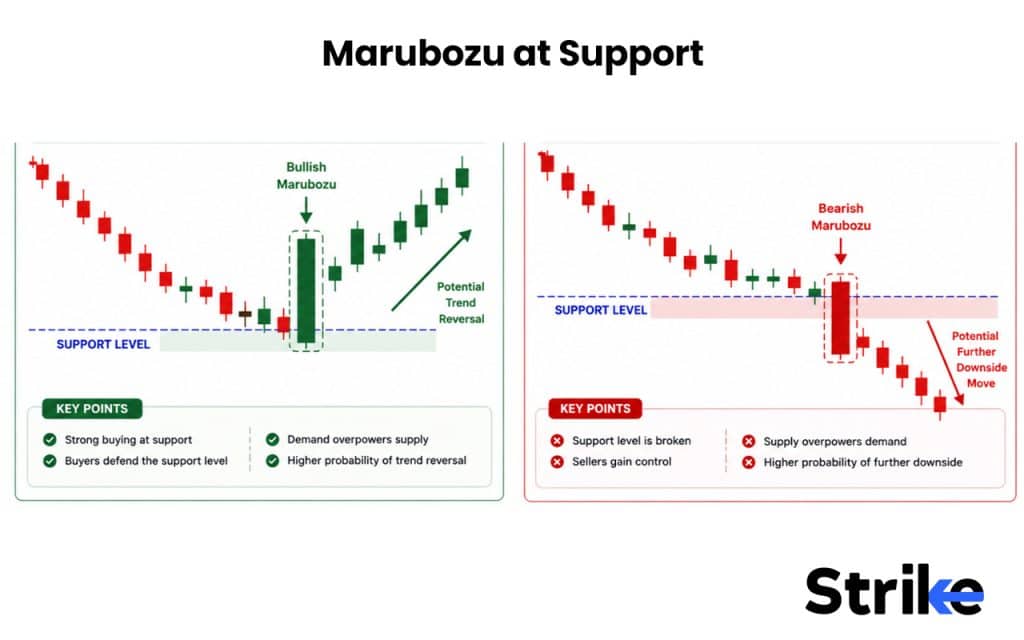
Marubozu candle forming near support and resistance carries a great significance because it indicates a shift in power between buyers and sellers at a very important level. A marubozu formed at support and resistance level can suggest either reversal or breakout.
- Marubozu at Support: A bullish marubozu formed near support indicates a strong buyer participation, defending the level. The large green bullish body indicates that the demand has overwhelmed supply and the reversal of trend is more likely to happen. If a red bearish marubozu forms breaking below support level, it indicates that the sellers have gained control and may trigger further downside move.
- Marubozu at Resistance: A bearish marubozu formed near resistance indicates a strong seller’s participation, defending the level. The large red bearish body indicates that the supply has overwhelmed demand and the reversal of trend is more likely to happen. If a green bullish marubozu forms breaking above resistance level, it indicates that the buyers have gained control and may trigger further upside move.
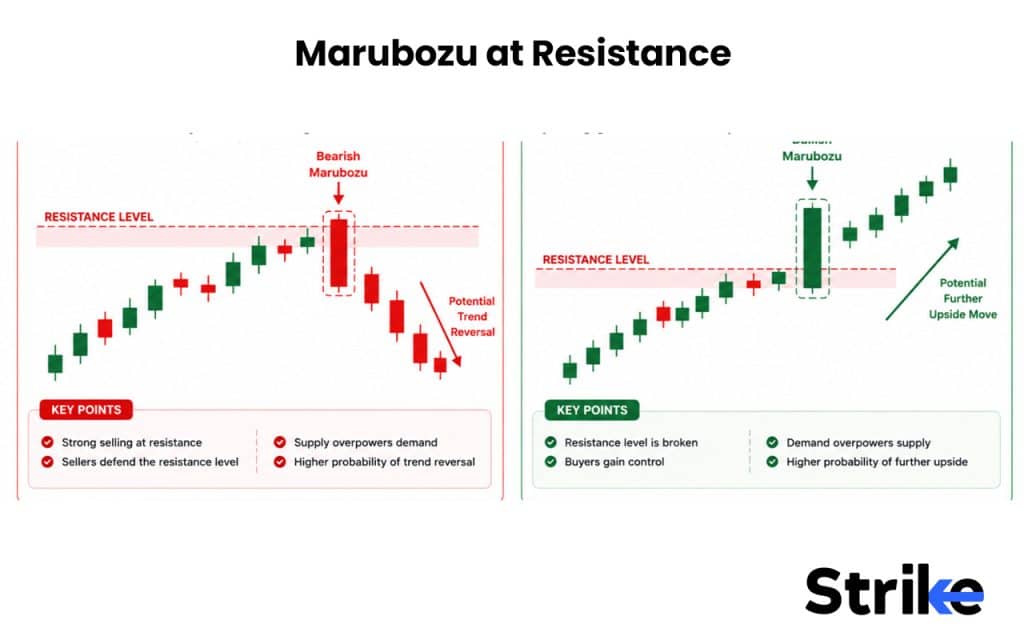
The significance of a Marubozu candle at Support & Resistance levels lies in its ability to reveal who has gained control at a key price level. Whether it signals a reversal or a breakout, traders should look for confirmation through volume, follow-through price action, and the overall context of Support & Resistance before making trading decisions.
Which Technical Indicator Works Best with Marubozu?
There are five technical indicators that work best with the marubozu candlestick pattern. The indicators are volume, moving averages, RSI, VWAP, and MACD.
- Volume: Volume indicator helps in understanding the real buying or selling strength behind the marubozu formation. A marubozu formed with above average volume usually has higher reliability.
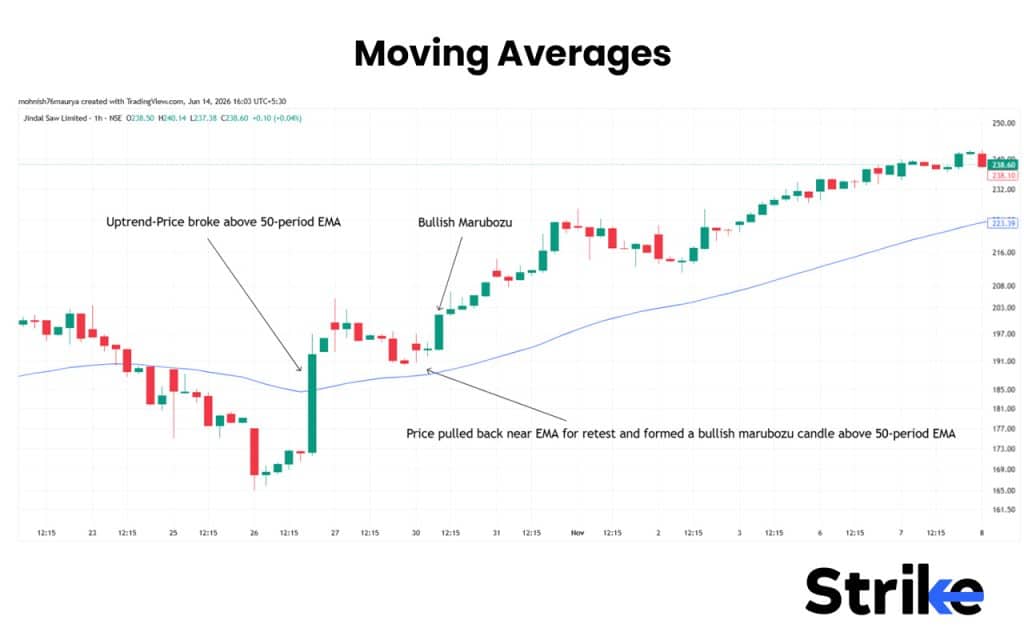
- Moving Averages: Moving averages like 20-period or 50-period are typically used to identify the present trend of the market. If bullish marubozu forms above the 20-period or 50-period EMA, it strengthens the bullish signal. If bearish marubozu forms below 20-period or 50-period EMA, it strengthens the bearish signal.
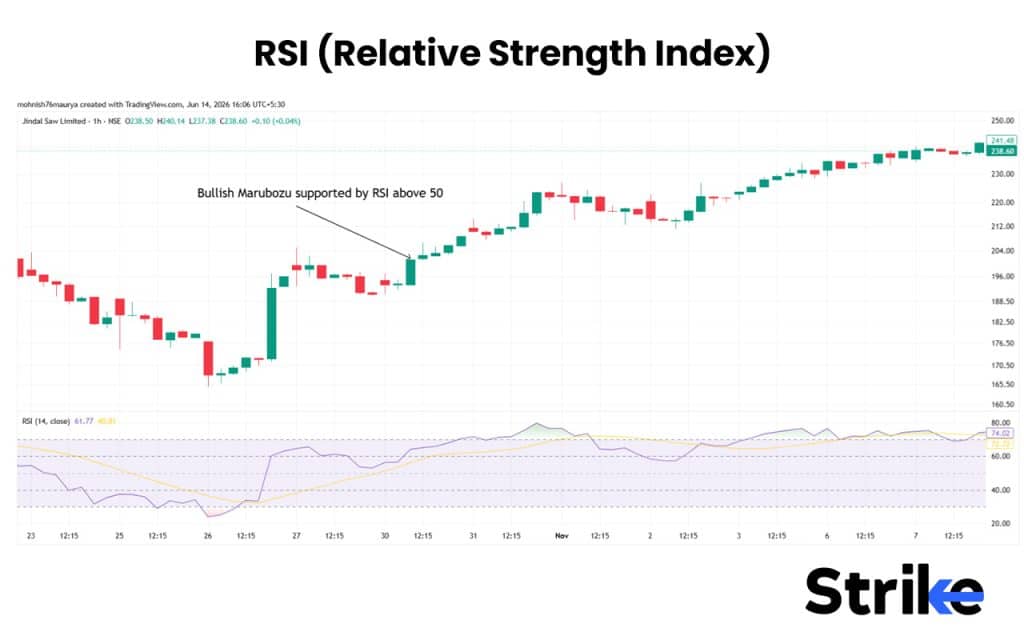
- RSI (Relative Strength Index): RSI above 50 during the formation of bullish marubozu supports the bullish outlook of the pattern, while RSI below 50 during the formation of bearish marubozu supports bearish momentum. RSI in overbought and oversold territory support the reversal marubozu candlestick pattern.
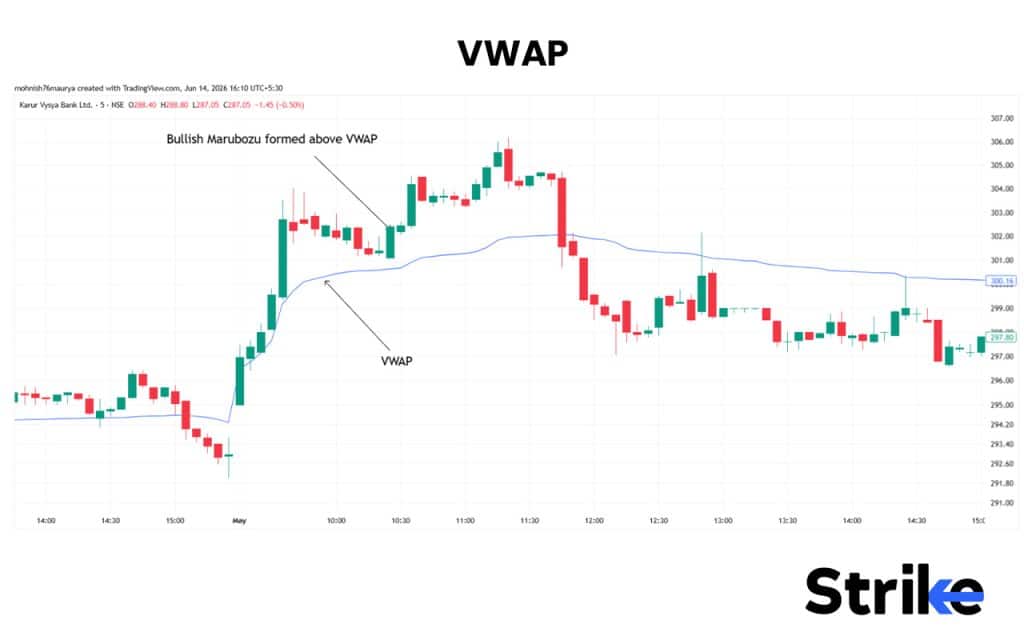
- VWAP: VWAP is mostly used by intraday traders to identify trend direction and premium/discount zones. A bullish marubozu from above VWAP shows strong institutional buying, whereas a bearish marubozu formed below VWAP shows strong institutional selling.
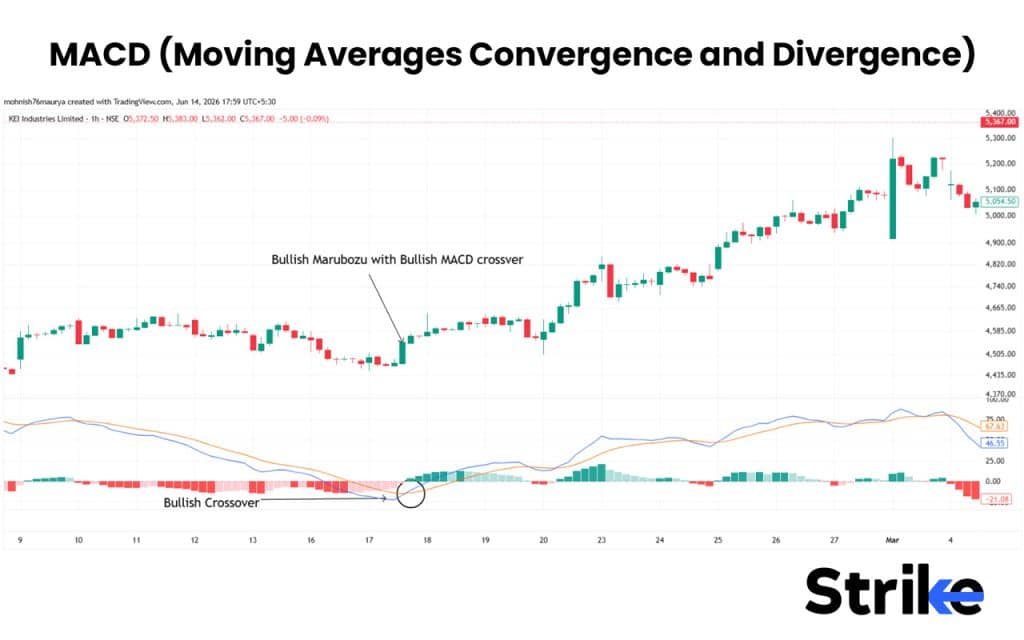
- MACD (Moving Averages Convergence and Divergence): MACD is used to identify trend direction and momentum of the market. Bullish marubozu formed with bullish MACD crossover increases the strength of the bullish view, while bearish marubozu formed with a bearish crossover increases the strength of the bearish view.
A signal generated by Trading Indicators becomes stronger when multiple confirmation signals appear at the same time. The simultaneous alignment of various Trading Indicators helps filter out noise and increases the probability of a successful trade.
Why do Marubozu Trades Fail & How to Avoid Them?
Despite being a strong momentum pattern, Marubozu patterns do not always work successfully. There are three major reasons for Marubozu failure which are briefly discussed below.
- Low Volume: When marubozu forms with low volume, it represents a lack of strong participation. Hence, without strong participation, the momentum behind the candle may quickly fade, leading to a false signal. Consider trading marubozu only when the volume is above average.
- Entering Without Confirmation: Entering immediately after the formation of Marubozu candle will expose you to the risk of false breakout and sudden reversal. You can avoid them by waiting for the next candle to confirm the Marubozu candle by closing above and below the high and low of the candle.
- Marubozu works best in trending markets: Marubozu forming in sideways or range-bound markets may show a strong participation, but can lack a strong follow-through candle, which often increases the chance of getting stopped out. So focus on the Marubozu setup that occurs during established trends.
You can avoid making a loss while trading marubozu by considering the above points. You can also combine indicators to avoid trading less reliable marubozu patterns.


 Previous Article


![15 Investing.com Alternatives [Free+Paid] You Should Use in 2026](https://www.strike.money/wp-content/uploads/2026/04/Investing.com-Alternatives.jpg "15 Investing.com Alternatives [Free+Paid] You Should Use in 2026 92")
![15 TradeStation Alternatives [Free+Paid] You Should Use in 2026](https://www.strike.money/wp-content/uploads/2026/04/TradeStation-Alternatives.jpg "15 TradeStation Alternatives [Free+Paid] You Should Use in 2026 93")
![15 Chartink Alternatives [Free+Paid] You Should Use in 2026](https://www.strike.money/wp-content/uploads/2026/04/Chartlink-Alternatives.jpg "15 Chartink Alternatives [Free+Paid] You Should Use in 2026 94")




No Comments Yet.