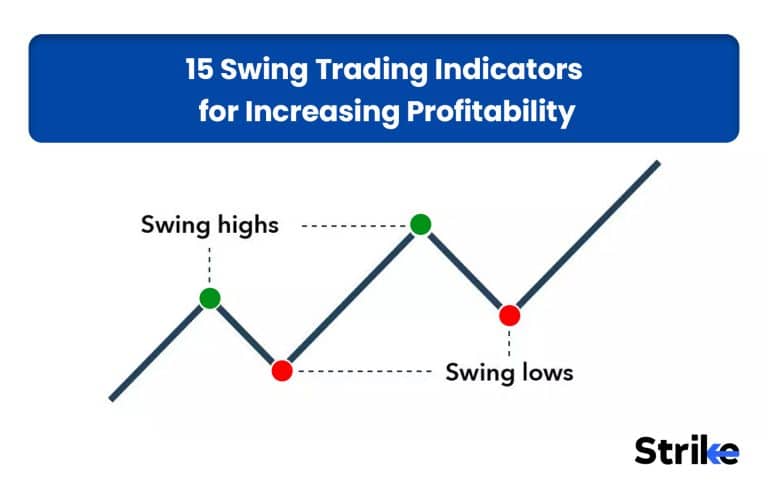
Swing trading is a type of trading where traders hold their positions for several weeks and days and try to profit from price fluctuations. Swing trading’s primary focus is recognizing trends, pullbacks, breakouts, and momentum reversals to capitalize on the right opportunity and at the right price.
Indicators for swing trading are technical analysis tools that enable traders to study the market’s price action, trend direction, trend momentum, volatility, and volume. Moving Average, RSI, MACD, Supertrend, and Bollinger Bands are indicators that assist traders in finding entry and exit points, stop losses, and target levels. However, there is no certain indicator available. Reliability depends on how traders use the indicator to filter out false entries and to boost trading conviction.
1. Moving Averages (MA)
A moving average calculates the average price of the underlying over a specific period of time and smooths out price noise. In swing trading, moving average helps in identifying market trends and works as a dynamic support and resistance level.

- If the price is trading above the moving average, it suggests an uptrend. In an uptrend, a moving average acts as a dynamic support.
- If the price is trading below the moving average, it suggests a downtrend. In a downtrend, a moving average acts as dynamic resistance.
- If the price is frequently crossing around the moving average, it suggests a sideways trend.
Moving averages are commonly used in trending markets to trade pullbacks. In an uptrend, traders enter the trade once price pullbacks near the moving average and form a bullish candle or chart pattern. In a downtrend, traders enter the trade once price pullbacks near the moving average and form a bearish candle or chart pattern.
| Moving Averages (MA) Summary | |
| Indicator Name | Moving Averages (MA) |
| Best Timeframe | 1H, 4H, Daily |
| Best For | Trend identification and pullback trading |
| Leading/Lagging | Lagging Indicator |
| Entry | Buy on pullback to 20/50 MA with bullish confirmation in an uptrend. |
| Price Target | Previous swing high or trend continuation |
| Stop Loss | Below recent swing low or slightly below moving average zone |
| Exit | When price breaks below MA or trend structure fails |
The reliability and success rate of moving averages vary depending on their period and timeframe. According to backtest results by TradeSearch, 50-day MA trend-following (stocks, 2 years) has a 60% win rate, +25% net profit, and 12% max drawdown. The shorter the period of moving average, the faster it reacts with the price.
2. Moving Average Convergence Divergence (MACD)
Moving Average Convergence Divergence (MACD) is a momentum-based indicator that measures the relation between two moving averages (12 EMA and 26 EMA) of the security.
In swing trading, MACD is used to measure momentum and to identify momentum shifts, trend continuation, and possible reversals. MACD consists of three main components: the MACD line, the signal line, and the histogram.

- Bullish Crossover: When the MACD line crosses above the signal line, it indicates a bullish momentum shift.
- Bearish Crossover: When the MACD line crosses below the signal line, it indicates a bearish momentum shift.
- Histogram: If a histogram expands, it suggests increasing momentum. Whereas, if a histogram shrinks, it suggests momentum is weakening.
MACD works best in trending markets and helps traders to improve entry timing. Enter a long position after a bullish crossover in an uptrend and enter a short position after a bearish crossover in a downtrend.
| Moving Average Convergence Divergence (MACD) Summary | |
| Indicator Name | Moving Average Convergence Divergence (MACD) |
| Best Timeframe | 1H, 4H, Daily |
| Best For | Momentum confirmation and trend continuation |
| Leading/Lagging | Lagging Indicator |
| Entry | Buy when MACD line crosses above signal line with rising histogram in uptrend |
| Price Target | Previous swing high or trend continuation |
| Stop Loss | Below recent swing low or key support level |
| Exit | When MACD crosses below signal line or momentum weakens (histogram shrinks) |
MACD performs poorly when used in isolation. According to liberatedstocktrader, it has a low win rate of 40%. However, the win rate can be improved by combining MACD with other indicators like RSI. According to quantified strategies, MACD + RSI has a 73% win rate, with a 0.88% avg. gain per trade.
3. Relative Strength Index (RSI)
The Relative Strength Index (RSI) is a momentum oscillator that measures the speed and magnitude of the price movement on a scale of 0 to 100. RSI is useful in identifying overextended movement (overbought and oversold zones). Identifying these overextended zones helps traders to spot reversals or good buying or selling points in trending markets.

- If RSI is above 70, it suggests a strong bullish momentum, but possibly overextended
- If RSI is below 30, it suggests strong bearish momentum, but possibly exhausted
- If RSI keeps oscillating between 40 and 60, it suggests neutral zone
In a strong uptrend, RSI 40-50 often acts as a support zone, while in a strong downtrend, RSI 50-60 often acts as a resistance zone. While in a sideways market, RSI keeps oscillating between 0 and 100. In strong trends, RSI can remain overbought or oversold for extended periods, which is why traders avoid using RSI alone for reversal trades.
| Relative Strength Index (RSI) Summary | |
| Indicator Name | Relative Strength Index (RSI) |
| Best Timeframe | 1H, 4H, Daily |
| Best For | Pullback entries and momentum timing |
| Leading/Lagging | Leading Indicator |
| Entry | Buy when RSI bounces from 40 in uptrend with bullish confirmation |
| Price Target | Previous swing high or trend continuation |
| Stop Loss | Below recent swing low or key support level |
| Exit | When RSI reaches overbought zone (60–70) or shows weakness |
In a strong uptrend, RSI 40 is used for pullback entries for long trades, whereas in a strong downtrend, RSI 60 can be used for pullback entries for short trades. The standard 14-period RSI on the daily timeframe has a win rate of 54% across stocks but drops to 20-23% when used on 1-5 min charts, according to liberatedtraders.
4. Stochastic Oscillator
The Stochastic Oscillator is a momentum indicator that compares a stock’s closing price to its price range over a specific period, helping identify overbought and oversold conditions. This indicator is designed to identify momentum extremes and potential reversal points.
It consists of two lines, %K (fast line) and %D (signal line), both oscillating between 0 and 100 and giving the following signal.

- A reading above 80 represents overbought zone
- A reading below 20 represents oversold zones
Traders usually look for reversal trades in these zones. When stochastic falls below 20 and %K crosses above %D, it signals a potential bullish momentum shift (buying opportunity). When stochastic rises above 80 and %K crosses below %D, it signals a potential bearish momentum shift (selling opportunity).
However, it is important to confirm the crossover signals with a candle or a chart pattern like a bullish engulfing candle near the %K/%D crossover. This indicator performs well in a sideways and slow market.
| Stochastic Oscillator Summary | |
| Indicator Name | Stochastic Oscillator |
| Best Timeframe | 1H, 4H, Daily |
| Best For | Entry timing in range markets and pullbacks |
| Leading/Lagging | Leading Indicator |
| Entry | Buy when %K crosses above %D below 20 (oversold) near support |
| Price Target | Range high or next resistance level |
| Stop Loss | Below recent swing low or support level |
| Exit | When Stochastic reaches overbought (80+) or gives bearish crossover |
A stochastic oscillator on its own has a low win rate. A backtest of standard 14.3.3 settings on hourly charts of DJ30 stocks for 12 years gave a 43% win rate, as per liberatedtraders. However, the win rate can be increased by using a stochastic oscillator with a trend filter. According to backtest results by StartBase on crypto and forex, it found a 56-62% win rate and a profit factor of 1.31-1.58.
5. On-Balance Volume (OBV)
On-Balance Volume (OBV) is a volume-based indicator that cumulatively adds volume on up days (days when price closes higher than the previous close) and subtracts on down days (days when price closes lower than the previous close). This helps traders to understand buying and selling pressure through the flow of volume.
OBV is plotted as a single continuous line that rises or falls based on volume flow and suggests the following signal.

- OBV moving along with price indicates a trending move.
- OBV moving opposite to price indicates divergence and a possible trend reversal.
- If the price is rising but OBV is flat or falling, it signals a weak trend.
- If the price is falling but OBV is rising, it signals hidden accumulation.
This indicator helps traders to confirm breakouts, avoid false breakouts, spot early accumulation or distribution phases, and validate trend strength. OBV is particularly used in breakouts to validate the price break.
| On-Balance Volume (OBV) Summary | |
| Indicator Name | On-Balance Volume (OBV) |
| Best Timeframe | 1H, 4H, Daily |
| Best For | Volume confirmation and breakout validation |
| Leading/Lagging | Leading Indicator |
| Entry | Buy when price breaks resistance with rising OBV (volume confirmation) |
| Price Target | Next resistance level or trend continuation |
| Stop Loss | Below breakout level or recent swing low |
| Exit | When OBV diverges from price or trend weakens |
It is important to know that OBV is primarily a confirmation indicator, not a trigger; hence, use it in confluence with price action and other indicators for better results. PicturePerfectPortfolios backed the OBV divergence on tech stocks for 3 years. The backtest resulted in a 68% win rate and 12% average annual return.
6. Average Directional Index (ADX)
The Average Directional Index (ADX) indicator is a trend strength indicator that measures the strength of the trend regardless of its direction. This indicator helps traders to filter out strong trends from the choppy or sideways market.
ADX is made up of three main lines: the ADX line, +DI (positive directional movement), and -DI (negative directional movement).

- Bullish Pressure: When the ADX line is above 20 and the +DI (positive directional movement) is above the -DI (negative directional movement), it suggests a bullish trend.
- Bearish Pressure: When the ADX line is above 20 and the -DI (negative directional movement) is above the +DI (positive directional movement), it suggests a bearish trend.
- Sideways Trend: When the ADX line stays below 20, it suggests a sideways market.
It is important to note that +DI and -DI tell the direction; ADX only tells the strengths of the trend. Traders usually trade pullbacks or breakouts after identifying the trend and strength of the trend using ADX.
Avoid using ADX as a buy and sell signal because ADX is a filter indicator, not a trigger indicator.
| Average Directional Index (ADX) Summary | |
| Indicator Name | Average Directional Index (ADX) |
| Best Timeframe | 1H, 4H, Daily |
| Best For | Measuring trend strength and filtering trending markets |
| Leading/Lagging | Lagging Indicator |
| Entry | Buy when ADX rises above 25 and +DI is above –DI with trend confirmation |
| Price Target | Trend continuation based on structure |
| Stop Loss | Below recent swing low or key support level |
| Exit | When ADX starts falling or trend structure breaks |
The reliability of ADX totally depends on how it is used with market context. The effectiveness of ADX increases when combined with the SuperTrend or moving average.
7. Bollinger Bands
The Bollinger Band is a volatility-based indicator that measures market volatility using two standard deviations around the 20-period moving average. It dynamically expands and contracts based on market volatility.
This indicator helps traders to measure market volatility, overextended price moves, and potential breakouts.

- Widening Band: It indicates volatility has increased
- Contracting Bands: It indicates volatility has decreased
- Price Near Upper Band: It suggests buying pressure is high
- Price Near Lower Band: It suggests selling pressure
- Breakout: When price breaks the contracting or narrow range, it indicates expansion in volatility, and the price moves sharply in the direction of the breakout.
Traders use Bollinger Bands either for trend continuation or for reversals. If there’s a Bollinger Band squeeze, traders look for breakout trades, and if price becomes overextended near the upper or lower Bollinger Band, traders look for reversal trades. However, Bollinger Bands should not be used alone for reversal trades because price can ‘walk the band’ during strong trends.
| Bollinger Bands Summary | |
| Indicator Name | Bollinger Bands (BB) |
| Best Timeframe | 1H, 4H, Daily |
| Best For | Volatility analysis and breakout trading |
| Leading/Lagging | Lagging Indicator |
| Entry | Buy on breakout after band squeeze with volume confirmation |
| Price Target | Based on volatility expansion or next resistance level |
| Stop Loss | Inside the consolidation range or below breakout level |
| Exit | When volatility contracts or price returns inside bands |
Bollinger Band practical reliability improves significantly when combined with trend/momentum filters, like RSI/volume/price action confirmation, rather than treating every band touch as a reversal level.
8. Average True Range (ATR)
Average True Range (ATR) is a volatility-based indicator that measures the average range of price moves over a specific period of time, typically 14. ATR does not tell the market direction but tells how much the market will move, helping traders to place stop-loss orders, size positions, and understand volatility contraction and expansion.

- High ATR = High Volatility = Bigger Stop-Loss = Smaller Position Size
- Low ATR = Low Volatility = Smaller Stop-Loss = Larger Position Size
Traders usually use 1.5× to 2× ATR to calculate stop loss. For instance, if ATR is ₹10 and your entry price is ₹500, then stop-loss is calculated as follows:
- Stop-loss: ₹500 – (2 × ₹10) = ₹480
This ensures your stop loss adapts to market volatility, rather than being a guess. ATR expands during the period of high volatility and drops during the period of low volatility.
| Average True Range (ATR) Summary | |
| Indicator Name | Average True Range (ATR) |
| Best Timeframe | 1H, 4H, Daily |
| Best For | Volatility measurement and risk management |
| Leading/Lagging | Lagging Indicator |
| Entry | Not used for direct entry (used with other indicators for setup) |
| Price Target | Based on ATR multiples (e.g., 1.5×–2× ATR move) |
| Stop Loss | 1.5×–2× ATR away from entry price |
| Exit | Trail stop using ATR or exit when volatility drops significantly |
This ensures your stop-loss adapts to market volatility, not emotions.
9. Parabolic SAR
Parabolic SAR (Stop and Reverse) is a trend-following indicator that identifies the trend direction and a potential reversal point. It helps traders to identify market trend direction and trailing stop loss levels.
- Uptrend: When price is trading above the SAR dots, it suggests an uptrend.
- Downtrend: When the price is trading below the SAR dots, it suggests a downtrend.
- When dots flip: A flip in a SAR dot suggests a potential trend reversal.
This indicator works best in momentum-driven and trending markets. However, not every flip is an entry, especially in a sideways trend. Combine SAR with other indicators like ADX, moving average, RSI, etc. to increase the confluence.

Parabolic SAR is most effective in trending markets, whereas in sideways markets it generates very frequent false signals.
| Parabolic SAR Summary | |
| Indicator Name | Parabolic SAR (Stop and Reverse) |
| Best Timeframe | 1H, 4H, Daily |
| Best For | Trend-following and trailing stop-loss |
| Leading/Lagging | Lagging Indicator |
| Entry | Buy when SAR dots shift below price with trend confirmation |
| Price Target | Trend continuation (ride the trend) |
| Stop Loss | At SAR level (below price in uptrend) |
| Exit | When SAR dots flip above price (trend reversal signal) |
According to TradersVPS, PSAR on standard settings has a 65-70% win rate, which drops to 45-50% in ranges.
10. Supertrend
Supertrend is the trend-following indicator plotted on the price chart based on ATR and price action calculation. This indicator helps traders in determining ongoing trends, potential entry and exit points, and dynamic support and resistance.

- Uptrend: When SuperTrend is below the price and green in color, it indicates an uptrend.
- Downtrend: When SuperTrend is above the price and green in color, it indicates a downtrend.
A change in supertrend color and position indicates trend reversals. In a strong trending market, SuperTrend works best and helps stay in the entire trend. Traders buy when supertrend shifts from bearish to bullish and sell when supertrend shifts from bullish to bearish.
| Supertrend Indicator Summary | |
| Best Timeframe | 15 Min, 1 hr, 4 hr, Daily |
| Best For | Trend following and reversal trading |
| Leading/Lagging | Lagging Indicator |
| Entry | Buy when price closes above Supertrend with bullish confirmation |
| Price Target | Previous swing high or trend continuation |
| Stop Loss | Below Supertrend line or recent swing low |
| Exit | Exit when price closes below Supertrend or trend reversal |
A backtest by Nishchal Jain (quant researcher) on the Nifty 500 from 2012 to 2025 found that the win rate of SuperTrend is around 40–43% if used alone. However, a win rate can be improved if traded with the confluence of a momentum indicator like RSI.
11. Fibonacci Retracement
Fibonacci retracement is a technical analysis tool that helps traders and investors to identify potential pullback support and resistance levels in a trending market. It is based on the famous Fibonacci sequence, like 38.2%, 50%, and 61.8%.
As the market does not move in a straight line, price usually pulls back to these Fibonacci levels to take support or resistance before continuing its main trend.

- If price pulls back to 38.2% and reverses, it shows a shallow pullback and strong trend.
- If price pulls back to 50% and reverses, it shows healthy correction
- If price pulls back to 61.8% and reverses, it shows deep pullback and last strong support zone
Price retracing below 61.8% often shows weakening of the trend and a possible trend change. Traders look for a buy trade when the price retraces to one of these levels and forms a bullish reversal pattern. For a short trade, traders look for the price to retrace back to these levels and form a bearish reversal pattern.
| Fibonacci Retracement Summary | |
| Indicator Name | Fibonacci Retracement |
| Best Timeframe | 1H, 4H, Daily |
| Best For | Pullback entries in trending markets |
| Leading/Lagging | Leading Indicator |
| Entry | Buy near 38.2%, 50%, or 61.8% retracement with confirmation |
| Price Target | Previous swing high or trend continuation |
| Stop Loss | Below next Fibonacci level or swing low |
| Exit | At previous high, resistance level, or trend exhaustion |
Fibonacci retracement can be drawn from swing high to swing low in a downtrend and from swing low to swing high in an uptrend. Hence, it works best in a trending market.
The win rate of Standalone Fib Levels is only 37%; however, if you use Fibonacci Retracement in combination with price action and candlestick confirmation, the win rate can increase up to 50-60%, according to liberatedtrader. This significant improvement highlights why Fibonacci Retracement is most effective when integrated into a broader technical analysis framework.
12. Pivot Points
Pivot points are price-based levels calculated based on the previous day’s high, low, and close price. This level acts as potential support and resistance for the current trading session. The pivot point consists of one central pivot line, multiple resistance (R1, R2, R3) levels above the pivot line, and multiple support levels (S1, S2, S3) below the pivot line.

Pivot points are widely used by intraday traders because the levels remain fixed throughout the trading session.
| Pivot Points Summary | |
| Indicator Name | Pivot Points |
| Best Timeframe | 5min, 15min, 1H (Intraday) |
| Best For | Intraday support & resistance levels |
| Leading/Lagging | Leading Indicator |
| Entry | Buy near Pivot/S1 with bullish confirmation or on breakout above Pivot |
| Price Target | Next level (Pivot → R1 → R2 or S1 → S2) |
| Stop Loss | Below support (S1) or below Pivot level |
| Exit | At next pivot level or when price fails to hold above/below a level |
According to quantifiedstrategies, pivot points breakout strategy has a win rate of 62%, with an average gain per trade of 0.16%.
13. Ease of Movement (EOM)
Ease of Movement is a volume-based oscillator that measures how easily a price moves relative to its volume. It helps traders to identify whether the price is moving smoothly with low resistance or difficulty with high volume pressure.
EOM gets plotted as a single line around a zero level, suggesting ease of price movement.

- A rising EOM line above the zero line indicates smooth upward momentum with low resistance.
- A falling EOM line below the zero line indicates smooth downward momentum with minimum support.
Traders also use EMO to identify divergence. Rising prices with falling or stable EOM indicate weak momentum, while falling prices with rising EOM indicate a weak fall. It works best in a trending market and a breakout phase.
| Ease of Movement (EOM) Summary | |
| Indicator Name | Ease of Movement (EOM) |
| Best Timeframe | 1H, 4H, Daily |
| Best For | Trend strength and breakout confirmation |
| Leading/Lagging | Leading Indicator |
| Entry | Buy when price breaks resistance with EOM above zero (easy movement) |
| Price Target | Trend continuation or next resistance level |
| Stop Loss | Below breakout level or recent swing low |
| Exit | When EOM falls below zero or price shows weak movement |
When evaluating Leading or Lagging Indicators, a price breakout above resistance on high positive EOM (where low volume is needed) is often more reliable than traditional volume-based signals. Using EOM alongside other Leading or Lagging Indicators helps traders determine if a move is a genuine push or just a sign of distribution.
14. VWAP (Volume Weighted Average Price)
VWAP (Volume Weighted Average Price) is an intraday trading indicator that calculates the average price of the security weighted by its trading volume. Unlike moving averages, it shows the average price where most traders are buying and selling. This indicator helps traders in trend identification, finding support and resistance, and entry zones.

- Price trading above VWAP indicates bullish sentiment
- Price trading below VWAP indicates bearish sentiment
Works best for intraday trading and a trending market.
| VWAP (Volume Weighted Average Price) Summary | |
| Indicator Name | VWAP (Volume Weighted Average Price) |
| Best Timeframe | 5 min, 15 min, 1 H (Intraday) |
| Best For | Intraday trend and fair value trading |
| Leading/Lagging | Lagging Indicator |
| Entry | Buy near VWAP bounce in uptrend or breakout above VWAP with confirmation |
| Price Target | Intraday high or trend continuation |
| Stop Loss | Below VWAP or recent swing low |
| Exit | When price breaks below VWAP or loses trend strength |
Standard VWAP resets every day when the market opens, hence it is mostly used for intraday instead of multi-day analysis.
15. Divergence Indicator
Divergence is a technical analysis concept that forms when price and indicator move in different directions, suggesting a shift in momentum. Indicators that spot this divergence are RSI, MACD, stochastics, and RMI. This indicator helps traders to spot early reversal opportunities with a high reward.

- Bullish Divergence: When price forms a lower low but the indicator forms higher lows, it suggests a weakening of selling pressure and a rise in bullish momentum.
- Bearish Divergence: When price forms higher highs but the indicator forms lower highs, it suggests a weakening of buying pressure and a rise in bear momentum.
Traders trade this divergence when price breaks a key support or resistance level after a divergence. These indicators work well in overextended trends and at a key level.
| Divergence Indicator Summary | |
| Indicator Name | Divergence (RSI / MACD / Stochastic) |
| Best Timeframe | 1H, 4H, Daily |
| Best For | Identifying reversals and trend exhaustion |
| Leading/Lagging | Leading Indicator |
| Entry | Buy on bullish divergence near support with price confirmation |
| Price Target | Previous resistance or reversal move |
| Stop Loss | Below recent swing low (for bullish divergence) |
| Exit | At resistance level or when momentum fades |
Most traders only know regular divergence (reversals), but hidden divergence is equally powerful. This is used by professionals to add to winning positions mid-trend, not just catch reversals.
How to Combine Indicators for Swing Trading Strategies
Combining indicators for swing trading is about adding clarity and structure in your decision-making. Instead of adding more random indicators, add indicators with a specific role, so they work together instead of creating confusion.
A strong indicator combination typically has a trend indicator, a momentum indicator, and a volatility indicator.
- Trend Indicator: Trend-following indicators like moving averages or Supertrend are used to determine the market direction.
- Momentum Indicator: Momentum indicators like RSI or MACD are used to time the entry.
- Volatility Indicator: Volatility indicators like Bollinger Bands or ATR help to manage exits and risk.
The key is to avoid duplication. Do not use indicators with the same role. A few common combinations of indicators in swing trading are given below in the table.
| Combination | Indicators | Purpose | Entry | Exit |
| Trend + Momentum | 50 EMA, RSI | Direction + timing | Above EMA + RSI bounce / Below EMA + RSI fall | At key levels or RSI exhaustion |
| Trend + Momentum + Volatility | 20 & 50 EMA, RSI, Bollinger Bands | Trend + pullback + zones | Pullback near EMA + band support | Opposite band or weak momentum |
| Price Action + Confirmation | S/R, RSI/RMI, ATR | Structure + confirmation + risk | At key levels with confirmation | ATR-based trailing |
When indicators are combined with clear intent and aligned with price action, they stop being random signals and become the backbone of disciplined Swing Trading Strategies. Such Swing Trading Strategies allow traders to filter out market noise and focus on capturing high-probability trend movements over several days.
Common Mistakes in Using Swing Trading Indicators
There are four common mistakes traders make in using swing trading indicator. These mistakes are briefly discussed below.
- Using Too Many Indicators: Beginners think using too many indicators (more than 5) will give them a strong confirmed signal, but it creates conflicting signals leading to analysis paralysis. As a professional, you should stick to a maximum of 2-3 indicators of different types, like RSI for momentum and moving average for trend.
- Ignoring Market Context: Using range indicators like stochastic oscillators in a trending market or using trending indicators like moving averages in a range-bound market leads to unnecessary loss. Always check market context and apply the indicator accordingly.
- Trading Solly on an Indicator: Using indicators for a buy and sell signal alone without any price action confirmation. This style often leads to failed setups.
- Neglecting Risk Management: Oversized positions on indicator signals amplify losses when setup fails. Set the stop-loss beyond swing points and risk 1-2% of the total capital. Try a minimum of 1:2 reward targets regardless of indicator strength.
Swing trading indicators work best when combined with price action, market context, and proper risk management.
What Timeframe is Best for Swing Trading Indicators?
For swing trading, higher timeframes like hours, days, and weeks are considered to be the best timeframes. Higher timeframes provide reliable, practical, and clear signals by filtering out intraday noise and capturing swings of days to a week.
Indicators like RSI, moving averages, Bollinger Bands, etc. tend to perform better on higher timeframes. However, the real edge comes from using multiframe analysis.
| Timeframe | Purpose | What to Look For | Role of Indicators |
| Weekly | Big Picture Trend | Major trend (up/down/sideways), strong support & resistance zones | Indicators confirm long-term strength or weakness (avoid trading against this trend) |
| Daily | Core Setup | Trend direction, pullbacks, chart patterns, key levels | Indicators give reliable signals for entry/exit setup (main decision timeframe) |
| 4-Hour | Entry Timing | Precise entry points, smaller pullbacks, tighter stop loss zones | Indicators help fine-tune entries and improve risk-reward |
The real edge in swing trading doesn’t come from finding the “perfect indicator” or even the perfect trading timeframe; it comes from alignment.
How to Use Swing Trading Indicators for Entry and Exit Points?
Indicators can be used to find entry and exit points in swing trading, but not alone. As indicators are derived from price, they reflect what the market is already doing, not predict it. Most indicators confirm the movement of prices and indicate potential buying or selling activities rather than independent decision-makers.
Therefore, solely using indicators may result in false signals and a poor risk reward ratio. Use indicators with price action, trend, and key levels to sort out low-quality trades and concentrate on setups where both price and indicators are aligned, ensuring a much more favorable risk reward ratio on every trade.
Difference between Swing Trading and Day Trading Indicators
The difference between swing trading and day trading indicators is mentioned below in the table.
| Feature | Swing Trading Indicators | Day Trading Indicators |
| Holding Period | Days to weeks | Minutes to hours |
| Timeframes | 1H, 4H, Daily | 1 min, 5 min, 15 min |
| Focus | Trend capturing | Intraday momentum |
| Popular Indicators | EMA, RSI, MACD | VWAP, EMA, Volume |
| Signal Speed | Slower | Faster |
| Noise | Lower | Higher |
| Best Market | Trending | Volatile |
| Trade Frequency | Low | High |
| Overnight Holding | Yes | No |
The effectiveness of indicators depends on your trading style and market conditions. Use indicators that match your timeframe, strategy, and risk management approach.


 Previous Article


![15 Investing.com Alternatives [Free+Paid] You Should Use in 2026](https://www.strike.money/wp-content/uploads/2026/04/Investing.com-Alternatives.jpg "15 Investing.com Alternatives [Free+Paid] You Should Use in 2026 64")
![15 TradeStation Alternatives [Free+Paid] You Should Use in 2026](https://www.strike.money/wp-content/uploads/2026/04/TradeStation-Alternatives.jpg "15 TradeStation Alternatives [Free+Paid] You Should Use in 2026 65")
![15 Chartink Alternatives [Free+Paid] You Should Use in 2026](https://www.strike.money/wp-content/uploads/2026/04/Chartlink-Alternatives.jpg "15 Chartink Alternatives [Free+Paid] You Should Use in 2026 66")
: Overview, 10 Types of Indicators, Settings for Different Markets 68")

 : Definition, Formula, calculation, Uses, Advantages Vs limitations 70")


: How We Used This 70/30 Indicator in 6 High Win-rate Strategies 73")


No Comments Yet.